Pages

Saturday, 28 September 2013

Better Pictures of the KCI Drawstring Jacket

 Sorry it took so long!
The weather has been very wet lately. I didn't want to drag my white train through the mud, so I had to wait a while to get better pictures of my drawstring jacket.
I also had to make a white petticoat to keep the blue of my undermost petticoat from showing through the scalloped one. I had been putting off this project because it was boring.
I filled my gauzy buffon with potato starch. It made it stand up very nicely, though the drawstring neckline did reduce the puffiness.

I was a little disappointed with how my hair turned out. I used the large C shaped rat and the spherical rat. I tried to curl my hair but the curls wouldn't stay. I suspect this is because the burner wasn't hot enough. My curling iron is a stovetop one so I'm a little timid with it.
The hair looked pretty dumb by itself, and soon became quite disheveled looking, but at least it held up the hat.

I tried one of those weird arm-stuck-out poses that you see in fashion plates so often.
 Who stands in a field with their arm stuck out like that? Fashion plates can be so weird.
The pictures were taken by my father. I was quite disappointed by his behavior. He complained about having to go to the park and didn't want to go into the woods portion of the park at all.
I don't think he fully understands the concept of a photoshoot. He only took 19 pictures.

 These last two pictures were taken by my little sister.
We have a teacup that's white and festooned with pink roses, similar to my hat, and I found the large difference in circumference amusing.
My scalloped petticoat was damaged slightly. I held it up on the way to the park, but foolishly let it drag on the ground on the way back. It's only a few blocks to the park, but the sidewalk wore away the hem stitches awfully quickly. Consequently, the hem now contains a tree seed and some bits of dried cedar.
 It's nothing too serious. I'll just unpick this section of hem, vacuum it out, and stitch it back up.

A promised, here are the pattern pieces! Seam allowances are not included.
(I apologize for the lack of contrast, numbers, and labels.)
The pieces for the outer fabric of the bodice.

The pieces for the bodice lining. The shoulder strap and middle piece are the same ones used for the outside.

The gathered panel and waistband.

The sleeves. The bit on the bottom folds up to account for the difference in length between the outer fabric and the lining.
This is my first complete historical costume ever! Actually it's not complete, I don't have proper shoes or stockings, but it's close enough for now. I am very pleased with how utterly ridiculous it looks.

Monday, 23 September 2013

Wooden Busk

I am in the process of re-finishing a chair.
I actually haven't worked on it for several weeks because the weather has been so cold and wet. It's nice weather to go walking in, but not nice for sitting outside and sanding furniture, so the chair remains only partially sanded.
The chair isn't the point of this post though. The lower part of the chair has a little shelf on it. The shelf originally had 4 wide wooden slats, but, by the time I came into possession of it one of the middle slats was broken, the other missing entirely.
This was the broken slat.
For a few days I wasn't sure what to do with it. There wasn't much sense leaving it on the chair, but it was such a nice piece of hardwood that I didn't want to burn it.
Then I realized that it was perfect for a busk! It was almost exactly the right size and shape already. I had been planning to make a pair of earlier 18th century stays, so having a busk would be great.
The broken slat, marked for sawing.
I sawed off the wide end and the corners of the narrow end. Later, upon discovering that it was too long, I sawed a bit more off the wide end.

I looked at a lot of extant busks, mostly from the Met, and found an enormous variety in shape. They ranged from thin, round sticks to giant tongue depressors.
I made mine medium sized and somewhat tapered.
It required very little chiseling.
After cutting it down to the right size and shape I sanded it. (By hand. Palm sanders are wonderfully fast but terribly inaccurate.)
All sanded.
I suppose I could have left it like this, but I don't really like the tan colour of unfinished wood.

Fortunately, I happened to have a bottle of stain that I made a few years ago.
I made it using walnuts. The instructions for making walnut stain say to use black walnuts, but I've never seen any black walnut trees. I don't think they grow in New Brunswick. We do have plenty of white walnuts though. I got a bunch of them from a tree at my Grandfather's farm while they were still green.

I put these green walnuts into a large can, poured boiling water over them, and let them sit for three days. I then removed the walnuts, strained the resulting dark brown liquid, and brought it to a boil to kill any microbes that may have taken up residence there.
I put it into a bottle and added some vinegar to keep it from going bad. I found these directions on the internet, but I can't remember where.

I'm not sure if this stain is historically accurate or not, but being made from local ingredients by a very simple method I think it's entirely plausible.
The stain appears to be running low. I must obtain more walnuts.
I brushed the stain on in thin coats, letting it dry for about an hour between applications.
 After 4 coats it was a very nice dark brown.
The busk after being stained.
It still needed to be sealed with something as the stain was not entirely fast.
My original plan was to use shellac, but the shellac that my father had was quite old and wouldn't dry. I decided to use tung oil instead. The Chinese have been using tung oil as a wood finish for thousands of years, but it didn't arrive in North America until the 20th century. This makes it completely inaccurate for my location, but still historical.
Here is the busk after two coats of tung oil.
 It looks kind of dark in that light. Here is a picture taken without a flash.
Somewhat Altered Summary of Facts

The Challenge: #19- Wood, Metal, Bone.

Materials: One broken hardwood chair slat, walnut husk infusion, tung oil.

Dimensions: 36cm x 4cm x 7mm.

Year: A very large chunk of time. I'm not quite sure exactly how big the window is, but it is definitely good for most of the 18th century, up until about the 1780s. There are portions of the 17th century for which it would also work.

How historically accurate is it? The look is most likely accurate. The wood is pretty old and I don't see how it could possibly be inaccurate. The stain is plausible. The tung oil is inaccurate for my location, though it did exist at the time. Shellac would have been much more accurate. The making situation is completely inaccurate, a lady would most certainly not have carved her own busk.

Hours to complete: 4 hours, 20 minutes.

First worn: Not yet, I still need to make stays to go with it.

Total cost: $0

I suppose the busk isn't technically finished since I'm going to give it a few more coats of oil over the next couple of weeks, but it is still waterproofed and usable in it's current state.
I am still working on the pattern for the stays.
So far the only extant stays I've found that have a busk pocket are the orange ones from the KCI.
Stays, early 18th century, Kyoto Costume Institute. The pocket in the front is clearly visible.
These stays look nothing like the ones I'm making though, so I'll probably just ignore them. Mine are going to be front lacing, with a large stomacher panel. I'm not sure if it's accurate to put busk pockets in those stomacher things, but I'm doing it anyway.
Does anyone know of any other extant stays with busk pockets?

Wednesday, 18 September 2013

Liripipe Hood

This is an older project. I made it before I started this blog so I don't have any in-progress pictures of it.
It's a liripipe hood!

Judging from my sketchbooks, I made this sometime around the beginning of August 2012. I had been reading a book on Medieval costume from the school library when I came across a picture of a liripipe hood. I immediately decided that liripipe hoods were awesome and that I needed to make one.

A definition of the word "liripipe" can be found here, some Medieval illustrations of them can be seen here, and an article on hoods and liripipes can be read here.
From what I remember reading in the book they were a man's garment that was popular around the 14th century. They were usually made of wool and the liripipes were separate pieces that were sewn on to the back of the hood. With all the fashionable men trying to outdo each other, the liripipes kept getting longer and longer until they had to be tied into fancy knots to keep them from dragging on the ground.

The pattern is pretty simple so it didn't take much work. I drew the pattern on an old sheet and used that as a mockup. It seemed to fit okay. It is loosely based off of hood #4 in this illustration.
The light spot was caused by a stain on the blanket that blocked some of the dye.
I cut my pieces from a grey wool blanket with blue stripes on the ends. There was just enough room to get all 3 pieces out of it without any of the blue stripes ending up in the garment. I put the pieces, plus a small scrap, into a big pot with forest green acid dye.
My mother teaches dyeing and has a small dye kitchen right outside my room, which is quite useful when something isn't the right colour.
The scraps that I didn't dye.
The colour is mostly even. Despite my constant stirring, there was one place where the wool was at the bottom of the pot for too long and came out much darker than the rest.
I don't really mind.
Oops.
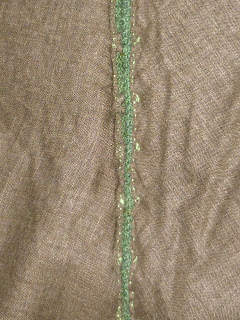
The seam holding the two halves together is whip-stitched with fine linen yarn. I dislike sewing bulky fabrics by machine because you can't match the thickness of the thread to the thickness of the fabric. There is a running stitch going down the middle of both seam allowances to keep them open and flat, and to help hold the lining in place. There is also a running stitch inside the edge of the hood.
The inside of the hood.
The liripipe is made from one piece and is exactly one metre long. It is also whip-stitched. I sewed it up right side out because turned liripipes always look too thick and bubbly and I wanted mine to be very thin. The thick wool did a very good job of hiding the stitches.
It tapers to quite a small point.
I poked the seam allowances in on both the liripipe and the tip of the hood and whip stitched them together. I used the small scrap I dyed to patch a small hole at the top of the hood. There are a few smaller holes elsewhere on the liripipe hood. I suppose I should darn them.
The hole repair is on the left, the liripipe join on the right.
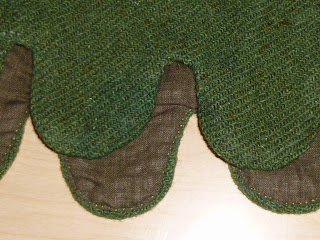
The hem has 28 scallops. After measuring and cutting them, I pinned them with the edges turned in, and stab-stitched around the very edge of the lining. I am certain that real Medieval dagging was not done this way, but it was not my intention to be historically accurate.

(Side note: What does spell-check have against costumers? It didn't accept liripipe or dagging as words. Look what it's fist suggestion for "liripipe" was.
Lipizzaner??
It knows the word for that particular breed of white horse but it doesn't know what a liripipe is. Why is this?)
The outer fabric sticks out about 3 mm further than the lining.
The front closes with 14 buttons. The button loops are made of cotton cord with bias strips of the lining fabric carefully whip-stitched over them.
The buttons themselves are actually little felt balls, a bit smaller than a marble. I wet felted them using green merino roving.
I like the way the loops outline the buttons in brown.
Here is the button closure from the inside.
The garment is lined in a thin brown cotton. The lining seams are the only part that is sewn by machine. There wasn't quite enough of the cotton, so one half of the lining has some piecing it it. The lining ends at the point where the liripipe is attached and is tacked into place.
You can't see the piecing in this picture, but it's on the right side.
I like my liripipe hood. Unfortunately, it doesn't really have a place in the wardrobe I plan on having one day, and certainly not with the one I have now. I did wear it a few times last fall, but found the liripipe somewhat awkward.
It got compliments when I wore it, but nobody knew what to call it. I was asked several times if I put my braid in the liripipe. What a dumb question. A braid would obviously not fit in there and even if it did it would be very awkward because the liripipe is so far up on the head.

Wednesday, 4 September 2013

Black Linen Waistcoat

Last weeks sewing schedule did not go as planned at all. I had been working on a shirt pattern and preparing to make another petticoat (in order to do a proper photoshoot for my jacket I need another white petticoat to wear under the scalloped one so the blue one doesn't show through).
Unfortunately, I was dragged off to the cottage again and so had to work on a hand sewing project. (I know it's horrible to complain about one's vacation accommodations but there is no room to sew there.) That is why there was no post last week.

The project I brought was a waistcoat that I started for the Lace and Lacings challenge but didn't finish on time.

My inspiration was this lovely waistcoat from Sweeney Todd.
(I can't remember where I found this image. I tried to track it down but the only place I could find it was on tumblr. I hate leaving "source" links to tumblr.
Do any of you happen to know where the original source is?)
Update: Here it is!


I know it's not historically accurate but I love the cut of this waistcoat. I tried to find historical evidence of something close to this design, but didn't come up with much.
The closest extant waistcoat I have found is this one from All the Pretty Dresses. The cut isn't quite the same but it is velvet and double breasted.

All the Pretty Dresses has got quite a few posts on waistcoats and all of the early 19th century men's waistcoats have some kind of fastening in the back to give it more shape.
At least one of the waistcoats that Sweeney wore in the movie had a small bit of lacing at the back (His jacket had one too, you can see a picture in this article.) This regency waistcoat also has one.

Purple velvet Regency waistcoat. (source)
All of the extant waistcoats appear to have seams only on the sides and centre back. Most of them also have 3 pockets.
Here is a very quick sketch of what my waistcoat should look like.

I'm not sure how plausible the design is, but I plan on wearing it as part of my regular wardrobe so accuracy is not a huge concern.

My pattern, before shoulder adjustments.
 I used the pattern for the striped waistcoat to get the pattern for this one. I got rid of the seam in the front, straightened out the other two and trimmed a bit off the lapels and collar.
The front of the waistcoat is black linen and the back is cream coloured linen. The pieces are whip-stitched together. The lining is off white linen and is sewn together in the same way. It's assembled but not pictured here.

The white thread is linen and the black thread is cotton.
 After sewing the outside panels together and trying them on, I saw that the front piece did not extend far enough up the shoulder. The cream coloured fabric of the back could be seen clearly from the front. I removed the tops of the two back pieces and replaced them with pieces of black linen.
I think I may have overcompensated.

The piece on the left is fixed and the piece on the right is not.
 I interfaced the lapels and collar with cotton canvas.

 I put herringbone stitching around the edge of the interfacing in the hopes that it would help prevent fraying.

 I didn't do this to the collar interfacing because I sewed the collar much earlier and it hadn't occurred to me to do herringbone stitching yet.

The stitching holding the collar interfacing on.
 The collar pieces are sewn together with a running stitch. The topstitching is also a running stitch, but a very careful one.

The inside of the finished collar. The white mark is an "I" for "inside".
 I have marked out the placement of the pockets, but this is as far as I've gotten. I have never made welt pockets before so I'll have to try one out on a scrap before I go any further.
The locations of the two pockets on the left side of the waistcoat.
That's all I have to post at the moment. I have finished the shirt pattern and will hopefully be making a shirt from it soon. I've just started school this week though, so I don't have quite as much time to spend on my own projects.