Pages

Sunday 31 March 2019

Another shirt, this time with slightly more exciting ruffles

This was my Historical Sew Monthly item for February. I cut it out nearly a year ago and it sat around for many months until I finally decided to begin sewing it up.
I've wanted to try one of those shirts with ruffles on the cuff slits ever since I noticed that they existed. It's hard to see that part of the sleeve in a lot of portraits, but I've gathered a bunch on pinterest where a cuff slit ruffle can be seen.
(In most of them there are other ruffles but there's one very weird shirt in that portrait of Paul Revere holding a teapot where there are ruffles on the cuff slit and nowhere else on the shirt. It is very strange and I do not like it.)

I also managed to find photos of an extant shirt that has these ruffles.
Shirt, 18th century, Meg Andrews.
Here's one of the portraits in which the ruffle is most clearly visible.
The Greenwood-Lee family by John Greenwood, c. 1747 (Detail)
My shirt is made of that fine linen twill I got years ago. It's an inaccurate weave for 18th century shirts but I still have a bunch that needs to be used up.
It's mostly machine sewn. There's hand finishing on the bosom slit and the inside of the collar. The cuffs, ruffles, buttons, and buttonholes are all by hand. Hm, maybe that's not mostly machine sewn.
These are definitely the best ruffles I've ever done. I didn't know how to attach ruffles properly until very recently, when I came across this nice video tutorial on doing rolled whip gathers.


Attaching the ruffles.
  The ruffles are made from a semi sheer cotton that has been in my stash for years. I think it might have come from Mama's stash originally. I'm quite sure I didn't buy it.
I hemmed the ruffles with a small rolled hem.
Ruffles attached! Lovely!
As with so many historical sewing techniques, I couldn't figure this out on my own, but it seems so obvious now. It took quite a long time to attach all the ruffles but the results are well worth it.
I can't see the seam joining the two parts of the ruffle on the extant shirt, but I'm assuming it's just a tiny flat felled seam. And the narrower ruffle must have the end cut on an angle, since there's no other way to attach it smoothly to a wider one.
The scrap of fine cotton I had wasn't quite big enough to cut all the ruffles out of in one piece, so one of the slit ruffles is pieced in the middle. (The part that's at the innermost end of the slit.)
I sewed my ruffle seams by hand and made them very small. I made a new pair of sleeve buttons after I finished this shirt, with floral metal buttons, which are shown in the photo above. The red ones in the photo below are one of two pairs I made with cheap rhinestone buttons last year.
I was a bit late posting this in the HSM group. I originally cut the cuffs too small, and after I had hand sewn them on, and done buttonholes on them by hand, I had to take them off and make new ones 1cm longer. This was rather discouraging, so I was 3 days late finishing it.

Because I had cut the shirt out so long before I sewed it up, the collar turned out to be too high. I should have noticed and trimmed it down before sewing it on, but I did not, and so it's a bit too high collared to be an early 18th century shirt. I could probably just fold it down and hide it under a stock though.
The Challenge: #2 - Linen/Linens

What the item is: A man's shirt

How it fits the Challenge: It's made of linen, and is an undergarment

Material: Linen twill, fine cotton for the ruffles

Pattern: My usual set of shirt dimensions

Year: uhh 1760's-70's ish? It could have gone as early as the 30's if I hadn't made the collar too tall.

Notions: Silk thread, linen thread, cotton thread, heavy linen thread for buttons, DMC cotton pearl for buttonholes.

How historically accurate is it: Maybe about 80%? The linen twill isn't an accurate weave for shirts. The main seams are by machine, but there's a fair amount of hand finishing. The pattern is mostly accurate but I did cut the collar a bit too high.

Hours to complete: 40 (Including picking off and re-doing the cuffs)

First worn: March 3rd, 2019

Total cost: I think about $15 or so (Canadian). The linen was on a buy 1m get 2 free sale.
I love my gauzy ruffles! They make such a difference in how nice the shirt looks!

Monday 25 March 2019

Brown Wool Waistcoat

I've noticed that when I get dressed I tend to reach for my plain grey wool waistcoat most often, provided the weather is cold enough. Since I still have a lot of the picked apart wool garments my grandmother gave me (because they were the wrong weight for rughooking) I decided to make another wool waistcoat out of a brown worsted skirt.

It's probably the most boring waistcoat I've ever made, but I expect I'll get a lot of everyday use out of it. As much as I like fancy silks, I'm reluctant to wear them for things that might get them dirty.
I used the same c. 1770's pattern as for my bright green waistcoat, but I extended it a few centimetres because it was a bit too short.
I had to piece the fronts in 4 places because the skirt was so small. Two big chunks on the top corners, one small piece on the bottom left corner, and a thin strip along the left side seam. I did this by machine, except for one end of the long strip.
I wish modern suit skirts were just a wee bit bigger!
I made buckram by stiffening some linen scraps with watered down fabric stiffener. As usual, I let them dry flat on this window pane.
I only recently saw this Burnley & Trowbridge video tutorial on setting in buckram and buttonstands, so I added a buttonstand in this waistcoat. I hadn't previously done that, but I think my buttons are pretty securely attached either way.

For my buttonholes I couldn't find any thread to match the dull greyish brown, so had to make do with a bright rusty brown linen. But that's ok, they didn't always have matching thread in the 18th century either.

I sewed my covered buttons on with more of the same thread.
The pocket bags and the lining are a cream coloured cotton sateen. It's been in my stash for quite a while and I have no idea where it came from.
I sewed the two halves of the pocket bags together by machine, and hand stitched them to the fronts.
I put the front linings in with le point a rabbatre sur le main, as usual.
I sewed the centre back, side seams, and shoulder seams by machine, and put the back lining in by hand.
The cotton lining is also pieced on two corners because I only had a narrow strip of it.
The back is made of brown linen, and in the spirit of re-using fabric and getting the most out of your cabbage I pieced it out of 7 scraps. Brown linen isn't something I have a huge amount of, and since I'm not buying fabric this year I'd rather save the bigger pieces for fancier waistcoats. Besides, I like piecing. I think it makes this boring waistcoat more interesting, and it's a very 18th century thing to do.
The lines on the darker pieces are because it was from an unfinished embroidery that I found in my grandparents attic. (An ugly, possibly 70's embroidery in a gross synthetic thread.) I meant to cut it so the lines on the big piece were on the wrong side, but I accidentally pieced two left halves, and so had to pick out that seam and flip it around.
The straight seams on the back are by machine, and the curved bits are by hand.

This month's HSM challenge was "Sewing Kit - Create an item that makes use of your favourite sewing tool, instrument, or gadget; or an item made for your historical sewing kit".

I was a bit conflicted about what to submit for it because my favorite tool in my sewing kit is probably my antique silver thimble, and since I use it for nearly everything I sew that feels like cheating. But a few weeks ago I realized that the waistcoat I was working on also made use of my buttonhole cutter, which is a tool I quite like, and only bought less than a year ago. It's just a small modern one, and nowhere near as nice as 18th century buttonhole chisels, but good and useful all the same.

The Challenge: #3 - Sewing Kit

What the item is: A man's wool waistcoat

How it fits the Challenge: I used my buttonhole cutter (and my thimble) on it.

Material: Wool from a thrift store skirt, cotton sateen for the lining, scraps of brown linen for the back.

Pattern: My own

Year: c. 1770's

Notions: 11 wooden button molds, buckram, brown silk thread, heavy brown linen thread, fine white linen thread, a bit of polyester thread for the machine sewing.

How historically accurate is it: Pretty good. The materials and construction are mostly accurate, and it's mostly hand sewn.

Hours to complete: 30

First worn: March 19th, 2019

Total cost: Less than $10, because most of the materials were given to me. Not sure how much it would be if I'd bought them, maybe closer to 40 or 50?

I tried to get good photos of me wearing it last night, but the lighting turned out so horrible and orange that I re-took them today in daylight.
The terrible orange photos looked ok in black & white though. I'm wearing my most recent shirt in these pictures, which I haven't posted here yet. (Edit: It's posted now.)


Thursday 14 March 2019

Black corduroy coat

Oh my, I am behind on blogging. Even more behind than I usually am when I say I'm behind on blogging! I finished this coat over 5 weeks ago, and have finished two shirts since then.

Oh, I should update you on my not-buying-fabric! It has been going well. I haven't bought fabric, nor any other sewing material since I decided not to in January.

I went to a fabric swap at the end of January and got rid of a lot of fabric that I had no use for. I brought some fabric back, but only about 1/6 as much as I got rid of, so overall that definitely counts as getting rid of fabric rather than getting new fabric. I have a bit more space in my room now, and I'm no longer tripping over boxes of extra fabric that don't fit into the filing cabinets! I still have a few pieces of fabric that I will probably not use, so I look forward to the next fabric swap, whenever that may be.

I started this coat sometime last winter, I don't remember exactly when.
I originally intended for it to be plain and simple, but then in my search for reference pictures I found several with shoulder capes, and decided I wanted them.
It's somewhat based on this one:
Coat, c. 1800. Germany.

It has plait pockets!
And this one:
I can't find the original source for this one
so all I know is that it's from 1792.
I considered doing the little button tabs, but they would have been nearly invisible on something so dark and matte.

I'd been meaning to make myself a spring/fall coat for several years. My old store bought one, besides being rather ill fitting and synthetic, was splitting at the seams in several places.
About a year and a half ago I bought some fine black corduroy (at one of the big sales that fabricville has a few times a year) which I intended for my new coat.
I made my pattern by tracing parts of my 1789 coat pattern and drawing on a lot of new stuff.
I cut the coat pieces in the black corduroy, cut the skirt lining in what I think is a cotton/linen blend, the sleeve and bodice area lining in rayon bemberg, the pockets in a plain woven black cotton, and the shoulder cape linings in a black cotton sateen. For the collar, pocket flaps, and front edges I used fusible interfacing.

Some of these were not good fabric choices. Bemberg is a bit troublesome to work with, and much better suited to modern coat lining techniques than historical ones. The coarse stuff I lined the skirts with isn't slippery at all, and so the front parts of the coat tend to stick to my pant legs and crawl forward when I'm walking, which is annoying. This may also be caused by the corduroy facing, which I think I made too wide.

I decided to machine sew most of the coat, mostly because the materials weren't great, but also because I wanted to get it finished quickly. (Which I did not do.)
Pocket flaps and pocket bags.
I'd never done plait pockets before, and wanted to try them, especially since my inspiration coat has them. I'd read a post on how to sew plait pockets years ago and so I re-read it, but I must have been quite sleep deprived at the time because I didn't understand the instructions at all. I tried to cram the pocket pieces together in a terrible way, and then had to pick them out again when the terrible way did not work.

I was quite frustrated and I put the coat aside for some months. When I came back to it I re-read the plait pocket post again and it made perfect sense. (Presumably because I wasn't sleep deprived this time.) I sewed the plait pockets fairly successfully, but because of my failed attempt I had lost a bit of width in the lining fabric, so they aren't perfect. I had to tack some bits by hand to help them lie better.

In 18th century coats the front pieces are supposed to be lined before being sewn to the back pieces, and then the pleats can be pleated with the lining and outer fabric as one piece. But since I was machine sewing it in a not-so-historical order of operations this didn't happen, and my pleats aren't as happy as they could have been.
My pockets. They ended up looking pretty nice from the outside.
I also messed up on the shoulder capes. I probably should have drafted the pattern for them by tracing the neckline of the front and back pieces, and then building the circle shape off of that, but instead I just drew a circle for the neckhole. I vaguely recall mocking the capes up, but it must not have been in a stiff enough material because when I sewed the final ones up they didn't sit right on the neckline. They were puckered and crappy in the back!
I picked them off and trimmed down the back portion of the neckhole, and re-attached them and they fit. I don't think I attached them in the best way though. In Costume Close Up the shoulder cape is attached to the cloak by just having the raw edge turned in and hand stitched down, but it's in wool and I can't do that with fray-y corduroy. I could perhaps have turned in the seam allowances of the neckhole area to make the capes finished all around, and then hand stitched those down.

As it is I sewed them all into the neck of the coat itself along with the collar, so that seam ended up being very thick and I had to do it by hand. All together it was 5 layers of corduroy, 2 of interfacing, and 2 of cotton sateen. I hand stitched the coat lining to the inside of this, after tacking the giant bulky seam allowance in a few places to help it stay put.
Next time I make a coat like this it will be wool, and I will have none of these troubles.
The third thing I messed up was the lining. I machine stitched the front linings together, with the cotton on the bottom part, the bemberg on top, and a wide corduroy facing on the front edge. While I was doing this I accidentally ironed one side of the rayon on a setting that was far too hot and it shrunk. It shrunk rather more than I realized, and I didn't want to pick out that piece and re-cut it, though I wish I had because it would have saved so much time. I thought I could get away with keeping it if I sewed it with smaller seam allowances, but no. I ended up having to hand stitch in several extra strips of bemberg where the shrunken pieces didn't reach far enough.
The coat has 18 death's head buttons. Aside from a few practice ones, this was my first time making death's head buttons. I followed the directions in this booklet, but similar instructions can be found here. The only differences are that the booklet instructions have you wrap without a stick, and then insert a pin through the middle after a few wraps. And they also say to secure the wraps at the back with a different piece of thread that's waxed. I did it that way and I'm quite happy with how my buttons turned out.
I used a thick-ish black cotton yarn from Mama's yarn stash for both the button wrapping and the buttonholes.. I meant to do 10 buttons on the front, but I accidentally cut 6 buttonholes so it became 12 buttons, which is better anyways.

This coat took 52 hours in total, but a good portion of that was fixing mistakes. So much for a quick machine sewn project.
I don't yet have any good photos of me wearing this coat, because it turns out that photographing matte black things against bright white snowbanks is a bad idea. I tried twice, and got my most excellent uncle to take photos both times. The first time it was cloudy and the coat was a black blob in the dim light.

The second time it was sunny, and the coat was still a blob because of all the glare from the snow. It's a good thing I didn't take the trouble to do my hair.
Overall I like the coat, and it's good in cold-ish weather. I am rather annoyed by the clingy-ness of the bottom lining fabric though, which makes the coat skirts crawl forward a bit when I'm walking, and I think I made it a bit too long.
It's as long as the coat in my inspiration image, which I think is a bit too long to be practical. My sister accidentally stepped on the hem once when we were both walking up a staircase. I don't think I want to shorten it though.
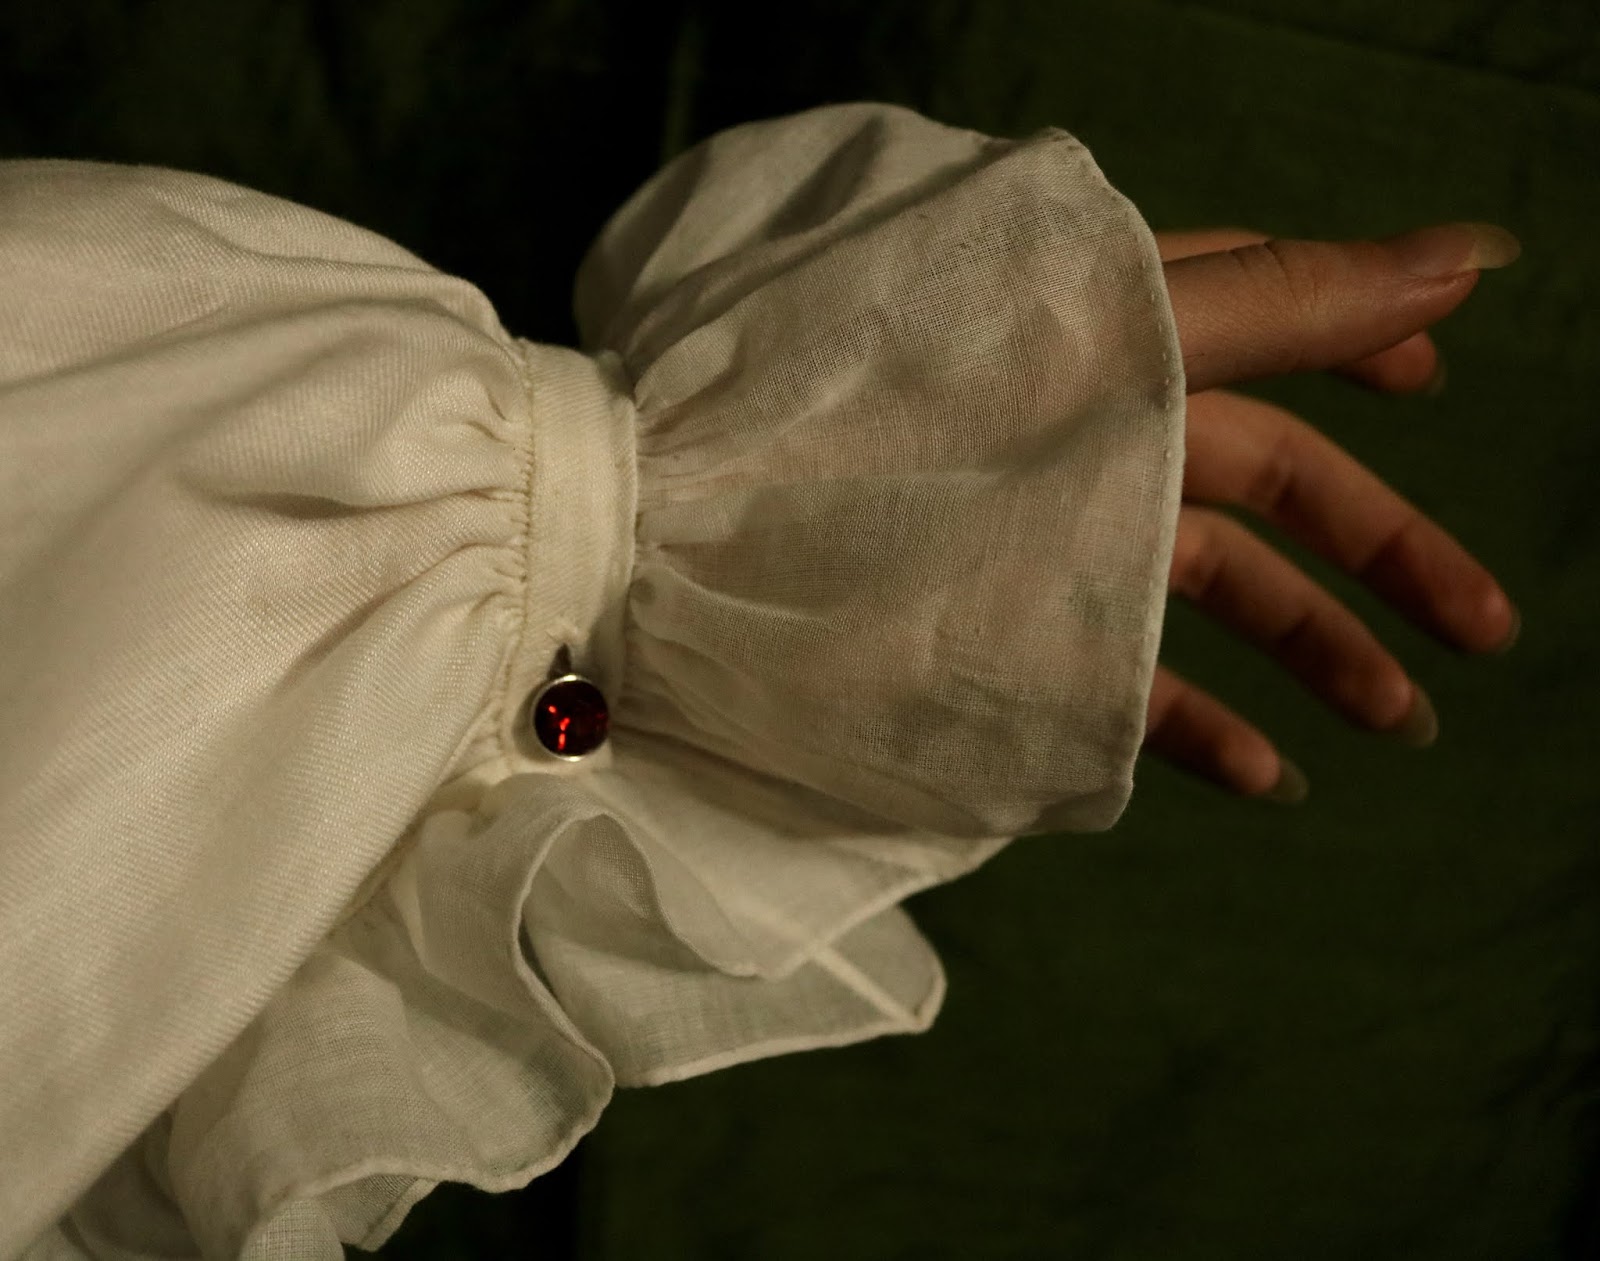
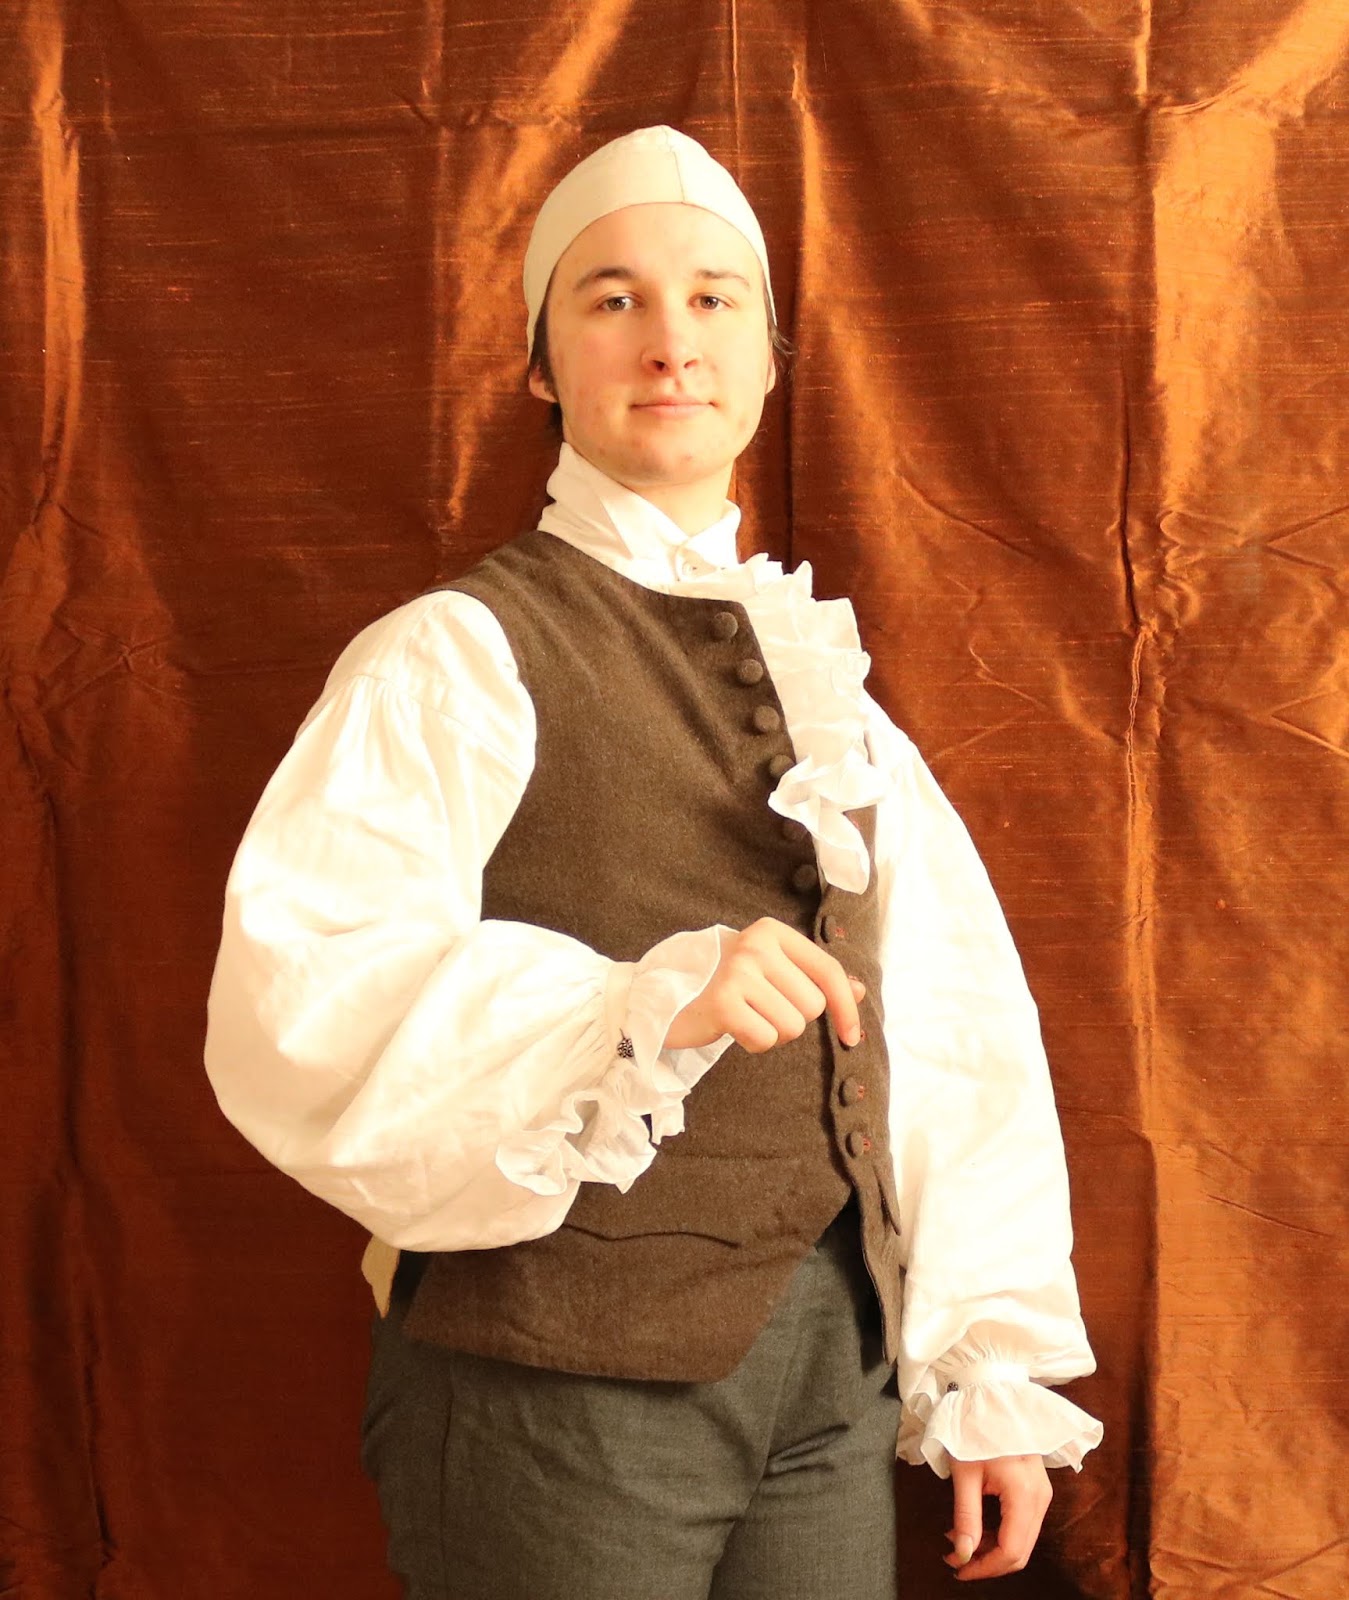
I forgot to bring a ruffly shirt the weekend these were taken, and I think I should have worn a white cravat too.  I will get better pictures later and post them!
The buttons look so nice but it doesn't show in these photos.

Now that I have this coat I feel like I really need to make one of those 1790's hats. The tall tapered ones that look sort of 17th century revival.
Portrait of Jacob Fox Willemsz, c. 1795