There are a couple of early 18th century waistcoat patterns in The cut of Men's Clothes, which were helpful, but I mostly based the shape of my pattern on these extant ones:
 |
| Waistcoat c.1720 (Though one can never be certain with the Met's dating.) |
 |
| Waistcoat,c. 1730 |
 |
| My waistcoat. |
 |
| Portrait of William Browne by John Smibert, c. 1734 |
 |
| Detail from The Garter by Jean Francois de Troy, 1724 |
 |
| Detail from The Declaration of Love by Jean Francois de Troy, 1731 This is one of my favorite suits in the entire history of suits. |
It's a good thing I did, because I do need to adjust the shape slightly. It is a bit too curved in the front, which causes it to ride up and gape at the top a bit more than I'd like it to. I had to keep pulling it down when I was taking the photos. Letting out the bottom of the back seam did help a bit though.
(Edit: It later came to my attention that I made this one a bit too short, and didn't put the pocket flaps quite low enough. The fit issues also prevent me from buttoning it low like it should be.)
 |
| The front interfacing tacked on, and the pocket opening cut and pressed back. |
The lining is a silk I bought secondhand, and which was originally one of those drapery fabrics that are covered in a lattice of little pintucks. I picked them all out but you can still see the lines. The back of the waistcoat is unbleached linen.
I interfaced the fronts with cotton muslin I stiffened, and the pocket flaps with stiffened linen. (The same linen as the back of the waistcoat.)
 |
| Half a pocket bag hand stitched on and awaiting the other half. |
I would have done the other pocket bag and the back seams by machine, but then I went to stay with my uncle for a few weeks so I just brought it with me and did all the rest by hand.
I did a nice triangular pocket opening like the one I saw in this book.
I hand sewed the pocket flaps because the edges just look so much nicer that way.
 |
| Paperclips are good friends when doing le point a rabattre sous la main. |
I had to cut the buttonholes, turn back the lining and stitch it down, and then do the buttonhole stitch. A bit annoying, but at least I realized my mistake before I had lined the other front, and so was able to put the buttons on before the lining.
 |
| They look a bit hairier than they would have if I'd done it in the right order, but it's fine. |
 |
| The buttonholes from the right side. |
I sewed these linen and silk pieces together with a running backstitch, and I sewed the centre back seams of the outside and the lining in the same way.
I basted the back of the waistcoat to the front to check the fit, and decided I needed to let out the bottom of the back seam a bit. (See patterning troubles mentioned above)
 |
| Wax marks from when I ironed open my first seam. |
Well, mostly done. I originally had only put 13 buttons on the front, and none underneath the pockets, but later I decided that was not fancy enough so I added more buttons. I put them all the way down the front edge (which appears to have been more fashionable anyways) and added 3 underneath each pocket flap.
 |
| Even with buttons under the edge I feel like the pocket flaps are too well camouflaged. |
Now, with a grand total of 27 buttons, it was finished!
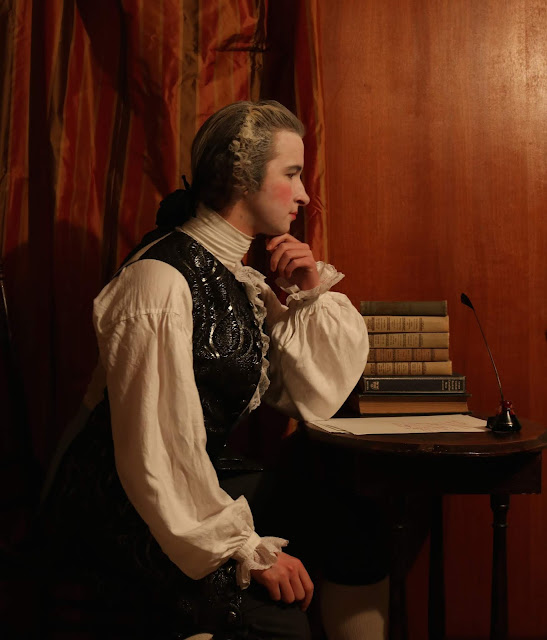
For the first time ever I actually put some effort into the background of my photos. I leaned a wooden door against the wall and hung some stripey fabric from the ceiling so it'd look more like a fancy room and less like a terrible basement.
I made a fairly successful attempt at 1730's hair, and finally got to wear my queue bag. I'm still not very good at hair, as it takes me a long time and I have to re-do bits a lot, but I am improving.
I meant to use some candles but couldn't find a single taper candle in the house, so the photos are lit only by a trouble light hanging from the ceiling.
I took all these with a self timer, and ended up with quite a few good ones!
 |
| I still need to make a good stock. The one I'm wearing here is a bad one I made ages ago and it's pinned shut in the back. |
 |
| The hair looks better on this side. |
What the item is: A waistcoat
Challenge: January - Dressed To The Nines
Material: Poly/cotton brocade, unbleached linen, blue-grey silk taffeta.
Pattern: My own.
Year: c. 1730's
Notions: Silk thread, linen thread, buckram, 27 wooden button molds.
How historically accurate is it? Not too bad! It's hand sewn except for 3 small seams, and the cut and construction are pretty accurate. The main flaw (besides the poly/cotton-ness of the brocade) is that the design repeats are too small and too symmetrical compared to fashionable brocades of the time. Also, the fit problems.
Hours to complete: 28
First worn: January 8th, 2019
Total cost: I'm very bad about keeping track of fabric I've bought, but I'm guessing around $40 (Canadian)
 |
| This is the photo I submitted to the HSM group, and multiple people mistook me for a painting! |


