A coat for my everyday wardrobe that I made back in early spring of last year. It's got a fair amount of machine sewing, and not meant to be perfectly historical.
It's sewn with the same pattern as the
black corduroy coat I made a few years ago, but with some changes. I don't remember everything I did to the pattern, but the main changes were shortening the coat by a significant amount, tightening the sleeves a bit, and adding front pockets.
The outer fabric is two slightly different navy blue wools from my stash, which were both given to me years ago. The main body and sleeves are one wool, and the smaller bits are the other.
I had to do some piecing on the back skirts and the underside of the sleeves, but kept it mostly symmetrical.
Since many late 18th century coats have a bit of padding to fill out the collar bone area, I added some to this coat, but I think I went about it in a pretty foolish way. I sandwiched the padding in between two layers of very thin green cotton, but I don't know why, there was no danger of the fibres wiggling out through the garment fabric. I attached it to the lining, and had to redo it because it wasn't sitting right.
Next time I'll be more sensible and just hold the layers together with pad stitching like you're normally supposed to.
Because this was meant to be a relatively quick machine sewn project, I used fusible interfacing. I didn't put anything in the lapels, since that seems to be the way they did it in the 18th century.
The pockets are machine sewn in, and the pocket flaps machine sewn and turned, then finished off and attached by hand. Most of the hand stitching is done with heavy black linen thread. I also did a running stitch to topstitch the edges of the fronts and the pocket flaps, to keep them nice and flat.
The lining is a smooth, tightly woven pair of cotton curtains from the thrift store.
My back pockets were much more successful than my disastrous first attempt (on the aforementioned
black corduroy coat) but I still don't think I got the flap quite right. Next time I'll make the pocket flap wider so it can be caught in the side/back skirt seam, instead of sewn down to the outside afterwards.
 |
| The pocket opening before I added the flap. |
 |
| The lined front, before sewing the back on. |
 |
| The top of the back vent being sewn down. |
 |
| And the inside view. |
 |
| The back skirts, with lining basted in place temporarily. |
 |
| Everything lined and sewn, waiting for the back lining to be added last. |
Another small change I made to the pattern was adding a button vent to the sleeves, with 5 small buttons. I made the sleeves tight enough that they need to be unbuttoned to fit my hands through them.
After sewing up one sleeve I realized the cotton lining wasn't anywhere near slippery enough for such tight sleeves, so I picked it apart and flatlined most of the sleeve lining with rayon bemberg.
 |
| This picture was taken with my bad older camera. |
Then sewed it back up and finished the sleeve.
Because I hadn't left the coat body lining free near the armhole, I had to press the seam allowances out into the sleeve instead of in towards the neck. It looks a bit odd to me, but
I think they did start to do that around the end of the 18th century. And it's covered by the cape anyways.
 |
| Kind of an unflattering shape on me, without the cape. |
I had some fit troubles with the shoulders, and picked out and re sewed them a couple times, but they were still rather wrinkly. Thank goodness for the cape!
Unlike the black coat, I only did one layer, simply because I was so very short on fabric. It's unlined, and I hemmed the edges with a herringbone stitch. The neck curve is clipped, pressed in, and then just whipstitched down around the collar. The fabric isn't the kind that can hold a raw edge without fraying, but it's not too bad, and this part should be fine.
I sewed the buttonholes by hand, and did
18th century covered buttons.


I'm not a huge fan of navy blue, but it works very nicely with my grey waistcoat and breeches.
Overall I'm mostly happy with it, but I think I overdid it with the sleeve tightening. They aren't exactly uncomfortable, but they're a bit more hassle to put on than I'd like, especially for a casual everyday coat.
There's also some room for improvement with the chest padding and back pocket flaps, but for a coat made of two odd remnants of wool and some curtain fabric I think it's pretty good!


 Since many late 18th century coats have a bit of padding to fill out the collar bone area, I added some to this coat, but I think I went about it in a pretty foolish way. I sandwiched the padding in between two layers of very thin green cotton, but I don't know why, there was no danger of the fibres wiggling out through the garment fabric. I attached it to the lining, and had to redo it because it wasn't sitting right.
 Next time I'll be more sensible and just hold the layers together with pad stitching like you're normally supposed to.
 Because this was meant to be a relatively quick machine sewn project, I used fusible interfacing. I didn't put anything in the lapels, since that seems to be the way they did it in the 18th century.
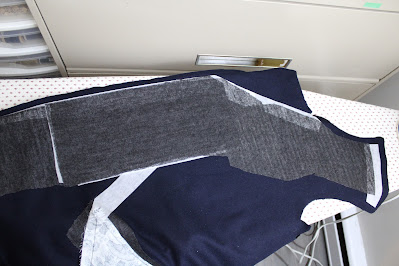 The pockets are machine sewn in, and the pocket flaps machine sewn and turned, then finished off and attached by hand. Most of the hand stitching is done with heavy black linen thread. I also did a running stitch to topstitch the edges of the fronts and the pocket flaps, to keep them nice and flat.
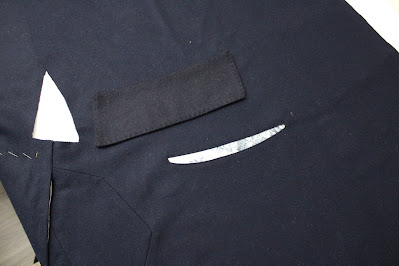 The lining is a smooth, tightly woven pair of cotton curtains from the thrift store.
 My back pockets were much more successful than my disastrous first attempt (on the aforementioned black corduroy coat) but I still don't think I got the flap quite right. Next time I'll make the pocket flap wider so it can be caught in the side/back skirt seam, instead of sewn down to the outside afterwards.
 After sewing up one sleeve I realized the cotton lining wasn't anywhere near slippery enough for such tight sleeves, so I picked it apart and flatlined most of the sleeve lining with rayon bemberg.
 Because I hadn't left the coat body lining free near the armhole, I had to press the seam allowances out into the sleeve instead of in towards the neck. It looks a bit odd to me, but I think they did start to do that around the end of the 18th century. And it's covered by the cape anyways.
 Unlike the black coat, I only did one layer, simply because I was so very short on fabric. It's unlined, and I hemmed the edges with a herringbone stitch. The neck curve is clipped, pressed in, and then just whipstitched down around the collar. The fabric isn't the kind that can hold a raw edge without fraying, but it's not too bad, and this part should be fine.
 I sewed the buttonholes by hand, and did 18th century covered buttons.