(
Part 2 here)
I don't normally post about things before I've finished sewing them, but I have a lot to say about the 1730's coat, so I'm doing it in two posts. The cut of 1730's coats are quite different from the late 18th century ones I'm more familiar with, so I'd like to discuss those differences.
First, I should mention that I've made a few changes to my 1730's waistcoat pattern.
Some months ago I sewed up a practice waistcoat in a cheap brocade and found that there was a bit of a fit problem. The front was too curved, and this made it gape too much in the front when I buttoned it up.
1730's waistcoats are typically worn with only a few buttons done up, just above the pocket flap. This waistcoat fits fine when I button it up higher and leave the lowest few buttonholes undone, but this won't work as well for the 1730's look. I also realized it was a bit short. It's quite long compared to the waistcoats I've made before, but still not quite long enough.
 |
My practice waistcoat, and the improved pattern.
You can see the extra bit taped on the hem, and the holes where the pocket corners were marked before. |
I lengthened my pattern by a few centimeters, and lowered the pocket a bit as well. I noticed that in contemporary portraits of men sitting down the pocket flap stuck out horizontally where the legs bend outwards, and mine was a bit higher than that, so I fixed it.
I think I'll mock it up one more time, just to be sure. I plan to make the waistcoat for this suit out of a piece of very nice vintage silk brocade, which is something I can't get any more of, so I
really don't want to mess it up.
With my waistcoat pattern all sorted I had to make a coat pattern. Thankfully there are two in The Cut of Men's Clothes that were just what I was looking for. I drew up a pattern that was pretty close to the second one, but with the cuff shape of the first one. I mocked it up and only had to make a few small changes.
(
The entire book is online as a pdf. Edit:
And here's another, better scan.)
 |
c. 1720-27
|
 |
| c. 1730 |
Here's my pattern:
 |
The front.
The marks for the pocket don't show up well in this photo, but they're level with the waist pleat thing. |
1730's coats are cut with very full skirts, and they have wider upper back pieces than later coats.
 |
| The back. |
Late 18th century sleeves fit quite tightly all the way down, but these earlier ones are only tight at the top. They get wider and looser at the bottom to accommodate the large cuffs. They're also comparatively short, leaving about 4 or 5 cm of wrist sticking out.
 |
| The sleeves, the extra strip that goes in the CB of the skirts, the cuff, and the pocket flap. |
Here's one of my main inspiration pictures.
I wanted HUGE cuffs, and wasn't sure exactly how they were constructed, as The Cut of Men's Clothes has next to no construction information to go with its patterns.
Costume Close up only goes as early as 1750, and the only coat cuffs it has are ones of a much smaller style that are attached differently.
After looking closely at images of extant coats with enormous cuffs I decided the best method was to sew the two halves of the cuff together, interface them with buckram, and line them - completely finishing all the edges.
They appear to be attached by overlapping them a little bit over the end of the sleeve (which has also been lined and finished on that edge) and tacking them down. I think I'll use a whipstitch for this.
This one has a much clearer view:
I've cut my coat pieces out of a fairly lightweight dark green wool with a bit of a brushed nap. The wool was 2.8m long by 159 cm wide, and I didn't have enough leftover for matching breeches, so hopefully I can find a wool that matches closely enough to make a pair.
Perhaps it's foolish of me to make a 30's coat with it when I could have made a narrower, later 18th c. coat and still had enough left for breeches, but oh well. I want a forest green coat with ridiculously huge cuffs, and I shall have one.
I sewed my cuff halves together by machine and stitched buckram in by hand. (I stiffened some black linen for the buckram because I have much more of it than I do brown linen)
It was a bit tricky to get the cuff to behave when it was stiffened and had a big curved seam down the middle, and I wondered if maybe the halves would have been lined individually first and whipstitched together, but looking at the coat photos it doesn't appear that they were.
 |
| The buckram doesn't extend past the fold. |
I'm lining the coat with a
60% cotton 40% silk satin-y fabric from puresilks. It's very heavy and nice, and much more affordable than 100% silk satin would be. (My one complaint is that it's the same on both sides, and I wish they'd put the floats on just one side so that they were more dense.)
 |
| Cuff lining going on. |
I think it may have been a mistake to line the cuffs before putting the decorative fake buttonholes on them, but I should hopefully be able to do them well enough through the first two layers.
Edit: Nope, I did end up unpicking the edge of the lining on all but the top edge of the pocket flaps, and part of the way around the cuffs.
Speaking of decorative buttonholes and buttons, there will be a
lot of them. The plain brown & brocade suit I posted above has 27 buttons and holes down the front edge of the coat alone!
This one has 26, with 10 more on the cuffs, 26 fake buttonholes down the sides of the back vent, and 8 on the pocket flaps, plus two buttons at the tops of the side vents.
That's... that's a lot of hand sewn buttonholes and covered buttons.
46 buttons and 70 buttonholes in all.
I'll see how the spacing works out on my coat, but I want to get the look right so I expect my numbers will be pretty similar.
(
Edit: I actually ended up doing
more than that. 47 buttons and 79 buttonholes.)
Only 5 of the buttonholes on this coat are functional - 4 at and just above the pocket, and (I think- it's a bit hard to see) the one at the very top. The 1735 brown & brocade one has the same, and this is mentioned in a number of patterns in The Cut of Men's Clothes as well.
I'm definitely doing only one line of buttonhole stitches for the decorative ones mine, because I do not want to stitch 70 fake buttonholes for twice as long as necessary, but the extant coats all seem to have 2 rows. Oh well I looked at some earlier and later coats for this, because often the photos aren't high quality enough to see the buttonholes clearly.
In the brown & brocade one I think they're one row? It's grainy though, so hard to tell.
Edit: Ehh, I think they're more probably 2 rows. And I'm not super happy with the buttonholes I ended up doing on this coat, so I'll do 2 rows next time.
This coat looks like it definitely has two rows of tiny stitches on all its decorative buttonholes.
I was excited to see the buttonholes on this coat, because they're partially worn away to reveal a bit of cord underneath! That will certainly help me get my buttonholes more raised and even!
 |
LACMA, c. 1755(The buttons are later replacements- the originals would most likely have been cloth covered.)
|
I have purchased 3 balls of DMC cotton pearl in a lovely almost-matching dark green, which I hope will be enough. (
Edit: It was way more than enough) I'm working on some sample buttonholes on scrap fabric and they're looking pretty decent so far.
I'm not sure why this coat has a little row of backstitches along the back seams like this. Were they sewn, pressed open, and then topstitched for extra reinforcement? Or did one piece have the seam allowance folded in and get backstitched onto the other one?

I can see that unlike later coats, where the CB vent has a little overlap, these ones meet edge to edge.
These earlier coats have more interfacing than the later ones, and thank goodness there's a diagram in The Cut of Men's Clothes to tell me what goes where! That's one of those things I can't figure out by looking at photos of displayed garments.
 |
A lot of heavy buckram and padding in there.
(the horizontal lines indicate padding) |
I have some cotton quilt batting in my stash that should work for the padding in the skirts. I thought this was weird when I first read it, but it makes sense when you think about it. It would give the pleated skirts that glorious poof without getting crushed when you sit down on it. I don't think buckram would hold up so well, as in my experience it likes to crease.
 |
| I'll need to iron it a bit because it's been crunched up in a box. |
This painting is from a decade later but it illustrates the poof really well:
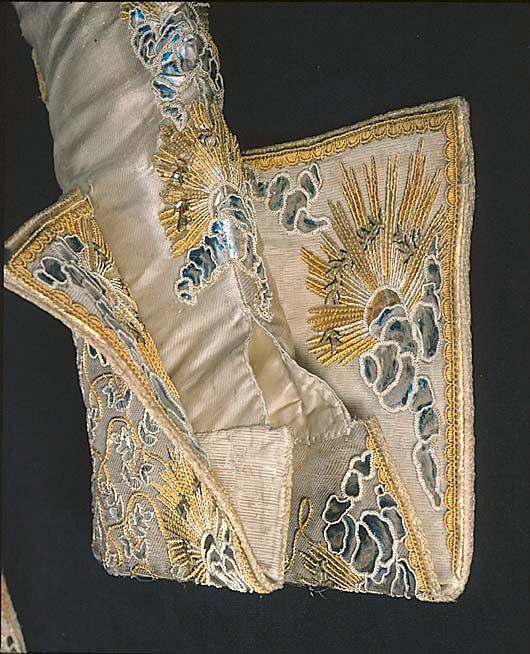
When I cut out my back panels I had to piece them because my wool was limited. I traced them out on either side of the end of the yardage, and where they crossed in the middle I cut there and pieced on the extra. This makes it more historically accurate too, because with 18th century fabric widths you see this kind of piecing on every single full skirted coat. I pieced a tiny bit onto the corners of the coat fronts as well. And on part of the lining, just to save on fabric.
Here's a really nice extant fragment that shows us a lot of good interfacing stuff, as well as piecing.
The pocket bag in this coat is so big! I cut my pockets in a similar size, out of the lining material.
As you can see, I also cut my back lining out of brown linen.
Here's the state my coat is in at the moment. I've got all the outer and lining pieces cut, and both sleeves & cuffs lined and assembled. The cuffs aren't attached yet because I want to add the buttons & fake holes first. I've got my pocket flaps interfaced, and the buckram for the front interfacing is still drying because I gooped it up with fabric stiffener this morning.
I have only 43 of the small
wooden button blanks, which may not be enough, but I've just ordered more
I'll do a second post on this coat when it's finished!