
The 30's coat is done! It's been done since June 30th but I have been rather slow in getting all these photos organized.
This is the first time I've made a coat with the proper 18th century construction techniques, and I wanted to go over it all quite thoroughly. There are some things I would do differently, but overall I'm very pleased with how it turned out!


In my earlier post on this coat I talked about the pattern, and puzzled a bit about some of the construction details. This post is mostly about the construction and there are a lot of pictures.
I haven't got any Fancy photos of me wearing the coat yet because I don't have proper 1730's breeches to go with it, nor a 30's waistcoat that actually fits correctly and is the right length. (And it's July, which is not a great time to wear wool coats.)
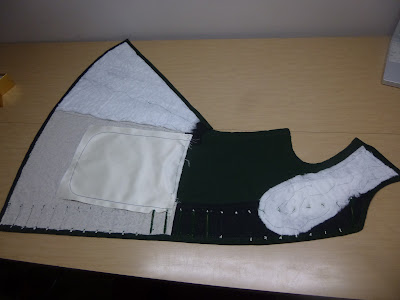
So! Construction. I made some buckram with black linen, and also slightly stiffened some patterned cotton canvas for the front skirts. It's not as stiff as the buckram, but since the canvas had been washed I wanted to make it a bit more crisp. I cut out a little bit of padding just like the one in the Cut Of Men's Clothes diagram in my previous post.
I tacked all the buckram in place.
 Cut the pocket hole open in that triangular shape you see on extant coats & waistcoats, and tacked the quilt batting on too.

 I pressed all the front edges inwards and stitched them down too.
I did the same on the back skirts. Buckram on the centre back edge, and quilt batting on the part that makes up the side pleats. Before this, though, I had to sew in the extra skirt panel in the centre back (you can see in in the pattern in my previous post). I did most of the long edge by machine and finished up the short edge on top by hand.
 Now it was time for buttonholes. So many buttonholes. I knew I wanted to have some cord in them to make them a bit thicker, and I did some samples to see what I liked best.
I looked around the house for a suitable bit of cord, but everything that was the right size was either too soft & squishy or too bumpy. I settled on a smaller cord which I waxed and braided to make it the right size.
 |
| All my interfacing bits |


I sewed both halves of the pocket bag together by machine and stitched it to the opening by hand.

 |
| This is the place where the functional buttons at the waist are attached so I added an extra bit of buckram. |

I looked around the house for a suitable bit of cord, but everything that was the right size was either too soft & squishy or too bumpy. I settled on a smaller cord which I waxed and braided to make it the right size.
Update: I do not like the way I did these buttonholes. I think they are bad, please ignore them.
 I marked out the locations of all 79 buttonholes. 27 down the front, 4 on each pocket flap, 5 on each cuff, and 17 down each side of the centre back split.
They're each 6.5 cm long, with the exception of the ones in the middle of the pocket flaps, which are slightly longer.
 I decided the nicest way to hide the ends of the cords would be to poke a hole with an awl and stick the end of the cord down through it. So I did that, and stitched the cords down.
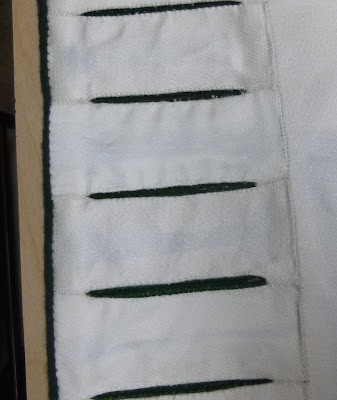
 After doing my sample I settled on just covering the cord with smooth stitches going round and round, but after I was halfway done doing the ones down the centre back slit I changed my mind, so the back ones are smooth and the rest of them are all done with buttonhole stitches.
I did only one row of buttonhole stitches on the false ones. I know some extant coats have false ones with 2 rows, but I really didn't want to spend nearly twice as much time sewing 79 buttonholes. Just doing them with one line of buttonhole stitches took an eternity.
Here are the smooth ones I did down the back:
 Here's one partly done with buttonhole stitches once I changed my mind:
 I had foolishly lined the cuffs and pocket flaps already, so I had to pick the lining off most of the way around and re-sew it after doing the buttonholes. That's ok though, I really like putting on linings.
I also realized later that it was better to couch down the whole cord instead of awkwardly stabbing it on like I had been doing.
 For the 6 functional buttonholes I also put a bit of cord around the edge to make them a bit more sturdy. It's the same cord as in the false buttonholes, but not braided.
I had not taken the chest padding into consideration, and found it rather troublesome to sew through. Next time I will know to add it after the buttonholes!
 I covered 47 5/8" wooden button moulds. I sewed the buttons on in all the necessary places. (Except for the last two that go over the back pleats.) I sewed the pocket flap in place around the same time too.


I pieced together the lining in a few places. I didn't need to, I had enough fabric to cut out all the pieces whole, but I wanted to be more economical with it.
The upper back lining is brown linen and everything else is a cotton/silk blend satin.
 I put the front and back skirt linings in the usual way, with le point a rabattre sur le main.
 Now all the pieces were finally lined and ready to be assembled! At this point the only raw edges are at the side, upper back, and shoulder seams, and the armholes.
 Originally when I did the lining around the functional buttonholes I did it my usual way, with the lining slashed and turned under, but it looked very bad. Due to a combination of the fabric being thick and prone to fraying, and the buttonholes being quite long, it was a horrible hideous mess that I didn't even photograph.
So I cut that whole chunk of lining out and re-did it with the method I should have used in the first place. By piecing little rectangular bits in between them all, allowing the lining edges to be folded down nice and flush against all the buttonhole edges. I can't seem to find a photo of this on the internet at the moment but I know it can be found on some extant garments. Waistcoats From The Hopkins Collection has a nice early 18th century example on page 13.
 Thankfully I hadn't gotten as far as the one functional buttonhole on the top before I changed methods, so I didn't have to replace the lining on both edges.
Here are the finished functional buttonholes from the outside:
I sewed the centre back seam with a backstitch.
 And after pressing it open I sewed the side seams with a backstitch too. It seemed reasonable that the lining should not get in the way of putting the sleeve in, so I caught the lining in the side seam for most of the way up, but made sure not to for the top 5 or 6 cm.
I did the same for the shoulder seams. I tried the coat on at this point, just to make extra sure it fit, which it did.
 I basted the sleeves in and then sewed them in with a backstitch. All the seam allowances from the sleeve and coat body get pressed inwards towards the shoulder.
(This is one of the few things that Costume Close Up isn't super clear on, but judging from the sloping shoulder look that you see in every portrait and on every extant coat it seemed the only place for the seam allowances to go.)
 I basted the lining down so it'd sit in the correct place.
 I also did a bit of a prickstitch on the outside of the armscye, because I was worried the seam allowances wouldn't stay in place well enough on their own.
 I folded down the front lining around the armhole and stitched it down. I'm not 100% satisfied with how the armscyes look on close inspection because I think I eased a tiny bit too much cloth from the top of the sleeve into it. Not enough so that it's puffy or anything, but it's not quite as smooth as the ones on extant coats.
It also didn't occur to me until later that maybe I should have added some extra bits of linen for structure and support into these seams. There's a bit of wrinkling, particularly around the left armscye, but it's not too bad.
It's hard figuring out 18th century tailoring all by yourself, and I'm very envious of people who get to go learn from professionals at places like Williamsburg!
 Making the back skirt lining end a bit above the waist instead of right at it is another thing I should have done. I hadn't considered exactly how the back lining would go in with the back pleats in the way, so it got a bit messy.
Wrangling the back pleats into shape was probably the most difficult part of construction. There's so much material there! I then sewed the last 2 buttons on, right over the tops of the back pleats.
I popped in the back lining and sewed all the edges down, finishing up all those raw edges.
 Had I sufficient foresight to make the skirt lining higher it might have looked more like this:
But instead it looks like this, which isn't particularly bad, just a bit bumpy.

They're each 6.5 cm long, with the exception of the ones in the middle of the pocket flaps, which are slightly longer.


I did only one row of buttonhole stitches on the false ones. I know some extant coats have false ones with 2 rows, but I really didn't want to spend nearly twice as much time sewing 79 buttonholes. Just doing them with one line of buttonhole stitches took an eternity.
Here are the smooth ones I did down the back:


I also realized later that it was better to couch down the whole cord instead of awkwardly stabbing it on like I had been doing.

 |
| Functional buttonhole being sewn. |
 |
| 1 - buttonhole cut 2- overcast 3 & 4 - cord added 5 - buttonhole stitches done. (6 is a false one with just the cord couched down) |


 |
| Finished cuff with buttons! |
As I decided to do in my previous post, I overlapped the edges of the cuff and the sleeve end and whipstitched them down. The sleeve, at this point, had already been lined. I sewed the long seams by machine and hand stitched the lining down around the cuff opening.


 |
| Lining being put on the cuff. |
The upper back lining is brown linen and everything else is a cotton/silk blend satin.


 |
| Outside of the lined pieces. |
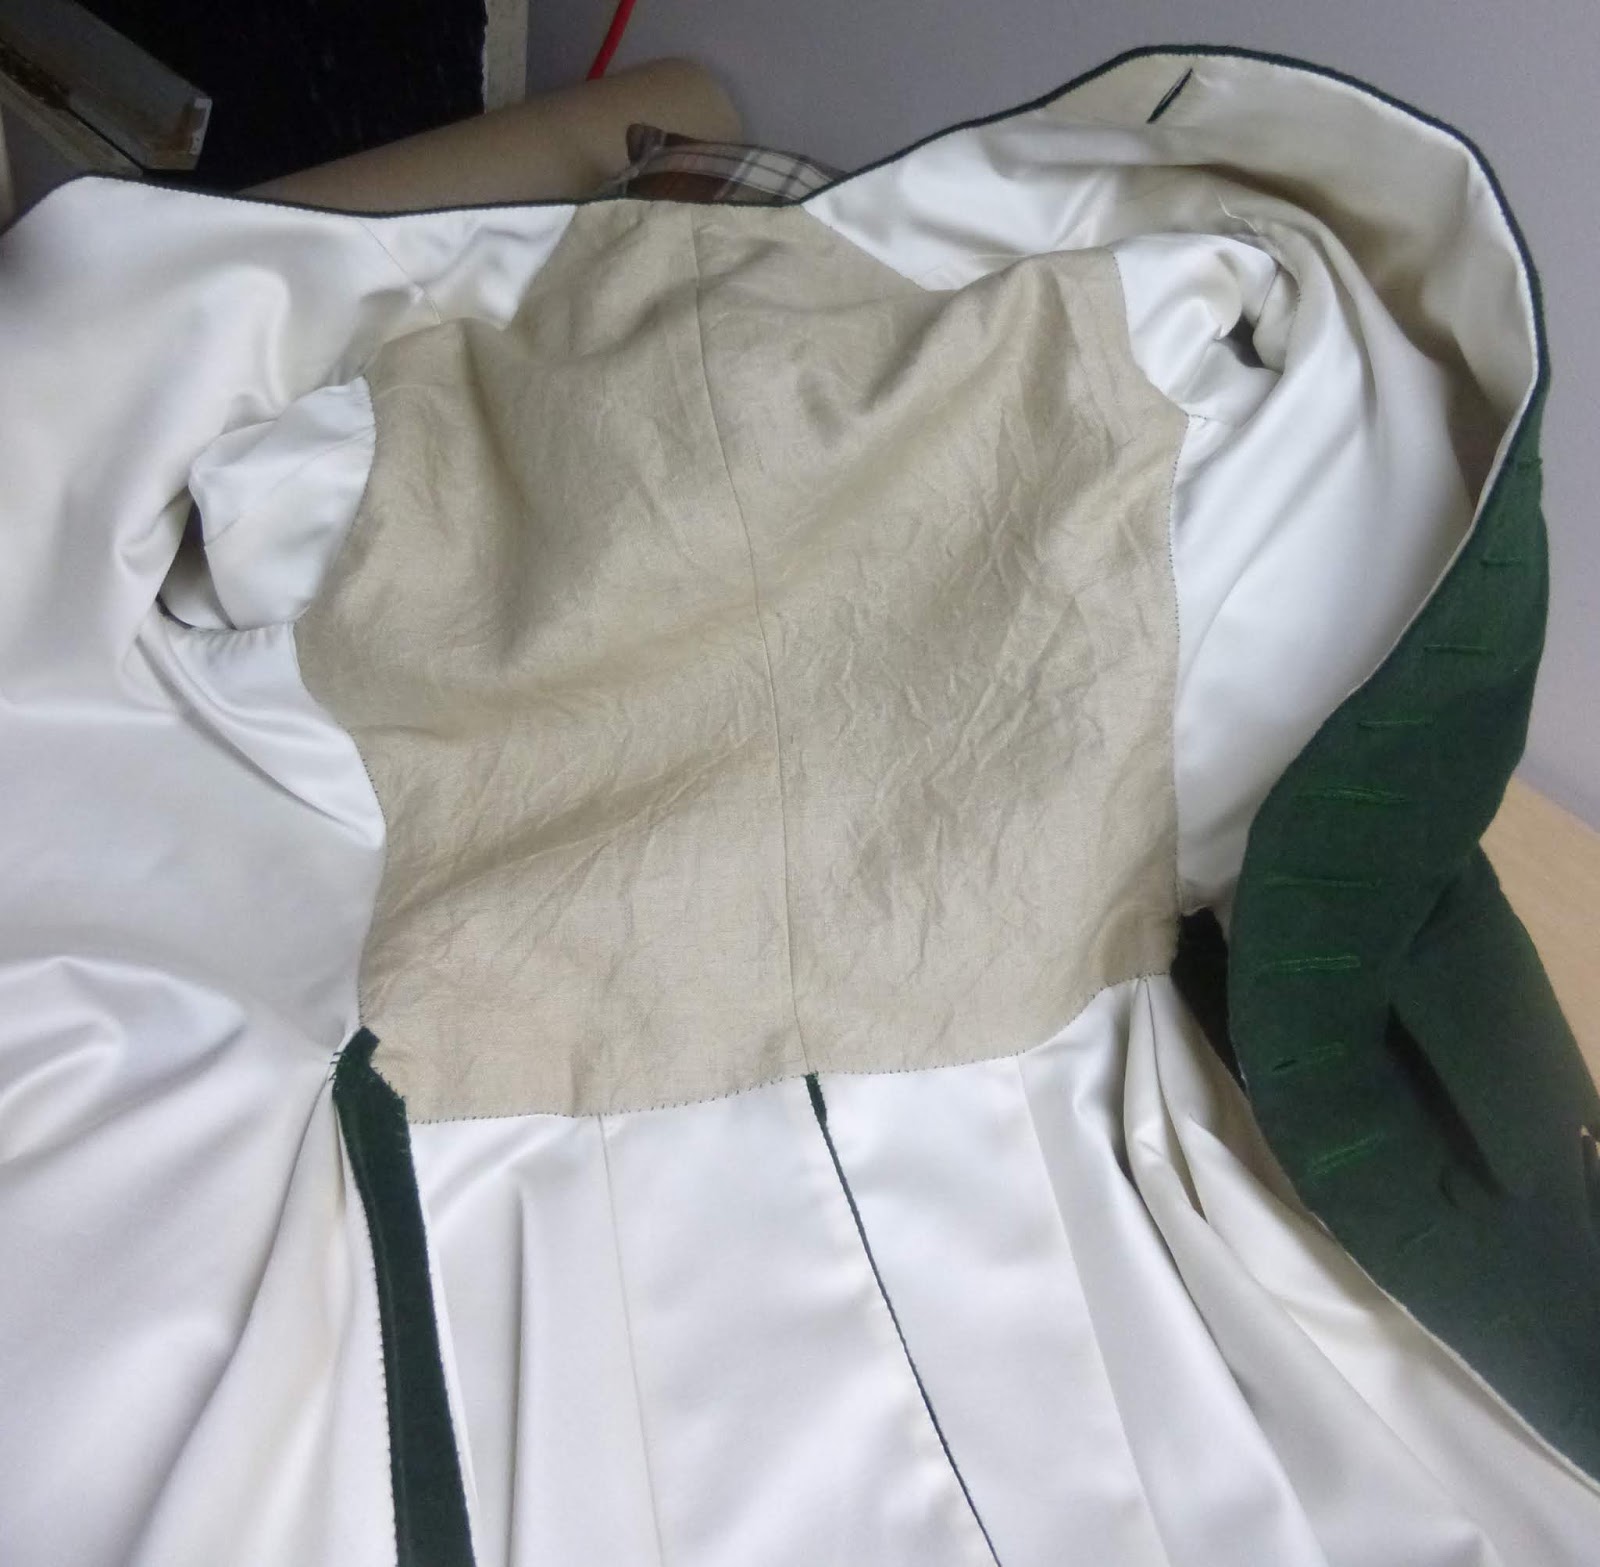
 |
| Inside of the lined pieces. As you can see, the back lining isn't attached yet. |
 |
| Pocket flap! |

So I cut that whole chunk of lining out and re-did it with the method I should have used in the first place. By piecing little rectangular bits in between them all, allowing the lining edges to be folded down nice and flush against all the buttonhole edges. I can't seem to find a photo of this on the internet at the moment but I know it can be found on some extant garments. Waistcoats From The Hopkins Collection has a nice early 18th century example on page 13.

 |
| Just had to add one little bit. You can also see some of the aforementioned lining piecing on the shoulder. |
 |
| Only 5 of them, right at the waist. Plus one more at the very top. |

 |
| Side seams sewn. |

(This is one of the few things that Costume Close Up isn't super clear on, but judging from the sloping shoulder look that you see in every portrait and on every extant coat it seemed the only place for the seam allowances to go.)


It also didn't occur to me until later that maybe I should have added some extra bits of linen for structure and support into these seams. There's a bit of wrinkling, particularly around the left armscye, but it's not too bad.
It's hard figuring out 18th century tailoring all by yourself, and I'm very envious of people who get to go learn from professionals at places like Williamsburg!

Wrangling the back pleats into shape was probably the most difficult part of construction. There's so much material there! I then sewed the last 2 buttons on, right over the tops of the back pleats.
 |
| Back pleats all tacked together. I added a bit more stitching to them after taking this photo. |

 |
| Back lining of a man's silk satin coat, c. 1780's. |
 |
| Back lining all in. |
Update: I found that the weight of the coat was pulling on the tops of the back and shoulder seams, which were pretty unsupported with no collar and no reinforcement there, so I unpicked the top of the lining, added a bit of twill tape, and stitched it back down.

In order to keep the cuff in place I stuck the top edge of it to the sleeve with some careful running stitches, like the cuff here:
As you can see from the various photos on the V&A coat object page, the cuffs are tacked down along the top edge, and down the length of the cuff on the inside edge only. No such dimples appear in the photo of the outward side of the cuff.
After wearing it for a bit with the sides not tacked I saw why this was - the sleeve pulls on the corner on that side of the cuff and makes it fold to the inside, but the outside edge is fine.
And it was finally finished!

 The back pleats didn't turn out poofy like I hoped they would in my first post, but that's ok because they turned out looking just like these ones.
I may need to add some of those long thread bar tack thingies because the pleats could stand to sit a little bit better than they do. I wish more museums posted pictures of the insides of things!

 I'll get Good Fancy photos eventually, once the weather stops being horrible and sweaty.
Amazingly, the day I finished it had very nice 17 degree weather and I was able to get photos of me wearing it outside.
 I didn't tack down the tops of the cuffs until after I'd taken these photos, oops.

 Hopefully I'll finish the waistcoat and breeches to go with it by this autumn!
 |
| Coat c. 1730's, V&A. |
 |
| Cuff secured. |
After wearing it for a bit with the sides not tacked I saw why this was - the sleeve pulls on the corner on that side of the cuff and makes it fold to the inside, but the outside edge is fine.
 |
| The inside edge about to be stitched down. |
And it was finally finished!


 |
| John Smibert, William Browne, c.1734. |

I finished the coat just in time for the June Historical Sew Monthly challenge!
The Challenge: June: Favourite Technique
What the item is: A man's wool coat
Which favourite technique does it feature? I'm bad at choosing favourites, but two that are very high on my list are le point a rabattre sous la main, and piecing to economize on fabric. I had to piece the wool to squeeze such a full coat out of it, and I pieced the lining just because I wanted to be less wasteful with the cutting. I also really love the way 18th century coats & waistcoats are assembled, and how different it is from modern sewing, and how much easier it is to do it that way when you're hand sewing most of it. This is the first time I've done a coat this way.
Material: 2.8 m of green wool, 2.8 m of cotton/silk blend satin, a bit of brown linen for the back lining.
Pattern: My own, based on two of the ones from The Cut Of Men's Clothes
Year: 1730's
Notions: 47 wooden button blanks, linen thread, a tiny bit of polyester thread, DMC cotton pearl, some sort of cord (maybe linen?) that I put in the buttonholes, linen buckram, cotton canvas, cotton quilt batting.
How historically accurate is it? Maybe 85-90%? Aside from a little bit of machine sewing and a couple of things I'd do a bit differently the construction is as accurate as I could get it.
Hours to complete: 100 hours and 33 minutes. Of that time, 39:56 of it was spent on the 79 buttonholes, and 7:32 on the 47 buttons. (That hundred hours doesn't include drafting & mocking up the pattern.)
First worn: Sunday June 30th, 2019
Total cost: I'm guessing somewhere around $50 Canadian. It would have been much more if I'd bought the wool, rather than tragically inherited it. The interfacing and padding was all stuff that was given to me.

Amazingly, the day I finished it had very nice 17 degree weather and I was able to get photos of me wearing it outside.


