Edit: Argh! I only found an 18th century buttonhole tutorial right after I finished making this, and now the lack of bar tacks is bugging me too much, so I'm going back and adding them. Please excuse the shamefully bar tack-less buttonholes in the rest of this post.
I finished the 1730’s waistcoat and am now one pair of breeches away from having a complete suit! (I should have started with the breeches, but I’m very foolishly doing this suit in the wrong order.)
Some years ago my aunt gave me a lovely piece of vintage brocade which someone had given it to her when she was in Japan in the late 90’s. It’s probably the best fabric I’ve ever worked with. So heavy and crisp, and the enormous asymmetrical pattern makes it perfect for early 18th century. Most modern brocades have far too much symmetry, making them better suited to 18th century decor than clothing, but this one is incredibly similar to a “
bizarre silk”.
Edit: I had assumed this was silk, but upon doing a burn test I think it's actually rayon! It's very nice all the same.
There are
a lot of 18th century portraits showing men in richly patterned waistcoats and plain coats, and the pine needles in this pattern match the green of my 1730's coat perfectly. I'd been planning on making a 1730's suit with these materials for a few years now and it's so good to finally do so!
The brocade is 68 cm from selvedge to selvedge, which is another thing that makes it much closer to 18th century silks than modern ones. The full piece was 3.93 metres, and I used about a metre and a half.
I had assumed it was just unused yardage, but a commenter in the
Historical Sew Monthly group informed me that it's a picked apart Maru Obi, and that this is the most formal and elaborate
kind of obi. They said the staining and the very firm crease down the middle would indicate that it was worn and picked apart to be cut up and remade into other things, and that historically some fabrics like these came to Europe via Dutch merchants, which is very interesting!
 |
| The back of the brocade. |
There's a date stamp on one corner that's slightly smudged but I'm pretty sure it's 1950, making this material just about 70 years old. I tugged discreetly on the edges and it proved to be sturdy, though after cutting I pulled on the frayed threads of some scraps and found the darker coloured threads to be weaker than the undyed ones.
 |
1950.
Pretty old, but not so old that I feel bad about cutting into it. |
It's hard to convey in photos just how nice the texture is. It's really nice, really heavy stuff.
 |
| Stiff, but not excessively so. |
There is some water staining, and a few places on one end where the dye appears to have caused weird bands of discolouration, but the overall condition is still pretty good and there was plenty of nice presentable material to work with.
There are a lot of 18th century waistcoats with large scale brocades, and here are a couple with somewhat similar colours to mine.
That one's a bit later than what I'm going for, but the patterns are still very large.
The pattern on this one is huge! And it's got a lovely bright raspberry coloured silk lining. Why it has ties instead of an actual back I do not know. I can only assume the Victorians did something horrible to it for fancy dress party purposes.
In
the part 1 post about my 1730's coat I mentioned lengthening my waistcoat pattern and lowering the pocket flaps. When it was time to finally make the waistcoat I mocked it up twice more and ended up moving the pocket flaps even lower. They should be about level with the coat pockets, and when I tried the coat on over the first mockup they weren't.
I also had to move the pocket flaps back a bit once I marked out the buttonhole locations on the pattern, because originally I had put them too far forward and they would have gotten in the way of the long buttonholes.
This waistcoat doesn't have sleeves, but I think I'll try doing a sleeved one next time.
 |
| My finished pattern. |
With a bit of piecing I was able to fit both fronts onto one width of the 68 cm wide fabric, with one front positioned slightly higher than the other. I put both front edges facing the selvedges because the crease down the middle would not press out completely, and the stained bits were mostly in the middle too.
 |
| Starting to piece onto the back corner. |
Since the fabric is so nice I decided to sew the whole thing by hand.
 |
| Piecing completed! |
I may have gone a bit overboard with the piecing. I used up so many small scraps that when it was time to make the buttons I didn't have enough scraps to cover them and had to cut a bit more from the yardage!
Some extant waistcoats have extra bits of the fancy fabric pieced into the lower back, so I did that on mine, and you can see them cut out on the left of the above photo. The rest of the back is
the same cotton/silk blend I used for the coat lining.
I had a bit of an "aha!" moment while working on
the coat when I realized that these fancy strips might actually show a little bit while you were moving, because the centre back edges of the coat skirts just butt up against each other, as opposed to the ones on later coats (
like my 1790 one) which overlap.
As usual, I made buckram by brushing diluted fabric stiffener on linen and leaving it to dry flat on the table. I used a heavy brown linen for the front edges, and a lighter yellowish linen for the pocket flaps and front skirts. I haven't found any information on stiffening for waistcoats this early, but the skirts stick out so stiffly on the ones displayed on mannequins, and
in some you can see the outlines of the buckram indicating the whole front skirts were stiffened, so it seemed reasonable to do so.
The strips of brown linen weren't quite wide enough for the front edges, so I had to piece a little extra onto them. Having already worked out the buttonhole locations on the pattern, I made sure to place the joins between pieces of buckram where they wouldn't interfere with the buttonholes.
I tacked the buckram on along the edges with a long stitch on the back, and only a tiny prick showing on the front of the fabric.
In the below photo you can see that I also added an extra bit of buckram to the right side at pocket level, where the most used buttons will be.
I pressed all the edges in, save for the ones that would become the side and shoulder seams.
I cut the lining for the fonts and pocket flaps out of off-white silk taffeta. (The same taffeta I'm currently using for
an embroidered waistcoat.) The back lining is brown linen.
I made two of the three buttonholes on each pocket flap functional, and carefully pieced the lining around them just like I did with the functional buttonholes on my coat.
I worked the buttonholes through the brocade and buckram with a fine silk yarn that Mama gave me from her stash of weaving supplies, and then sewed the lining on after.
 |
| The pocket flap on my completed waistcoat. |
This detail was
inspired by several extant examples, particularly the one in the photo below.
 |
| Sleeved waistcoat, c. 1700's-20's |
Unfortunately I cannot find the source for the above image. The
source link (apparently to an article about buttons) was dead, I can't find any other images of this waistcoat, and google search by image isn't turning up anything else. If anyone recognizes this waistcoat and knows the source, please tell me.
I marked out the location of the pockets on the wrong side of the fabric, and ended up trimming the buckram down a bit here to make room for the slits. I cut pocket bags from the same off-white silk taffeta as the front lining. I cut the slit in the usual shape - a long slightly curved cut with a short downwards cut in the middle.
 |
Pocket slit cut and edges pressed back.
Pocket bag halves pinned to be sewn together. |
I sewed the pocket bags with a small backstitch (
and posted a short video of that here) and then carefully attached them to the slits with tiny whipstitches.
 |
| Pocket bags in! |
Then it was time for yet another eternity of hand sewing buttonholes, though the 25 on this waistcoat aren't nearly as bad as the 79 on the coat. There are 19 down the front, and the top 12 of those are functional.
 |
| Buttonholes worked, but unlined. |
I cut the functional buttonholes, overcast them, and did a buttonhole stitch in fine silk yarn (heavy silk thread?). I wish I'd used something just a bit finer.
I did the false buttonholes by just making buttonhole stitches on the surface of the fabric, and they're not bad but are a bit thicker than I'd like them to be.
Shortly after I finished all these buttonholes I came across
Neal Hurst's tutorial for 18th century false buttonholes, which are nicer than mine, so I'll need to do some samples and practice that technique.
How did I manage to neglect the bar tacks for this long??
Edit #2:
and Neal Hurst now has some youtube tutorials on buttonholes!
For the 25 buttons I used the smallest
wooden moulds from Burnley & Trowbridge, covered them in cloth in the usual way, and sewed them on in the usual way with heavy linen thread.
(
Link to the B&T tutorial for covering buttons.)
(
Link to their tutorial for attaching buttons.)
 |
| Buttons in progress. |
I wanted to do
those little
metal thread
passementerie buttons
that are
so ubiquitous on early 18th century waistcoats, but I haven't got any suitable metal thread yet, and I have no idea how a lot of those buttons are done, so I'll have to learn and do some practice ones before I can make a waistcoat with them. Same goes for metal thread buttonholes. I will do a waistcoat with them eventually!
 |
| Buttons attached. |
I attached the pocket flaps and forgot to take a picture of it, but it's just the usual stabby whipstitch thing, which I did in heavy off-white silk thread. I brought the needle up just outside the edge of the flap, and then back down through about 1mm in on the edge of the flap. It's rather slow and awkward because it's in the middle of the waistcoat, and the thickness makes it hard to pin, but thankfully it's only two very short seams.
The pocket flaps are sewn down along the top edge, and about 2 cm down the sides to keep them lying nice and flat.
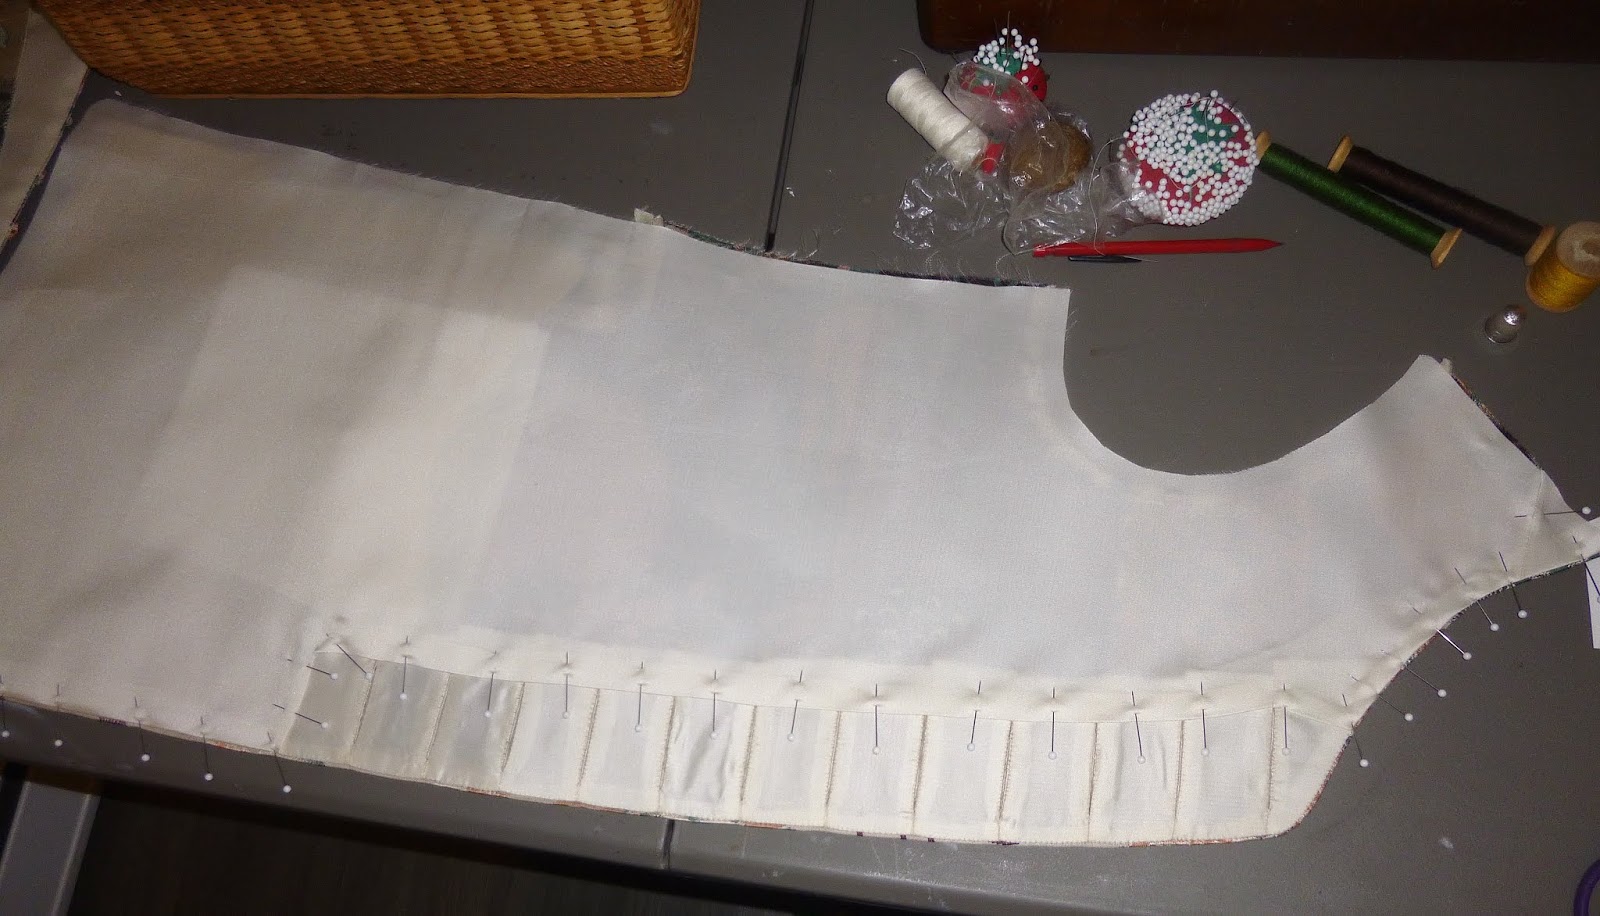
Pockets, buttonholes, and buttons all finished, it was time to line the fronts!
When I lined the functional buttonholes on
the coat I pieced in all the lining bits around them edge to edge, but for this waistcoat I decided to copy the lining technique shown in
WAISTCOATS: From the Hopkins Collection 1720-1950. I cut out the left front lining with a gap where the functional top 12 buttonholes would be, leaving a generous seam allowance on the long edge. I cut little rectangles from my silk scraps to fit in between them.
 |
The lining bits. The rectangles are a bit big and uneven,
but I trimmed them down to size as I sewed them in. |
I used fine white linen thread to put the lining in. One by one I folded in the edges of the rectangles and stitches them down right on the edges of the buttonholes with tiny whipstitches.
 |
| This took forever. |
Once they were all in I pinned the rest of the lining on over them, having pressed the long edge of the buttonhole gap in.
I sewed down the long folded edge about 1cm in from the fold, using a spaced backstitch. I'm pretty sure this is how the one in the book was done. None of the backstitches went through to the surface - they only caught the little lining rectangles and the buckram.
You can see the same technique in one of the photos of
that extant waistcoat part, though sadly the picture isn't very clear.
The rest of the lining edges are stitched down with
Le point à rabattre sous la main, as usual.
I sewed the back pieces together with backstitching, basted the side and shoulder seams, tried it on to make sure it fit, and then securely sewed the side and shoulder seams with backstitches. At this point I also pressed in all the raw back edges.
I decided to add a piece of twill tape to the back of the neck area, to reinforce it. I don't know if this was done, but it seems a sensible thing to do, and I mean to open up this area on my coat and add a bit of tape there too, because the coat is
heavy and it's pulling the top of the CB seam a bit more than I'd like.
 |
I folded down the ends of the tape and whipstitched them to the shoulder seam allowances.
This will be hidden by the lining. |
The two halves of the back lining were sewn together with a running backstitch (or maybe a backstitch? I forget. I do a lot of backstitching because I want things to be sturdy.)
And in went the back lining, with little whipstitches, covering all the remaining raw edges and seam allowances.
 |
| Part way through pinning the back lining in, |
Finished!
Here it is over the
shirt I made in February, and my everyday black cotton pants because this isn't a proper fancy photoshoot, just a few quick pictures to show what it looks like on me. Fancy Photoshoots will have to wait until after the breeches are done.
I would have put the coat on over it for a few pictures too, but these photos were taken at my parents house and the coat was at the apartment in which I now live. I moved out sometime during the buttonhole lining, which is why the work table and the camera used to take the progress photos both get worse then.
I really must get myself a good camera soon, now that I can't conveniently borrow my mothers'. Mine is old and terrible and has dirt mysteriously stuck in the lens.
 |
| The back piecing. |
 |
| Pocket flaps buttoned closed. |
I sewed the false buttonholes in the middle of the pocket flaps first, and consequently they're much thinner than all the other buttonholes. This only bugs me a little bit.
 |
So many of my reference portraits are of guys sitting,
so here's what the waistcoat looks like when I sit. |
I'm really glad I did
a practice waistcoat, and then two mockups after that. The fit of these is a bit weird because they button so low.
Without initially aiming to, I happened to finish this just in time for the November
HSM challenge, which was "above the belt". Being slightly above knee length I had thought it was too long to be “above the belt”, but then I saw
the inspiration post for November and saw that I was taking it a bit too literally, and that it’s ok if it hangs a bit below the waist as long as it's an upper body garment.
What the item is: A man’s waistcoat
How it fits the challenge: It’s worn on the upper body, so if there was a belt it would mostly be above it.
Material: About a metre and a half of vintage Japanese rayon brocade (which is less than it sounds, the fabric is very narrow), some brown linen for the back lining,
off-white silk taffeta for the front lining, and
cotton/silk blend satin for most of the back.
Pattern: My own.
Year: c. 1730’s
Notions: 25 wooden button blanks, silk thread and linen thread (two different weights of each), and two different weights of linen that I stiffened for buckram, about 10 cm of cotton twill tape.
How historically accurate is it? Very. It’s entirely hand sewn, and the construction methods are accurate to the best of my knowledge. The materials are not perfect, but reasonably close to accurate.
Hours to complete: 61
First worn: Saturday November 30th very late at night, just for a couple of crappy mirror photos.
Total cost: Approximately $35 Canadian BUT only because the brocade and the linen were given to me, as was most of the thread.
And now, detail shots!
 |
| I took a lot of closeups of the pretty pretty fabric. |
 |
Oh.. I just realized this button looks like a shooting star!
That was completely unintentional. |
 |
| One of the false buttonholes. |
 |
| One of the functional buttonholes. |
 |
A bit of water damage on one of the edges.
This doesn't show at all under the coat. |
 |
| And the piecing on the opposite edge. |
 |
| I'm rather proud of that little angled seam! |
 |
The lower back, with its fancy added strips.
The one on the left of this photo is pieced too. |
 |
Two bits of piecing on this shoulder.
A bit one on the lower corner, and a teeny tiny one on the opposite corner. |
 |
| The back lining is pieced in two places too. |
 |
| The corners on the front and back, as seen from the inside. |
 |
More piecing on the front lining!
Have I mentioned that I love piecing? |
 |
| And a closeup of the inside view of the side seam. |
That's all for now! I've finished a couple of smaller projects since this waistcoat, which I should get around to blogging about soon.
Overall I'm very pleased with how this turned out, and look forward to seeing the finished suit all together.
The 1730's breeches are not going to be finished before the new year, but at least I've started the patterning and finally dyed the wool!


 For the 25 buttons I used the smallest wooden moulds from Burnley & Trowbridge, covered them in cloth in the usual way, and sewed them on in the usual way with heavy linen thread.
 Pockets, buttonholes, and buttons all finished, it was time to line the fronts!
 I sewed down the long folded edge about 1cm in from the fold, using a spaced backstitch. I'm pretty sure this is how the one in the book was done. None of the backstitches went through to the surface - they only caught the little lining rectangles and the buckram.
 I would have put the coat on over it for a few pictures too, but these photos were taken at my parents house and the coat was at the apartment in which I now live. I moved out sometime during the buttonhole lining, which is why the work table and the camera used to take the progress photos both get worse then.

 Without initially aiming to, I happened to finish this just in time for the November HSM challenge, which was "above the belt". Being slightly above knee length I had thought it was too long to be “above the belt”, but then I saw the inspiration post for November and saw that I was taking it a bit too literally, and that it’s ok if it hangs a bit below the waist as long as it's an upper body garment.