Pages

Showing posts with label hair. Show all posts

Friday, 4 January 2019

A queue bag and another pair of pants

I've got 3 projects to post before I write up my 2018 in review and these two are simple so I'll put them in the same post.
The first is a queue bag I made for the November HSF challenge. The challenge was "Purses and Bags" and a queue bag is one of the things I need for a 1730's suit.
I didn't post this here at the time because it's so small I didn't want to give it its own post.
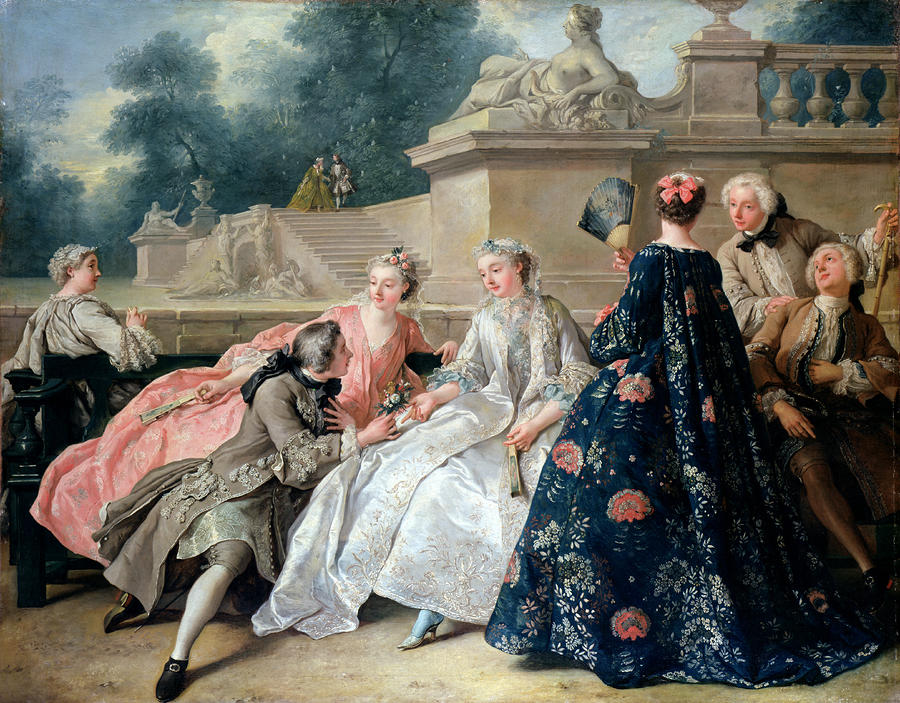
It's hard to find detailed back views of people, but thankfully “The Declaration of love” by Jean Francois de Troy, 1731 offers an excellent view of a stylish man's queue bag. (see below) It's about the size of his face, so I made mine the size of my face. There are a few extant queue bags in museums, but none as early as this one that I can find, and in any case I can't find any information on the construction particulars so I just guessed.
I used a black silk fabric from my stash and I ordered 2" and 1/2" black silk ribbon for the bow and drawstring.
I cut a rectangle of silk, sewed the sides up, turned the edges of the seam allowances in and stitched them closed (like a French seam but done in the wrong order) and then put a narrow hem on the top edges and folded them down and attached them. This left me with a drawstring channel on each top edge, so the ribbons can come out at the side seams. I then made a big floofy bow with the wide ribbon, tacked it on, and threaded the narrow ribbon through the top. When putting it on I cross the small ribbons over the top and tie them in a bow underneath the queue.
Detail from “The Declaration of love” by Jean Francois de Troy, 1731.
What the item is: A queue bag
How it fits the challenge: It is a bag
Material: Silk taffeta (or perhaps one of the better dupionis- it has a few small slubs)
Pattern: None. I cut it so it would measure 15cm by 25cm.
Year: I was aiming for 1730's, but it could easily go several decades later too.
Notions: 2" silk ribbon, 1/2" silk ribbon (less than a yard of each), silk thread
How historically accurate is it? Pretty good, I think. I don't know how exactly these things were constructed, but it's too simple to be very far off, and it's 100% silk and all hand sewn.
Hours to complete: 3
First worn: Not yet
Total cost: About $ 8 or so. I bought the ribbon, the fabric was given to me.


_______________________

There isn't much to say about these pants. I started them nearly a year ago, so they're another thing I was glad to get off of The Pile. They are nearly identical to my other pair of pants, but with a different lining and buttons.
 
 My goodness, I didn't realize these photos were so dark. Sorry about that.
I used buttons from my stash, and none of them match. 3 black shank buttons for the waistband, 2 black whatever the word is for non-shank buttons for the fall corners, and 2 dark green shank buttons for the pockets because I didn't have a pair of suitable black ones and am trying to use up the buttons I have in small amounts.
The lining is brown cotton print, and the waistband lining is off white cotton twill. I used black for the pocket bags this time so they won't show like the other ones do. They took 13 hours.
My last project of 2018 was a pair of gloves, which I will post soon.

Wednesday, 15 November 2017

Two linen shirts (and some Halloween photos)

I have two new linen shirts that I have not posted yet, my goodness!

I finished this first shirt months ago, and have not posted it yet because I've been meaning to add lace ruffles to it, but since I haven't done that yet I may as well post it now. (I also realized that my old off-white lace might lighten up with some careful washing, and so may be better suited to a white shirt than an off-white one.)

I started it about 3 years ago, so it's another item off the Unfinished Things pile!
I only found one construction photo, but that's ok
because the construction is the same as usual.
It's made of a cream coloured linen, and it's somewhat heavier than both my other linen shirts.
It's completely hand sewn, making it the second hand sewn linen shirt I've done.
The thread buttons are ones I made around the time I started the shirt, and they're a bit smaller than I'd make them today. Two on the collar and two on each cuff.
It fits pretty well, but the collar was cut a bit too tight, and the cuff pieces are perhaps a bit too long.
The second shirt I finished a week ago, and it was also an unfinished thing from about 3 years ago. So unfinished, in fact, that I had been keeping it in my linen drawer instead of in my Unfinished Things box.

It started off as a pale purple linen, which for some reason I cut out and decided to make a shirt out of. After sewing the shoulder seams and one side of one neck gusset I realized that it was a terrible colour for a shirt, and it would not suit me at all.


Mama offered to take it to school and dunk it in the Indigo vat that happened to be set up at the time (They do them once a year for the natural dye class) and I agreed. After it was dyed, I put it in a bag and put the bag in my linen stash, and there it remained until two weeks ago when I dug it out and finished it.
 Most of the smaller pieces got lost somewhere along the way (probably frayed too much from all the dyeing and rinsing) but thankfully Mama also dyed the remaining bit of linen, so I was able to re-cut them.
 It's mostly machine sewed, with hand finishing on the insides of the cuffs & collar, as well as the underarm gusset and shoulder seam finishes. All the sewing is with silk thread.
This bit is rather awkward to fit under a sewing machine,
so it's easier to finish these little seams by hand.

As with the other shirt, they are rather smaller than I'd prefer to make them today.
 My buttonholes are done by hand as well, and the buttons are ones I made several years ago. I think the linen thread I used for them was dyed indigo at the same time, but I'm not sure.
 I used three buttons on the collar, and two on each cuff, and I have one left over because apparently I thought I needed 8 buttons when I made them.
It's a nice soft shirt and I am pleased with it! The dye job is mottled, but in a nice and even sort of way, and you can't see any of the original purple.
 I am rather less pleased with Indigo's tendency to rub off and turn everything blue. After a day of wearing it I discovered that my torso and arms were slightly blue tinted, and that the waistband of my pants, my underwear, and the lining around the armhole of my grey waistcoat were even more so!
I'm sure it'll improve after some more washings though.

A shitty dinosaur to illustrate what happened.

 Update: After a thorough washing during which it turned 3 sinkfulls of water very blue, the shirt does not leave any visible blue spots on me! It still rubs off a bit though. I did some hand sewing with white thread and it became pale blue thread.

And here are some pictures of me on Halloween!
This was my second attempt at doing 18th century hair, and I think it turned out okay. I definitely need more practice. I'm not at all sure how to do the side curls while still having the front look so swept back like it is in the portraits.
I also wore some excellent 18th century makeup from LBCC Historical. I shall have to make some more earlier garments to better go with it, as it's just doesn't fit well with the 1780's - 90's.

Here is a picture of me at a post-Halloween party on November 3rd, with slightly disheveled hair.


 And some photos from the same day when I tried on a different waistcoat.

And here's my first attempt at 18th century hair & makeup from some weeks earlier. The pictures turned out rather good!


I still don't know what I'm supposed to do with the top front section,
and there are some stray wisps of hair, but I am pleased with the curls!
 I have some other photos from this summer of me wearing historical clothes, so perhaps I should post those here sometime too.
And that's all for now! Hopefully I'll finish more shirts soon. I have recently made HUGE improvements to my sleep schedule, so I am getting more done now!

Friday, 23 August 2013

Making Hair Rats

In order to properly wear my ridiculous hat, I require a new rat.
I had saved up enough hair to fill my hair receiver, plus a small bag, so I thought there would be enough.
First, I suppose I should warn the people who are squeamish about this sort of thing. There are lots of pictures of clumps of hair in this post.
Personally, I shall never understand why anyone would find hair to be "gross" the minute it detaches itself from the scalp, but some people do and I have warned them in bold letters.

Hair receiver, having received several weeks worth of hair.

All the clumps, before washing.
I washed the clumps with shampoo. It did not turn out well. Maybe the water wasn't cold enough or maybe I agitated them too much. Whatever the reason, they felted slightly.
All the hairs are tangled up and matted.
It was very difficult to pull the clumps apart and fluff them up enough to get suitable rat materials.
A fluffed up clump. Still a bit snarled and matted in some places.
I wanted a big C shaped rat to go around the back of my head, which will hopefully help create a hedgehog. I started wrapping the hair around and around, making sure to put the pieces containing the most purple bathrobe fuzz on first so they would end up in the middle.
The beginnings of a C shaped rat.
I kept on fluffing up the clumps and wrapping them around the rat.
Fluffed up clumps on the left, not fluffed yet clumps on the top, and the end of the in-progress rat on the right.
I tried to stretch the bits of fuzz into longer shapes so that they would be easier to wrap around.
After about half the hair was added the rat looked awful. It wasn't wrapped quite as tightly as it should have been and the hairs were not holding on very well. It was lacking structural integrity.
A disappointing rat in progress.
After adding all the washed hair, the rat was a nice size and shape, but still not holding together well. I tried poking it with a felting needle, but it didn't help.
Thankfully, it was several weeks ago that I washed the hair clumps and I had accumulated a bit more hair since then. I found these unwashed clumps extremely easy to pull apart.
Wispy bits of hair!
I fluffed all of these clumps out.
And I wrapped them all around the rat. It was a definite improvement, but I didn't have enough clumps.
Before making this rat I had made 5 others and it hadn't occurred to me to wash the hair for any of them.
All of my rats.
You can really see the difference in texture. The earlier rats are very smooth and they hold together wonderfully. The newest rat is horribly scruffy looking. I will add more layers of unwashed hair as I accumulate them.
It seems that slightly greasy hair makes much better rats. It's probably more historically accurate too.
The unwashed hair rat on the left, the washed hair rat on the right.
I'm not sure where I will store this new rat. The other 5 hang from a shelf in a brown string bag I made, but this rat won't fit in there. Perhaps I will keep it in a box.
5 rats in a string bag.

Tuesday, 28 May 2013

Hair Reciever

What are hair receivers?
They are exactly what they sound like, they are things that receive hair.
You don't see them much nowadays (actually I have no idea if anybody else in this century is using one), but they were widely used in the 19th and early 20th centuries. Hair receivers are the pottery vessels into which ladies would deposit the clumps of hair from their brushes. These clumps would then be rolled into rats, which were used to puff up hairdos.
When I heard about hair receivers I thought they sounded very useful. I had been collecting my hair in a jar for quite some time and it didn't hold very much. My father was taking a pottery course for his sabbatical, so I got him to throw a hair receiver, which I then decorated. He is quite good at pottery and says he will start a website sometime, but he hasn't yet, so I can't leave a link to any such thing.

The top of the receiver, after decorating but before glazing.
I drew all over it with a thing called an "under-glaze pencil", which is a pencil that won't burn off in the kiln. My design is not remotely historical. There are 3 rat skulls on the lid, and 3 rats around the sides of the receiver. They look sort of like mice, but since it's a hair receiver they are rats. Rats and mice don't look all that different anyways.
Rat 1.

Rat 2.

Rat 3.
I made the third one a Borg. It's based on the drawing that I cropped my profile picture from.

A close up of one of the rat skulls.
The other stuff around the receiver is rose vines.

It took hours and hours of drawing, and a lot of pencil sharpening, but I finished it. Then Papa had to glaze it. There were several clear glazes to choose from, so several test tiles were fired with the different glazes to see how the pencil reacted to them. I drew Homunculi on the tiles.

Envy, Pride, and the second Greed.
The results were rather dissappointing.
Nooo! My favorite Homunculus has melted into a smudge.
He ended up using a different glaze, which still caused a bit of blurring.
The finished hair receiver.

The Rat Borg came out very light.

The other two rats were darker though.

The rat skulls were also lightened.
While the pencil lines aren't as dark as I had hoped, I am happy with how the receiver turned out.

The hole in the lid is for stuffing the hair through. It is the best way to collect hair, the receiver does a very good job of containing the clumps, which are terribly difficult to stuff into jars.
Since I have been saving hair clumps for a long time, I had more than a receiver full when the receiver was finished. I'm keeping it in a bag now, but I will make rats out of it soon, and then I'll write a post on rat making.