Pages

Showing posts with label at home wear. Show all posts

Sunday, 26 October 2025

Lightweight Cotton Wrapper

I'd been wanting to make an 18th century style wrapper for ages. I had made a wearable mockup in 2023, but didn't have any stash fabrics I wanted to use for the next attempt.
But earlier this year I came across a great fabric for it - not historically accurate, but well suited to a more fantastical version of a wrapper. It was a 100% cotton duvet cover from the thrift store, with a digital print of a foggy evergreen forest, with a dark green lining.
I'd never really considered duvet covers as a fabric source before (despite having seen other people make clothes out of them) because I don't like duvets and never think about them, but I saw a bit of that tree print sticking out as I walked by and it caught my attention. Very convenient how they come with a co-ordinating lining in the same size!

I don’t remember what the size was because I threw out the tag when I first bought it and took it apart, but the resulting fabric panels were each 2.54 metres by 2.15 metres. There was piping around the edge and I saved the cord from that.

This style of simple T shaped wrapper was popular through the entire 18th century, and was an informal "undress" garment for wearing at home. From what I've seen in portraits they appear to have been cut larger in the late 17th and early to mid 18th century, and tighter towards the end of the century.
A lot of sources call them banyans, but from what I understand it's the more fitted ones are banyans and these loose ones are wrappers? Unsure. I have a pinterest board with many examples of both though.
c. 1735-40, The Met.
(Though The Met is not good at dating clothing.)
I came across this pattern diagram years ago on pinterest and couldn't find the source, but then eventually someone on tumblr identified it and found a log of the website it came from on the internet archive.
(source)
It says the images originally came from a book called Histoire du Costume, Volume 10, 1678-1725 by Maurice Leloir. The book text isn't on the website page, only the pictures and captions.
I'm ignoring those two centre front extension bits and just doing the basic tunic shape with a simpler collar style.

Since this kind of pattern is very large and mostly straight lines I didn't make a paper pattern, I just measured and drew the lines on the fabric.
The mockup I'd made a couple years before was a bit smaller than I wanted, but it still fit, so I made the sleeves and upper body a bit looser. 
Here's my very messy sheet of measurements. 
I made the sleeves extra long because I wanted wide turned up cuffs. The underarm area is a bit rounded instead of being a sharp angle, which adds some more room in a similar way to gussets.

I cut out the lining all in one piece, folded at what will be the top and centre front so it's all symmetrical.

I trimmed the bottom edge to be rounded so the corners where it meets the side piece were at right angles, which is important to keep the hem smooth and even. 

Before cutting the outer layer I had to change the tree fabric around a bit. The print was arranged landscape style on the rectangular piece of fabric, which meant I couldn't cut it all in one piece. 
It was also much wider than the length of the wrapper pattern. 
I figured out roughly where I wanted it to be placed in order to best capture the tree gradient, and tore the excess strip off the light edge of the fabric.
I cut the remaining piece in half width-wise, sewed the two light edges together, and trimmed and pressed open that seam.
I now had a rectangle of fabric from which to cut the outer body as one with the trees growing in the proper direction on both the front and back.
It took a lot of fussing to get the lining piece lined up, and as you can see it's slanted because I lined the top fold up with the seam. The grainline must have been a little bit off.
I cut that out using the lining as the pattern, and cut open the centre front up to the seam.
On that top bit I cut in a little ways on either side to make it a T shaped opening, just like I do for my shirts.
Since the tree pieces were too narrow to get the full sleeves in, I pieced on the rest with that strip I'd torn off the top.
I sewed the side seams on both the outer and lining pieces, clipping the inward curve under the arm.
Then I pinned and sewed the entire outer edge right sides together, excluding the cuffs and collar opening. This took quite a while.
I turned it right sides out and pressed that big long seam open, and then into a flat edge.
The sleeve ends were pulled out through the neck hole one at a time and also sewn right sides together.
The collar is a rectangle shoved into the top part of the T shaped opening. You can see the same kind of collar fairly well on this blue damask wrapper in the V&A if you zoom in on the pictures.

Inserting the collar is the one thing I wish I'd done a bit differently. I should have made it in 2 pieces with a seam along the top. Not because I care much if the inner half matches the lining, but because the fabric is thin and a seam there would have added more stability. 
As it is I ended up sticking a scrap of cotton twill tape in there to give it more structure. I also wish I hadn't machine sewn the first edge in, because the corners didn't line up with the seam along the top. I could have lined them up more easily if I'd done it by hand, and it wouldn't have taken very much longer.
 But alas, I machine sewed it on and folded in and whipstitched the rest of the edges.
When I first tried it on the turned up cuffs started to slip down immediately. I don't think this would be as likely to happen with a stiff silk or wool, but this soft cotton doesn't have the structure to hold itself up. I considered pinning them up with little safety pins, but then remembered I have a pair of inherited blue-green rhinestone brooches. 
I stuck them on the cuffs and they're holding them up nicely. Unfortunately they do hang down in front, which causes them to smack into things sometimes, but if I get too annoyed someday I can replace them. If I do that it'll probably be with hooks & bars, or maybe snaps. 
I did consider tacking them up, but that would make washing and ironing more annoying. Not that this will need washing very often at all, but still.
Because of the wonky angle the sleeve piecing is very asymmetrical, but that's ok. The left cuff mostly covers up the most obvious part of it.
I'm very happy with the fit, and I love the colours.
Cutting the lining all in one made it shorter than it could have been if I'd cut the lining in the same way as the outer, but thankfully it's still a good length. A few cm longer would have been nice too, but I could have easily made it too long, which would be treacherous for walking up stairs.


Someday I'll make another one in a more 18th century appropriate fabric.

Tuesday, 10 October 2023

1830's Patchwork Dressing Gown (+Video)

 At long last, my patchwork dressing gown is finished, and so is the video about making it! 

I finished the dressing gown itself on May 11th, but the video took a bit longer. (Especially since I avoided it for a few weeks before starting to edit the 700+ clips.) 
I'm not sure when I started it, but the earliest progress photo I posted is from April 2019, so it was on The Pile for at least 4 years. 

I filmed every step of the construction, and ended up with a video that's an hour and 13 minutes long.

I photographed some of the construction too, but I'm afraid I forgot to a lot of the time, since I was busy filming, so the coverage in this blog post won't be anywhere near as thorough as it is in the video. Which is fine, because I say well over 11,000 words in that video, and frankly I'm pretty tired of writing about it and want to work on other things. If I didn't mention or show something in this post, then it's probably in the video.

The inspiration is this delightiful c. 1835 dressing gown from the MAAS collection.

It appears to be made entirely of silk - you can see little bits of fashionable dress and waistcoat silks in there, and some re-used bits of 18th century damask. It predates the sewing machine, so it's entirely hand sewn.
You can see the little whipstitches in between the edges of all the triangles, so I think it's done with English paper piecing.

I emailed the museum with a few questions, and they sent me photos of the inside! (And a form to fill out to get permission to use the website's photos in this video & blog post, because I asked about that too.)
I learned that it's lined in dark green silk taffeta (interestingly, the same colour lining as this very thoroughly photographed dressing gown) and that it has a pair of tabs inside the front (similar to this one from The Met).
The white tape isn't original, it's to keep it more stable on display.

And the velvet that looked black on the website pictures looks green in these ones!

The buttons are covered in a different fabric, with a basket weave sort of texture.
I drew up a diagram of the pattern on graph paper as best I could by following the lines of the grid formed by the triangles, and drafted my pattern based on that, plus the 1830's coat pattern on paged 126-127 of The Cut of Men's Clothes, which is quite similar. 
I left out the centre front seam on my pattern though, as it's not necessary here and would just be making the front even more bulky. I also made the front overlap a bit higher so I could give it 3 functional buttonholes, rather than the 1 that the original has, and rounded the ends of the lapels a bit more.
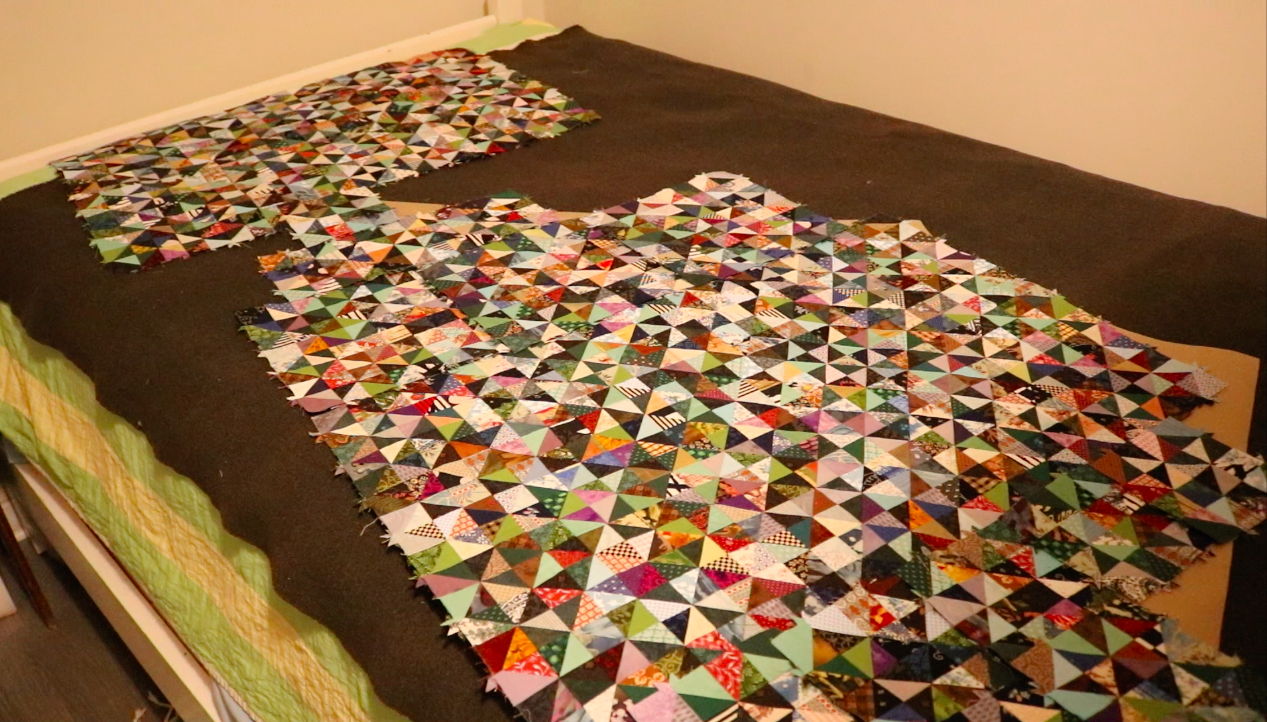
I'm not fond of using rotary cutters unless it's absolutely necessary, but it certainly was for this project. I ironed my cotton scraps and then cut them into 5.4 cm squares, and then diagonally into triangles. I had wanted to use up more of my garment scraps for this, but a lot of those are either too thick or too thin & shifty, so I ended up using mostly using quilting cotton. I have some silk taffeta in there too, but it was difficult to cut with the rotary cutter and kept getting stuck in the mat. I tried to keep track of how many different fabrics I used, and it's about 222, but I got a little mixed up and can't be certain if that's accurate.
I cut my triangles in batches of a few hundred at a time, and counted as I went. In between working on it I kept them in a large biscuit tin.
I ran the triangles through the machine one after another on a very small stitch length, using a 7mm seam allowance. Lining up the pairs beforehand and stacking them up next to the machine made this go a lot faster.
I sewed the squares of 2 into rectangles of 4, and those into squares of 8, and those into rectangles, etc. I stuck a piece of tape to the machine throat plate so I could get a consistent 7mm seam allowance, and for the first few steps I didn't use pins. 
After I'd sewed together the first smallish chunk of patchwork I was able to measure it, measure my pattern, and work out from that approximately how many triangles I'd need. I calculated I'd need 6,151, and decided to aim for 6,160.
I alternated the cutting and sewing tasks. Since there were so very many pieces I didn't have to wait until I had all of them cut out. Eventually I passed my estimated number, having cut out 6,332, but I came up short when piecing together the sleeves and ended up having to cut 625 more.
I didn't want any of the same fabric touching edge to edge, and wanted the pattern to be very mixed up. I realized that by matching up triangles that I thought looked nice together I was just doing the same colour combinations over and over. I switched to a method where I'd lay all my different triangles on the table with each fabric in its own stack, and I'd take one pile and lay a triangle on top of each of the other piles until it ran out, so that I could pair the fabric with as many others as possible.
The first two pieces I assembled were the back skirt panels, which was before I started making videos, so they didn't get filmed.
I built up my pieces one by one, putting large squares and rectangles together until I had a chunk of patchwork big enough to cover the pattern piece. Then I'd trace the pattern piece and cut it out, and re-use the offcuts in the edges of the next piece.
I really enjoyed working on the patchwork. It was probably the most absorbing thing I've ever worked on.
There are blocks of time in my timesheet that are more than 5 hours, because it was just that hard to tear myself away from it. It's so nice watching all the colours go together and the squares build up. So nice. I could not make myself work on anything else while the patchwork was out on the table, which is why it took so long to finish.
I would get out the patchwork and plug away at it for several days, doing terrible damage to my already awful sleep schedule, and then I'd put it away again and forget about it for a month or several. One time I actually stayed up until sunrise working on it, but I was unemployed at the time so it was ok.


All the seam allowances made the wrong side of the fabric much too bumpy to neatly trace an outline, so I traced the pattern pieces onto the right side, and basted over them with old yellow cotton thread so they'd be visible from both sides.


Once I had all the main pieces assembled and cut out, I added a layer of cotton flannel interlining to all of them. Partly to add more warmth, partly to help keep all those sea allowances pressed flat, and partly to smooth out the bumpiness a bit. The areas where 8 triangle corners meet are extremely bulky. I tacked the flannel down to each of those intersections with a couple of stitches in grey silk thread.
I left the flannel out of the lapels, but ended up going back and adding some later.
I cut my lining out of green & black shot silk taffeta, which is pretty similar in colour to the original lining. I got it from puresilks, but it's nearly doubled in price since I bought it a few years ago, so I think if I were to need more of a similar colour I'd get this one from silkbaron.

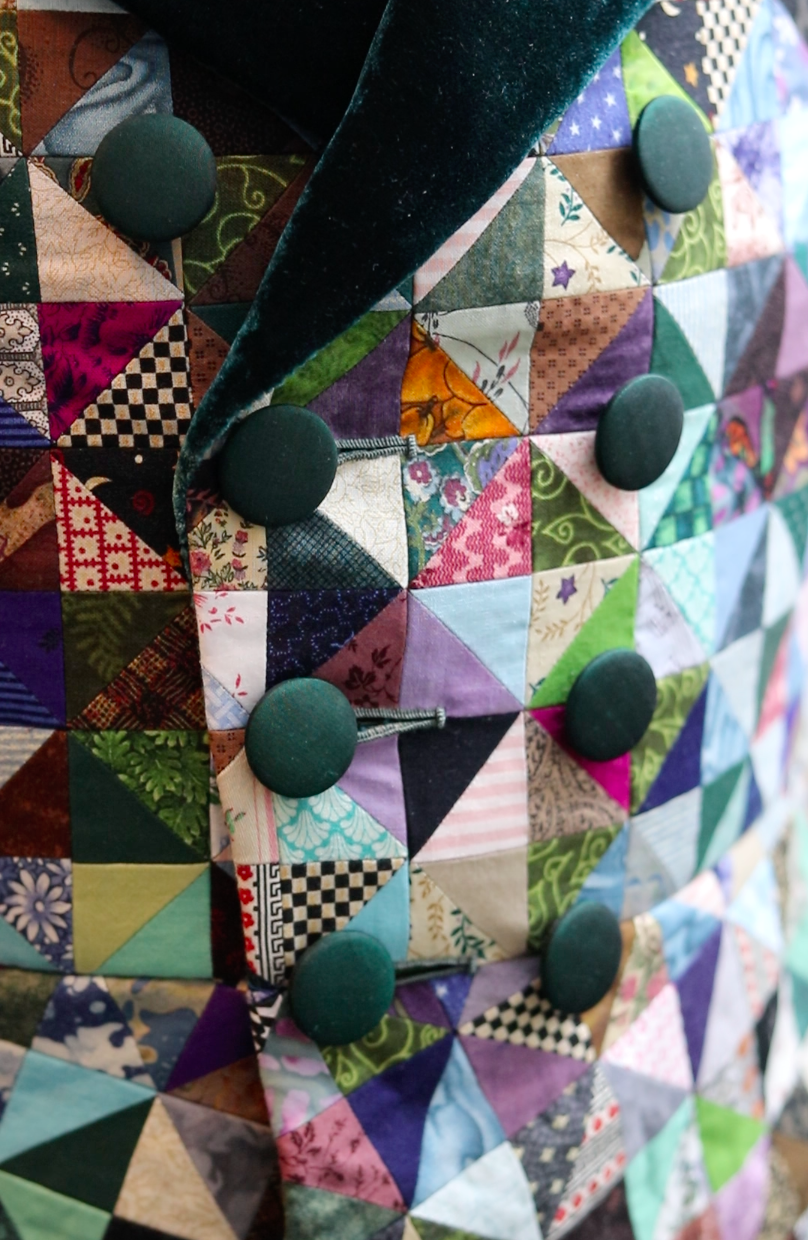
The facings, collar, & cuffs are a silk/rayon velvet that had been in my stash since dye class in college. I loved the dye sample we did for this colour so much that I dyed a little under half a metre of velvet with it, even though I didn't know what I'd do with it yet, and it turns out it was just the right amount and colour for this! It was PRO MX fiber reactive dye in the colour Marine at 4%.
I used a lot of odd flannel scraps for the interlining. Thin ones in the sleeves, medium ones in the skirts, and a heavier one in the bodice.
I sewed up the sleeves first. I used heavy black linen thread and did a backstitch in the areas where the patchwork was thinner, and a stab stitch in the bulkier parts. Afterwards I pressed the seam allowances open and tacked down the edges with a herringbone stitch, using more of that grey silk thread. (It's from my mother's weaving stash, so I have a very large amount of it and use it for lots of things.)
The sleeves were stiff enough to stand up on their own.
I sewed the sleeve lining pieces together by machine, and had to re-do the lower part of one of the seams, because the bulk of the sleeve meant that the lining was a bit too small. 
I backstitched the velvet cuff pieces together, tacked the bottom edge to the inside of the sleeve end, and slipstitched the top edge onto the sleeve, before putting the lining in.

I seem to have completely forgotten to photograph the pad stitching, oh dear. I had to redo it several times, but in the end it finally turned out good, and after that I sewed the front and back pieces together. Again, with backstitching or stab stitching, depending on the thickness.
I used collar canvas in the lapels, as well as the collar, because hair canvas would probably not have been stiff enough for such bulky material. I did modern pad stitching because the early 19th century version is much more awkward and difficult.
I was delighted to find that two blue triangles happened to match up almost perfectly across one of the side seams! I didn't plan that at all.
After sewing down tape to the edge of the lapel and then folding in the seam allowances over that, it was very bulky along the edges, so I added another layer of flannel on top so the velvet would have a smooth surface to lie on.
In hindsight I probably could have just added a little folded bit of flannel around the edge to smooth out the difference in thickness.
I added a folded strip of buckram to reinforce the area where the buttons go. I sewed down the top part first, and the lower bit for the last button much later, after the waist seam was finished.
I sewed on the decorative buttons, then carefully basted and stitched the velvet facing on. I'd sewn the facing to the front lining a while earlier. Then I sewed the 2 functional buttonholes in the front - the 3rd will go in the waist seam later. After that I marked out the locations of the buttons on the other side and sewed them on, and then added the velvet to that side too.
This was my first time using silk buttonhole twist, and I really ought to get some more of it and use it for my nicer things. For some reason I'm much much worse at letting myself spend money on thread than I am with fabric.
I used my eyelet hole punch to make the holes at the ends, since there was no way I'd be able to clip neatly through that many layers with shears.
I covered the buttons in the same silk as the lining.

For the interior tabs I covered squares of buckram in velvet and sewed the lining onto the back, the same way I usually do with 18th century waistcoats and such.
I made the pockets out of tightly woven cotton and added a silk facing to the edges near the opening.
I machine sewed them down to each of the skirt panels, and hand sewed the skirt side/back seams. The skirt is still in two halves, because it has a vent at the centre back.
After sewing these seams I also pressed them open and tacked down the edges as usual.

I basted on the linings for each skirt half, and sewed them down along the edges, except for the top bit.

Here's a picture of all the separate pieces before the final assembly. This isn't the order the original was sewn in, but I wanted to keep things separate for as long as possible, since they're so bulky and cumbersome.
I sewed the centre back & shoulder seams, then the waist seam, and then added the back lining. On my 18th century things I do that last, but with this it seemed best to do it before the collar and sleeves.
I seem to have forgotten to photograph all of this.
I did 2 rows of gathering stitches along the sleeve heads with heavy duty thread, basted them in to check the fit, and then sewed them in more securely. It was a lot of layers to go through, even with the edges of the flannel being trimmed back.
Unlike the 18th century sleeves I'm used to, on these ones the seam allowances all get pressed out into the sleeve.
The collar is pad stitched with a layer of cotton flannel in between the silk and the collar canvas. I very carefully whipstitched/stabstitched the collar onto the bodice, and then draped the velvet over it, basted it a whole lot, and slipstitched the edges down.


Finished! 
I'm very happy with it! I do have some little complains & things that could have been better (as I discuss in the video) but overall I think it turned out great!
It fits well and is comfortable, though it is quite stiff and I can't slouch when wearing it.
It's not as warm as I expected. It's only a little bit warmer than my linen toile practice version, which is quite surprising considering the amount of material in it. But that's ok, it means it's wearable for a larger portion of the year.

The little interior tabs don't really do much, and I don't think it looks very good with them buttoned and the outer buttons not. I think these might have been more practical on the original because it only has one functional button on the outside, while mine has 3.


I haven't got any other 1830's thing to wear with it, but that's ok.