Pages

Monday 13 November 2023

Buttonhole Tutorial (+Video)

Since I've made videos on thread covered and fabric covered buttons, and sleeve links, it's time I made a buttonhole video too.
In this blog post I've written out the instructions for a basic buttonhole (which I first posted here on tumblr) but the video has some more variations, as well as more advice on measuring and marking. 

Mark your line, a bit longer than your button is wide. 
I usually use a graphite mechanical pencil on light fabrics, and a light coloured pencil crayon on dark ones. Sometimes I use a waterproof drawing pen on light fabrics. (I have fabric pencils too, but they’re much softer and leave a thicker line.)
It's a good idea to baste the layers together around all the marked buttonholes, especially if you’re working on something big and the layers are shifty and slippery. I’m not basting here because this is just a pants placket.
Do a little running stitch, or perhaps a running backstitch, in fine (preferably silk) thread around the line at the width you want the finished buttonhole to be. This holds the layers of fabric together and acts as a nice little guide for when you do the buttonhole stitches.
Cut along the marked line using a buttonhole cutter, or a woodworking chisel. Glossy magazines are the best surface to put underneath your work as you push down, and you can give it a little tap with a rubber mallet if it’s not going through all the way.
I’m aware that there are some people who cut their buttonholes open using seam rippers, and if any of them are reading this please know that that is abhorrent behaviour and I need you to stop it immediately. Stop it.

Go get a buttonhole cutter for 10 bucks and your life will be better for it. Or go to the nearest hardware store and get a little woodworking chisel. This includes machine buttonholes, use the buttonhole cutter on them too. (Or get a pair of buttonhole scissors if you're feeling fancy.) 
If you continue to cut open buttonholes with a seam ripper after reading this you are personally responsible for at least 3 of the grey hairs on my head.

Do a whipstitch around the cut edges, to help prevent fraying while you work and to keep all those threads out of the way. (For my everyday shirts I usually do a machine buttonhole instead of this step, and then just hand stitch over it, because it’s a bit faster and a lot sturdier on the thin fabrics.)
I like to mark out my button locations at this point, because I can mark them through the holes without the buttonhole stitches getting in the way.

For the actual buttonhole stitches it’s really nice if you have silk buttonhole twist, but I usually use those little balls of DMC cotton pearl/perle because it’s cheap and a good weight. NOT stranded embroidery floss, no separate strands! It’s got to be one smooth twisted thing!

Here’s a comparison pic between silk buttonhole twist (left) and cotton pearl (right). Both can make nice looking buttonholes, but the silk is a bit nicer to work with and the knots line up more smoothly.
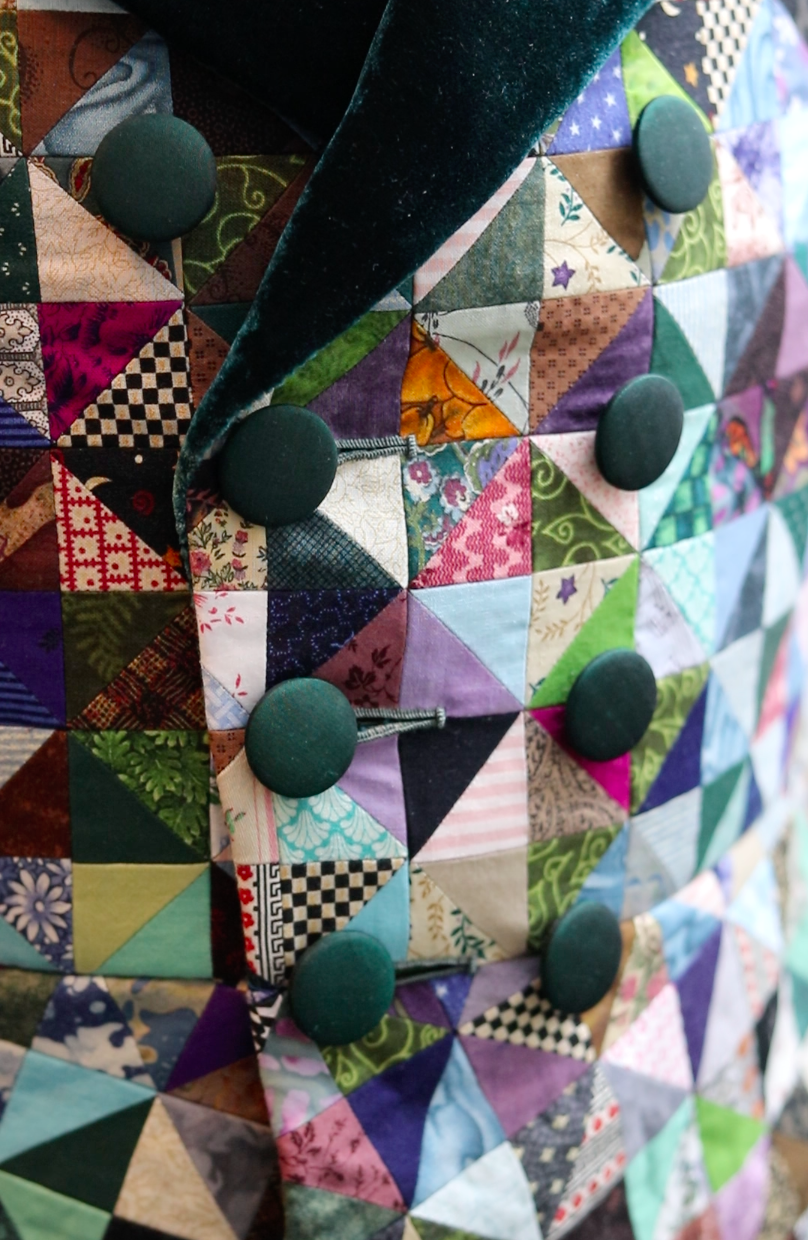
I’ve actually only used the silk for one garment ever (my patchwork dressing gown) but am going to try to do it more often on my nicer things. I find the cotton holds up well enough to daily wear though, despite being not ideal. The buttonholes are never the first part of my garments to wear out.

I cut a piece of thread about one arm’s length more or less, depending on the size of buttonhole. For any hole longer than about 4 cm I use 2 threads, one to do each side, because the end gets very frayed and scruffy by the time you’ve put it through the fabric that many times. And because a very long thread is a lot more cumbersome to work with.

I wax about 2cm of the tip (Not the entire thread. I wax the outlining/overcasting thread but not the buttonhole thread itself.) to make it stick in the fabric better when I start off the thread.
I don’t tie it, I just do a couple of stabstitches or backstitches and it holds well. (I’m generally very thorough with tying off my threads when it comes to hand sewing, but a buttonhole is basically a long row of knots, so it’s pretty sturdy.)
Put the needle through underneath, with the tip coming up right along that little outline you sewed earlier. And I personally like to take the ends that are already in my hand and wrap them around the tip of the needle like so, but a lot of people loop the other end up around the other way, so here’s a link to a buttonhole video with that method. Try both and see which one you prefer, the resulting stitch is the same either way.

Sometimes I can pull the thread from the end near the needle and have the stitch look nice, but often I grab it closer to the base and give it a little wiggle to nestle it into place. This is more necessary with the cotton than it is with silk.

The knot should be on top of the cut edge of the fabric, not in front of it.
You can put your stitches further apart than I do if you want, they’ll still work if they’ve got little gaps in between them.

Keep going up that edge and when you get to the end you can either flip immediately to the other side and start back down again, or you can do a bar tack. (You can also fan out the stitches around the end if you want, but I don’t like to anymore because I think the rectangular ends look nicer, and the ends ought to be rectangular if you're going for an 18th century look.)

Here’s a bar tack vs. no bar tack sample. They make it look so nice and sharp, and they reinforce the ends.
For a bar tack do a few long stitches across the entire end.
And then do buttonhole stitches on top of those long stitches. I also like to snag a tiny bit of the fabric underneath, which is sometimes tricky to do if the fabric is lying flat, so I often fold it along the bar tack line. 
Then stick the needle down into the fabric right where you ended that last stitch on the corner of the bar tack, so you don’t pull that corner out of shape, and then just go back to making buttonhole stitches down the other side.
Then do the second bar tack once you get back to the end.
To finish off my thread I make it sticky with a bit more beeswax, waxing it as close to the fabric as I can get, and then bring it through to the back and pull it underneath the stitches down one side and trim it off. Or maybe wax it after bringing it to the back, if it's silk and you're worried about getting wax marks on the front.

In my experience it stays put perfectly well this way without tying it off.

Hooray! Beautiful buttonholes! I suggest doing samples for practice before doing them on a garment.

Here are all the extant garments I showed in the video.
c. 1730's waistcoat, Cooper Hewitt collection.

c. 1760's coat, The Met.

Woman's jacket, late 18th century, The Met.

c. 1775-90 waistcoat, Cooper Hewitt collection.

c. 1740 breeches, The Met.

c. 1785-1800 breeches, The Met.
(They do have bar tacks, they're just very small.)

c. 1720's coat, The Met.
To my great shame, I forgot to label the top buttonhole on the centre front as functional when I included this image in the video.


c. 1755-65 coat, V&A.

c. 1760 woman's riding coat, The Met.

Late 18th century coat, The Met.

c. 1770-90 waistcoat, The Met.

And the inside facing.

c. 1770's waistcoat (part of a formal suit.)
Royal Ontario Museum.
And some which I didn't include in the video. 
Here's one of the only photos I've seen of the pieced lining method. (The other 3 are in the book Waistcoats: From the Hopkins Collection.) I'm sure there are plenty more garments with this lining method out there, it's just that we almost never get photos of the insides.
Waistcoat fronts, c. 1726-35, National Trust.
Not a very high resolution photo, but you can just barely see the piecing & little flap.
And the one example I've seen of bound buttonholes on an 18th century coat.
c. 1780's. Sold on ebay.
It looks to me like they cut the holes and bound them with strips of fabric, like the edges of stays, but I haven't tried a sample of this yet.

Bound buttonholes appear to have been pretty common on leather breeches, but these ones look different from the ones on the coat - like they sewed a little scrap to the outside in a rectangle, then cut the hole in the middle of the rectangle of stitching and turned the scrap to the inside and sewed it down.
c. 1790's, The Met.
This blog post about a recreation pair of leather breeches from Williamsburg has a nice view of the inside of one of these buttonholes.
Ok, I think that's it! I hope this was useful!

Tuesday 10 October 2023

1830's Patchwork Dressing Gown (+Video)

 At long last, my patchwork dressing gown is finished, and so is the video about making it! 

I finished the dressing gown itself on May 11th, but the video took a bit longer. (Especially since I avoided it for a few weeks before starting to edit the 700+ clips.) 
I'm not sure when I started it, but the earliest progress photo I posted is from April 2019, so it was on The Pile for at least 4 years. 

I filmed every step of the construction, and ended up with a video that's an hour and 13 minutes long.

I photographed some of the construction too, but I'm afraid I forgot to a lot of the time, since I was busy filming, so the coverage in this blog post won't be anywhere near as thorough as it is in the video. Which is fine, because I say well over 11,000 words in that video, and frankly I'm pretty tired of writing about it and want to work on other things. If I didn't mention or show something in this post, then it's probably in the video.

The inspiration is this delightiful c. 1835 dressing gown from the MAAS collection.

It appears to be made entirely of silk - you can see little bits of fashionable dress and waistcoat silks in there, and some re-used bits of 18th century damask. It predates the sewing machine, so it's entirely hand sewn.
You can see the little whipstitches in between the edges of all the triangles, so I think it's done with English paper piecing.

I emailed the museum with a few questions, and they sent me photos of the inside! (And a form to fill out to get permission to use the website's photos in this video & blog post, because I asked about that too.)
I learned that it's lined in dark green silk taffeta (interestingly, the same colour lining as this very thoroughly photographed dressing gown) and that it has a pair of tabs inside the front (similar to this one from The Met).
The white tape isn't original, it's to keep it more stable on display.

And the velvet that looked black on the website pictures looks green in these ones!

The buttons are covered in a different fabric, with a basket weave sort of texture.
I drew up a diagram of the pattern on graph paper as best I could by following the lines of the grid formed by the triangles, and drafted my pattern based on that, plus the 1830's coat pattern on paged 126-127 of The Cut of Men's Clothes, which is quite similar. 
I left out the centre front seam on my pattern though, as it's not necessary here and would just be making the front even more bulky. I also made the front overlap a bit higher so I could give it 3 functional buttonholes, rather than the 1 that the original has, and rounded the ends of the lapels a bit more.
I'm not fond of using rotary cutters unless it's absolutely necessary, but it certainly was for this project. I ironed my cotton scraps and then cut them into 5.4 cm squares, and then diagonally into triangles. I had wanted to use up more of my garment scraps for this, but a lot of those are either too thick or too thin & shifty, so I ended up using mostly using quilting cotton. I have some silk taffeta in there too, but it was difficult to cut with the rotary cutter and kept getting stuck in the mat. I tried to keep track of how many different fabrics I used, and it's about 222, but I got a little mixed up and can't be certain if that's accurate.
I cut my triangles in batches of a few hundred at a time, and counted as I went. In between working on it I kept them in a large biscuit tin.
I ran the triangles through the machine one after another on a very small stitch length, using a 7mm seam allowance. Lining up the pairs beforehand and stacking them up next to the machine made this go a lot faster.
I sewed the squares of 2 into rectangles of 4, and those into squares of 8, and those into rectangles, etc. I stuck a piece of tape to the machine throat plate so I could get a consistent 7mm seam allowance, and for the first few steps I didn't use pins. 
After I'd sewed together the first smallish chunk of patchwork I was able to measure it, measure my pattern, and work out from that approximately how many triangles I'd need. I calculated I'd need 6,151, and decided to aim for 6,160.
I alternated the cutting and sewing tasks. Since there were so very many pieces I didn't have to wait until I had all of them cut out. Eventually I passed my estimated number, having cut out 6,332, but I came up short when piecing together the sleeves and ended up having to cut 625 more.
I didn't want any of the same fabric touching edge to edge, and wanted the pattern to be very mixed up. I realized that by matching up triangles that I thought looked nice together I was just doing the same colour combinations over and over. I switched to a method where I'd lay all my different triangles on the table with each fabric in its own stack, and I'd take one pile and lay a triangle on top of each of the other piles until it ran out, so that I could pair the fabric with as many others as possible.
The first two pieces I assembled were the back skirt panels, which was before I started making videos, so they didn't get filmed.
I built up my pieces one by one, putting large squares and rectangles together until I had a chunk of patchwork big enough to cover the pattern piece. Then I'd trace the pattern piece and cut it out, and re-use the offcuts in the edges of the next piece.
I really enjoyed working on the patchwork. It was probably the most absorbing thing I've ever worked on.
There are blocks of time in my timesheet that are more than 5 hours, because it was just that hard to tear myself away from it. It's so nice watching all the colours go together and the squares build up. So nice. I could not make myself work on anything else while the patchwork was out on the table, which is why it took so long to finish.
I would get out the patchwork and plug away at it for several days, doing terrible damage to my already awful sleep schedule, and then I'd put it away again and forget about it for a month or several. One time I actually stayed up until sunrise working on it, but I was unemployed at the time so it was ok.


All the seam allowances made the wrong side of the fabric much too bumpy to neatly trace an outline, so I traced the pattern pieces onto the right side, and basted over them with old yellow cotton thread so they'd be visible from both sides.


Once I had all the main pieces assembled and cut out, I added a layer of cotton flannel interlining to all of them. Partly to add more warmth, partly to help keep all those sea allowances pressed flat, and partly to smooth out the bumpiness a bit. The areas where 8 triangle corners meet are extremely bulky. I tacked the flannel down to each of those intersections with a couple of stitches in grey silk thread.
I left the flannel out of the lapels, but ended up going back and adding some later.
I cut my lining out of green & black shot silk taffeta, which is pretty similar in colour to the original lining. I got it from puresilks, but it's nearly doubled in price since I bought it a few years ago, so I think if I were to need more of a similar colour I'd get this one from silkbaron.

The facings, collar, & cuffs are a silk/rayon velvet that had been in my stash since dye class in college. I loved the dye sample we did for this colour so much that I dyed a little under half a metre of velvet with it, even though I didn't know what I'd do with it yet, and it turns out it was just the right amount and colour for this! It was PRO MX fiber reactive dye in the colour Marine at 4%.
I used a lot of odd flannel scraps for the interlining. Thin ones in the sleeves, medium ones in the skirts, and a heavier one in the bodice.
I sewed up the sleeves first. I used heavy black linen thread and did a backstitch in the areas where the patchwork was thinner, and a stab stitch in the bulkier parts. Afterwards I pressed the seam allowances open and tacked down the edges with a herringbone stitch, using more of that grey silk thread. (It's from my mother's weaving stash, so I have a very large amount of it and use it for lots of things.)
The sleeves were stiff enough to stand up on their own.
I sewed the sleeve lining pieces together by machine, and had to re-do the lower part of one of the seams, because the bulk of the sleeve meant that the lining was a bit too small. 
I backstitched the velvet cuff pieces together, tacked the bottom edge to the inside of the sleeve end, and slipstitched the top edge onto the sleeve, before putting the lining in.

I seem to have completely forgotten to photograph the pad stitching, oh dear. I had to redo it several times, but in the end it finally turned out good, and after that I sewed the front and back pieces together. Again, with backstitching or stab stitching, depending on the thickness.
I used collar canvas in the lapels, as well as the collar, because hair canvas would probably not have been stiff enough for such bulky material. I did modern pad stitching because the early 19th century version is much more awkward and difficult.
I was delighted to find that two blue triangles happened to match up almost perfectly across one of the side seams! I didn't plan that at all.
After sewing down tape to the edge of the lapel and then folding in the seam allowances over that, it was very bulky along the edges, so I added another layer of flannel on top so the velvet would have a smooth surface to lie on.
In hindsight I probably could have just added a little folded bit of flannel around the edge to smooth out the difference in thickness.
I added a folded strip of buckram to reinforce the area where the buttons go. I sewed down the top part first, and the lower bit for the last button much later, after the waist seam was finished.
I sewed on the decorative buttons, then carefully basted and stitched the velvet facing on. I'd sewn the facing to the front lining a while earlier. Then I sewed the 2 functional buttonholes in the front - the 3rd will go in the waist seam later. After that I marked out the locations of the buttons on the other side and sewed them on, and then added the velvet to that side too.
This was my first time using silk buttonhole twist, and I really ought to get some more of it and use it for my nicer things. For some reason I'm much much worse at letting myself spend money on thread than I am with fabric.
I used my eyelet hole punch to make the holes at the ends, since there was no way I'd be able to clip neatly through that many layers with shears.
I covered the buttons in the same silk as the lining.

For the interior tabs I covered squares of buckram in velvet and sewed the lining onto the back, the same way I usually do with 18th century waistcoats and such.
I made the pockets out of tightly woven cotton and added a silk facing to the edges near the opening.
I machine sewed them down to each of the skirt panels, and hand sewed the skirt side/back seams. The skirt is still in two halves, because it has a vent at the centre back.
After sewing these seams I also pressed them open and tacked down the edges as usual.

I basted on the linings for each skirt half, and sewed them down along the edges, except for the top bit.

Here's a picture of all the separate pieces before the final assembly. This isn't the order the original was sewn in, but I wanted to keep things separate for as long as possible, since they're so bulky and cumbersome.
I sewed the centre back & shoulder seams, then the waist seam, and then added the back lining. On my 18th century things I do that last, but with this it seemed best to do it before the collar and sleeves.
I seem to have forgotten to photograph all of this.
I did 2 rows of gathering stitches along the sleeve heads with heavy duty thread, basted them in to check the fit, and then sewed them in more securely. It was a lot of layers to go through, even with the edges of the flannel being trimmed back.
Unlike the 18th century sleeves I'm used to, on these ones the seam allowances all get pressed out into the sleeve.
The collar is pad stitched with a layer of cotton flannel in between the silk and the collar canvas. I very carefully whipstitched/stabstitched the collar onto the bodice, and then draped the velvet over it, basted it a whole lot, and slipstitched the edges down.


Finished! 
I'm very happy with it! I do have some little complains & things that could have been better (as I discuss in the video) but overall I think it turned out great!
It fits well and is comfortable, though it is quite stiff and I can't slouch when wearing it.
It's not as warm as I expected. It's only a little bit warmer than my linen toile practice version, which is quite surprising considering the amount of material in it. But that's ok, it means it's wearable for a larger portion of the year.

The little interior tabs don't really do much, and I don't think it looks very good with them buttoned and the outer buttons not. I think these might have been more practical on the original because it only has one functional button on the outside, while mine has 3.


I haven't got any other 1830's thing to wear with it, but that's ok.