Dear me, I'm 3 garments behind on blogging again. I finished this waistcoat at the beginning of April, and I think I had cut it out about 2 months before that.
When I started this waistcoat it occurred to me that I've never shown how I make buckram, so I'll do that right now.
I take some fabric stiffener and pour a bit of it into a suitable plastic vessel and add about twice as much water. I just use the fabric stiffener that my mother has in her studio, and there is one bottle that's "Eileen's" and one that's "Stiffy" if the brands make any difference.
As far as I can tell they're more or less the same goop, and judging from the smell and texture it's very similar if not identical to white glue. Not historically accurate, but it's something that's already in the house, and as long as my buckram is sufficiently stiff I don't think it really makes a difference what exactly it's stiffened with.
(If you want to read more about historical options
I highly recommend this post. Great comparisons, including video clips of how the buckram moves.)
So, anyways, about 2 parts water and 1 part fabric stiffener. I don't measure it and it always turns out fine. I iron my selected fabric. (Worn out linens are a historically accurate option, and a good use for shirts when they get too full of holes to wear, but sometimes I'll use washed cotton muslin.)
I cut out a piece of fabric just big enough for all my interfacing pieces to fit on and I put it on a smooth surface. I have a (not attached to a window frame) windowpane I like to use, but that's at my parents' house so here I'm using a mirror. If the buckram needs to be really big,
like it did for my 30's coat, I'll put it on top of the laminated worktable.
I then just slather on the watered down fabric stiffener with my biggest paintbrush until it's good and saturated all the way through. Sometimes I have to go back and mix more, because as you can see from the pictures I mix it in pretty small amounts. I make sure to smooth out all the bubbles of air trapped under the fabric so it's not lumpy.
I let it dry overnight and peel it off. It should be
completely dry before peeling off, or else it may get all wobbly.
The nice thing about this fabric stiffener is that once it's dried water softens it but does not dissolve it, making it easy to scrub off a pane of glass but impossible to wash out of fabric. I've washed samples in hot soapy water and they get wrinkly but don't loose any stiffness once dried again. Drying it on a completely flat surface means I don't have to try to iron any lumps out before using it, and it doesn't want to warp into a different shape.
Ok, that's all I have to say about how I do buckram! Now onto the sewing.
Last December
when I ordered some obi silk one of the ones I got was this nice dark brown and gold brocade. It has a very small pattern of ovals with tiny little stylized animals in them.
I bought it with exactly this sort of late 18th century waistcoat in mind, and was delighted to find these nice woven stripes at one end when I unpicked it. (Why do we say unpicked? Shouldn't it just be picked?)
The stripes reminded me of those waistcoats that have woven patterns along the edges of the fabric which were incorporated into the waistcoat as trim!
Like these two:
There's also
this one,
this one,
this one,
this one,
this one,
this one,
and this one. (That last one is featured in
Costume Close Up.)
They would have cut the fronts so the decorative border would be right along the edges, and then carefully cut and stitched bits of it onto the other edges. Since mine was just a tiny bit of stripeyness on one end of a 68 cm wide piece of fabric, I couldn't do that, but I did have just enough to do the pocket welts, the collar, and the lapels.
For this waistcoat I used the same pattern as
the yellow striped one.
 |
| Pocket welts cut out, interfacing being added. |
I cut the pocket welts along that edge, and the facings.
Construction-wise it's pretty similar to
the yellow striped waistcoat made from the same pattern.
 |
| Lining the pocket welts. |
I pressed the edges in around the pocket welts and stitched the linings on as usual. I pieced a bit of the stripey edge along the tops of the facings so it would make a nice mitred corner.
I backstitched it on along the top and pressed it upward so it lay smoothly.
 |
| I strategically trimmed away a bit of the edge so the seam allowances would be small. |
I then folded it and sewed the corner with more tiny backstitches. The silk is quite stiff and tightly woven, so I was able to make the seam allowances quite small.
With some difficulty and a great deal of steam I folded the edges in around this corner.
I also made a foolish mistake when cutting the facings. I cut two the same direction, and had to piece a bit back onto the corner, but it doesn't really show.
Amazingly, I managed this with a 3mm seam allowance.
 |
The finished facings.
The pieced one is on the left. |
I tacked my buckram interfacing to the front edges, stopping just below where I wanted the lapel fold to start, and pressed in the edges all along the front edge.
I cut my fronts so that one edge had a bit of the stripey gold edge, even though it didn't have a wider brown stripe. This (and the facings being cut on a striped edge) meant that the pattern on the pocket welts is going a different direction from the rest of the waistcoat, but the pattern is so small and the difference so slight that it's not too bad.
I also pieced the edges with some linen scraps, even though I have a lot of this silk so it wasn't necessary, I just really love piecing and it made the cutting layout a bit more efficient.
I put in the pockets in the usual way. Cutting a slit, turning the edges under, and stitching the pocket bag to it. Pocket welts are carefully stab stitched on top.
I sewed the facing to the lapels, lining up the edges as well as I could and doing a careful stabby whipstitch thing to join them.
I sewed the lining in on the buttonhole side, did the buttonholes
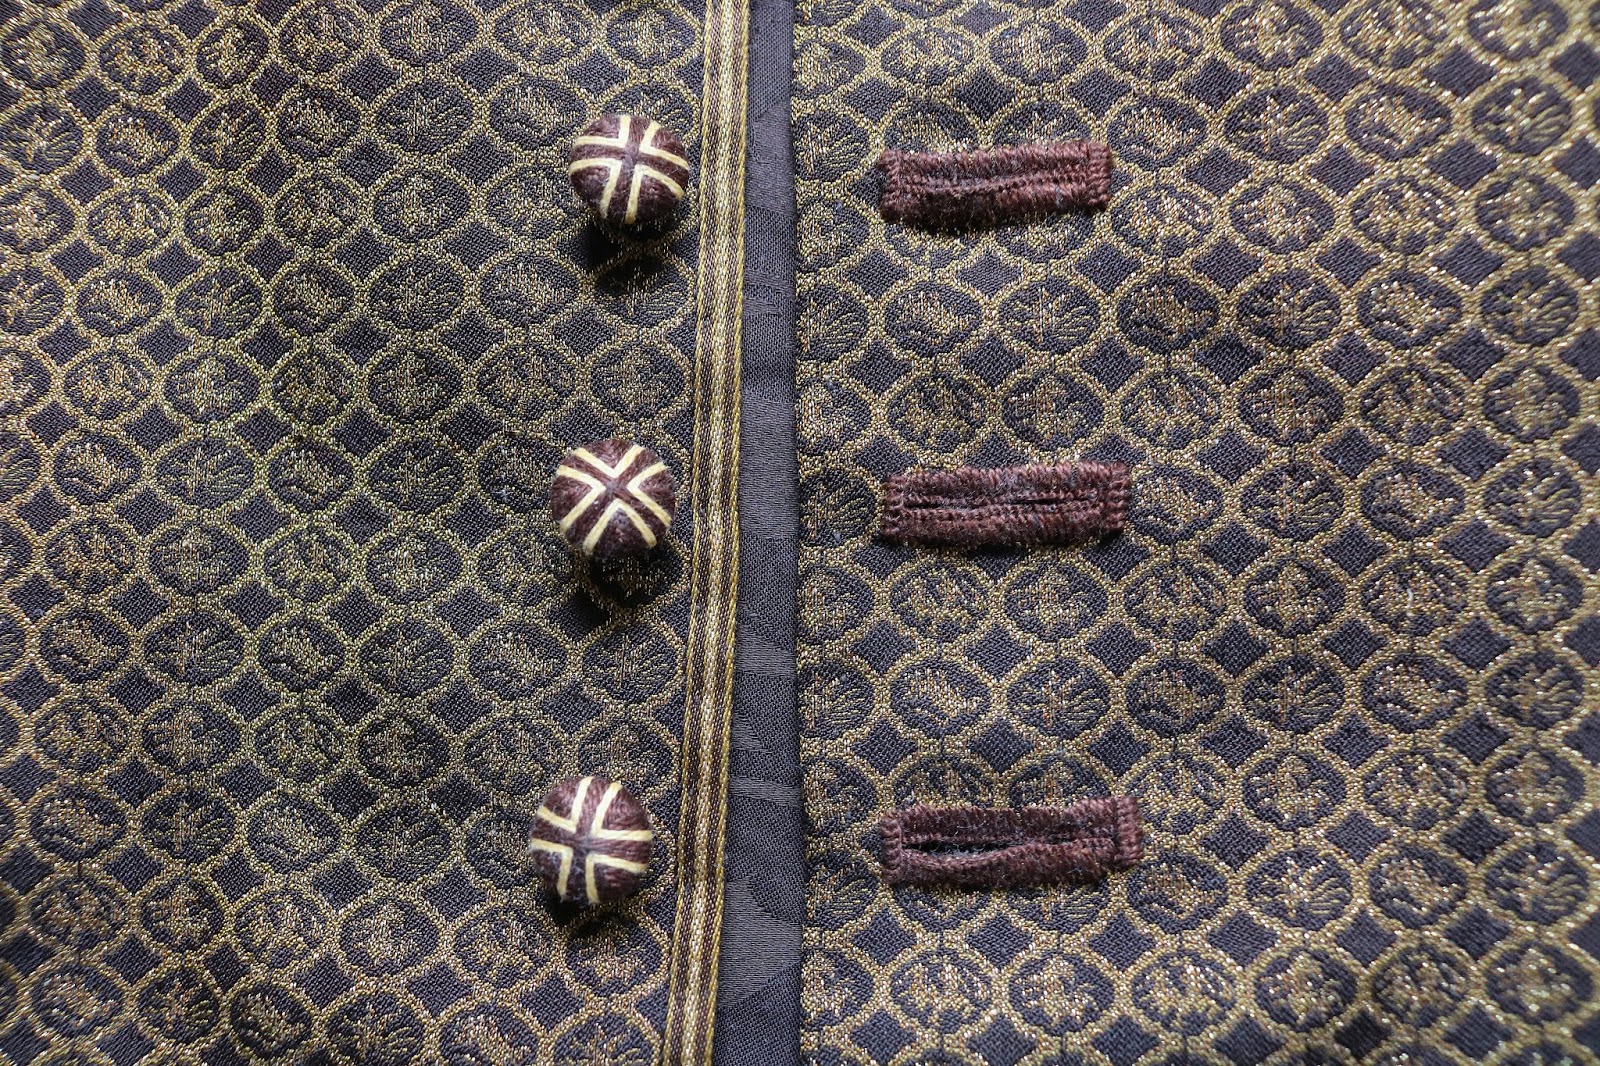
just as described in my 1730's breeches post, and then made teeny little death's head buttons with 12 mm
bone moulds from Burnley & Trowbridge. I used DMC cotton pearl for these, in dark brown and golden yellow, and used the brown for the buttonholes too. I left the lining of the button side until after the buttons were sewn on.
I also filmed the making and sewing on of the buttons, and will include them in the death's head button video I am slooowly working on.
The waistcoat is lined with the same cotton damask remnant as the aforementioned 1730's breeches, and I sewed it to the front along the front edge, and then the armhole.
Last year I made
a waistcoat with a pieced linen back, and I loved it so much I decided to do it again. (And will likely do more, as I still have a lot of linen scraps.)
I sewed a bunch of scraps together with backstitch. I could have done more machine sewing on this waistcoat, but I just didn't feel like it. At one point I sewed a scrap to the wrong side, and am posting that picture here because I think it's important that we remind each other that we all make sewing mistakes.
 |
Oops.
Didn't take too long to pick this off and re-sew it. |
The collar contains one piece of buckram, and I pieced the collar a bit in centre back.
I put the trim along the edges just the same as on the facings, only I sewed it on on both edges because there wasn't room to cut the collars along that edge. I sewed the lining in as usual, with
Le point à rabattre sous la main. I do wish there was a shorter 18th century name for that stitch. I think nowadays they just call it felling.
In my post about the
previous waistcoat I made from this pattern I complained of the wrinkling in the shoulders, so for this one I basted the shoulder seams and basted the collar in to check the fit before sewing them. I fussed around with the shoulders a lot but it didn't seem to help. The shoulders on this one are less wrinkly than the last, but it's only because the fabric is stiffer.
I went and
had another look at pictures of extant waistcoats, and it turns out there's a fair amount of variation in the shoulder seam placement. On earlier waistcoats they're typically pretty far back, but on these collared ones
some have the seam right on top of the shoulder, or even
slightly in front.
I've adjusted the shoulder seam on my pattern so it's on top of my shoulder, which I think will fix the wrinkle problem. I'll see next time I sew it up.
I sewed the shoulder seams and sewed the collar in with a backstitch, leaving the lining free at the front of the neckhole. I also pieced a little triangle of linen into the shoulder because multiple extant examples have them, and I thought it might help with the fit.
The centre back seam of the lining is the only machine sewn seam in the waistcoat. I tucked in the edges all around the back lining and sewed it down.
I then had to sew little bits of extra lining in under the shoulder triangles.
Finished!
Since this is mostly scraps and re-used material, I submitted it to the
Historical Sew Monthly for the Re-Use challenge.
The darker brown linen on the back is partly from some strips of fabric someone gave me that had been part of an art installation, and I think the lighter bits are from a piece of linen my grandmother found in a thrift store. There are a few tiny little scraps of some nice brown ribbed silk that are from an old drapery sample book someone gave me. The lining is a remnant of very nice bedsheet cotton I got from a fabric donation at school.
I also saved some of the thread when I picked the obi apart. It was partly sewn with running backstitch, but there were also some long areas of running stitches in heavy brown silk thread that was still in pretty good condition. I was able to pull some of it out without ruining it, and re-used it all in various parts of the waistcoat.
What the item is: A man’s waistcoat.
How it fits the challenge: The main fabric is silk from a somewhat worn old obi, the back and interfacing are all scraps, and I even re-used some thread.
Material: Heavy dark brown/gold silk brocade, dark brown cotton damask, brown linen, one teensy bit of brown ribbed silk from a drapery sample.
Pattern: Drafted by me.
Year: c. 1790’s
Notions: 9 bone button blanks, silk thread, linen thread, cotton thread, linen buckram.
How historically accurate is it? Pretty good, I think! It’s hand sewn everywhere except for the centre back of the lining, the cut and look are pretty accurate, and the techniques are too to the best of my knowledge. Materials are mostly accurate, aside from the DMC cotton pearl I used for the buttons & holes, and the cotton bedsheet damask lining.
Hours to complete: 40
First worn: April 3rd, 2020
Total cost: Less than CA$20, though I’m not sure how much exactly. I bought the obi, the button moulds, and most of the thread, but the rest was given to me. The obi cost very little and I only used a fraction of it.
That front edge I was so careful to line up the stripey bit on turned out to be a foolish mistake, alas. I didn't think to check what side I was doing it on and it ended up on the button side, so it isn't visible when the waistcoat is being worn. But it's ok, it's not as wide as the rest of the trim anyways.
Aside from the shoulder fit trouble I am quite happy with this waistcoat! I think it's nicely calm and understated, but with enough little details to still be interesting. The very orange breeches I'm wearing in these two pictures are my most recent garment, which I'm excited to post about! They are the opposite of calm and understated.
The thing I sewed in between these two projects is another everyday cotton shirt, which I haven't got much to say about, so hopefully I'll be a bit quicker in writing up that blog post.