
At the end of 2019 I made a pair of striped cotton breeches to test a pattern I had drafted, and this April I finally sewed up that pattern in a nicer fabric.
Looking back at my first pair of breeches I'm astounded by how badly they fit. And quite puzzled by how, at the time, I thought they fit pretty well. I've improved so much!
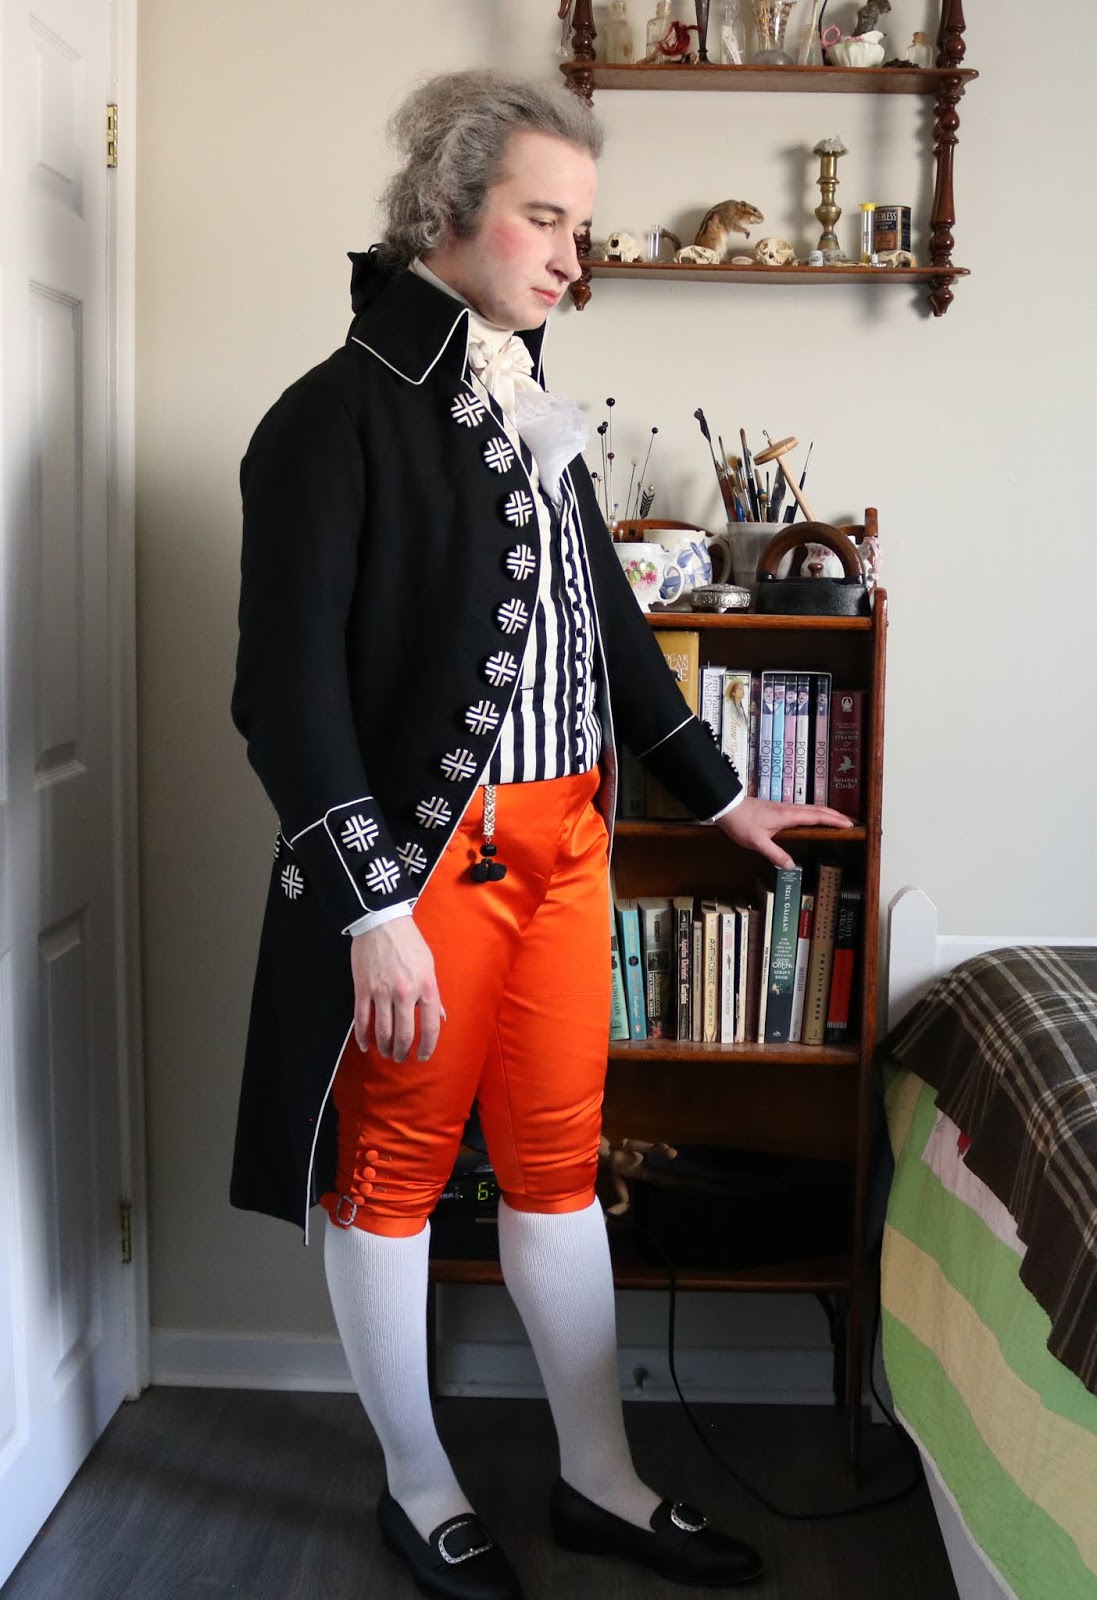
 |
| (I posted this on instagram a while ago) |
It's not a colour I'd ever think to buy, but it was such a heavy nice quality silk that I didn't want to use it for a lining.
I put it away in a drawer, and then a few weeks into this whole lockdown business I was feeling so crappy and unmotivated that I couldn't focus on anything. I thought that maybe a hand sewing project in this very bright orange would be interesting enough to keep my attention, and it was! I finished it within 9 days. I haven't done a huge amount of sewing in the weeks since then, but it was nice to feel motivated to work on something for a little while.
 |
| Standing up cone is the heavy linen, lying down cone is the probably rayon. |
For the buttonholes I used a shiny orange yarn I borrowed from my mother, which I think might be rayon.
I didn't have a working camera for a large portion of the construction, so I'm afraid I don't have photos of all the steps, but they are extremely similar in construction to my green 1730's breeches. The main difference is the front closure but I have a separate post about how I sew fall front plackets.

Because the obi lining was a little narrower than my breeches pattern I had to piece an extra little bit onto the crotch area on all 4 of my main pieces, but this doesn't show at all when worn. I also pieced a little bit onto the button extension at the knee so I could have the side seam straight along the edge.
 |
| This bit was whipstitched on selvedge to selvedge. |
I sewed the fall plackets with the same method I used in my tutorial, just with hand stitches instead of machine, but I know that's not quite right. I don't know how exactly they did these plackets historically but looking closely at photos of extant ones I can see they're not quite the same as mine.
I had originally intended to do those little buttoned corner pockets, but I forgot to trace the front piece and make the appropriate alterations, so I had to do pockets in the side seam instead. (Still a perfectly historical option!)
 |
| The front is at the bottom of the photo. You can see the pocket in the side seam pointing towards the back, right where my hand is. |
I interfaced the waistband with a heavy linen which I had stiffened with fabric stiffener. I basted it onto the waistband to keep it in place while I was working on it.
 |
| The green bits on the linen are from some screenprinting. Someone gave me this linen years ago along with a lot of old dye & print samples. |
 |
| Waistband attached. |


I pressed in all the seam allowances around the waistband. I had to piece part of the waistband lining because there wasn't quite enough cotton left. It appears I didn't get any photos of stitching down the waistband lining.
 |
| Piecing the waistband lining. |


I used Burnley & Trowbridge moulds for the buttons. 3 small wooden ones for the waistband and 10 even smaller bone ones for the knees and fall corners.


 |
| One thing I'm sure is different in the actual 18th c. plackets is the way the seam allowances face. Mine are pressed outwards, which kind of gets in the way of the buttonhole, but I think theirs are pressed in towards the centre, which lets them angle the buttonhole a bit more. |


 |
| My buttonholes have improved so much! And they look so much better with the bar tacks. |


 |
| The piecing is nicely hidden. |
 |
| Pocket in the side seam. |
What the item is: A pair of breeches.
How it fits the challenge: These are celebration worthy for a few reasons. They’re my first 100% hand sewn pair of breeches, they’re the best fitting pair I’ve ever made, and they were something I actually enjoyed sewing and was able to focus on after a month of being in an uninspired sewing slump.
(Yes I know the green 1730's ones technically fit just as well, but late 18th century breeches are tighter, smoother, and much more visible than earlier ones so I'm still counting these ones as better fitting.)
Material: Heavy orange silk, plain light brown cotton for the lining.
Pattern: Drafted myself, based on ones from The Cut of Men’s Clothes.
Year: Late 18th century. I’ll wear them for 1780’s-90’s
Notions: 10 bone button blanks, 3 wood button blanks, linen thread, buckram (which I made with heavy linen and fabric stiffener), silk weft threads pulled from the fabric, and probably rayon yarn for the buttonholes.
How historically accurate is it? Pretty good! (I feel like I say that about all my submissions) It's 100% hand sewn. The materials are mostly good and the less than ideal bits aren’t visibly so. I’m really dang proud of the fit. I’ve been told that bright orange is possible with 18th century dyes, and that it would have been quite expensive. Orange doesn’t appear to have been very popular in the late 18th century but I have seen a few examples of extant orange things and some orange in fashion plates.
Hours to complete: 53:23
First worn: May 1st, 2020
Total cost: I bought the silk and button blanks, but most everything else was given to me, so CA $29


 |
| When October comes I must remember to wear this next to some pumpkins. |

 |
| The only place I'd want to wear this is in a vegetable garden, holding a freshly pulled carrot in each hand. In that context it would be good. |


