Pages

Monday 25 January 2021

1730's suit photos + Getting Dressed Video

I've made a getting dressed video for my 1730's suit!


I took these photos a while ago, but wanted to wait until I'd finished the video to do the blog post on them.

 I am quite happy with these photos! Especially considering I took them in my room with a self timer.

When I posted these photos on social media a while back someone asked me how long the whole outfit took, and since I kept time sheets for most of the garments I was able to get an approximate number.

Coat: 100:33 (mostly hand sewn, with a few select bits done by machine. There are 79 buttonholes and 47 buttons and they took up nearly half that time.)

Breeches: 34:53 (Also mostly by hand, with a few machine seams.)

Waistcoat: 61 hours exactly. (Entirely by hand)

Shirt: 37 hours initially, but later I re-did the cuffs and added new ruffles with tiny little rolled hems, which would bump that up to at least 45. 

Neck stock: Didn’t keep a time sheet for this or write a blog post, oops, but it’s a pretty simple little thing that was maybe about 2 hours. Also partly by machine and partly by hand. I’ll keep better track next time I make one.

Queue bag: 3 hours. It’s all by hand, but very small and simple.

Shoe alteration: Ehh, in total about 5 hours maybe? Spread out over a few days because glue had to dry.

Grand total: Approximately 244 hours for the entire suit! Not including research, pattern drafting, or mockup fitting, so if you include all that it's probably closer to 300.

A lot of those hours were spent hand sewing while listening to and partially watching various videos and shows, which I think slows me down a bit, but it’s a more pleasant way to spend the time than just sewing in silence. I also did the shirt a few years ago - back before I learned how to use a thimble, so I’d be considerably faster now.

For these photos I moved the furniture out of one corner of my room and hung up some fabric and an old print. It's lit by a couple of lamps off to the side, which are sort of yellowish and bad, but that seems to work well and make the light look more painting-y.

Thank you to Liz Mavity for offering to photoshop out the electrical outlet that was visible in some of these photos!


Hopefully sometime this year I'll get some outdoor photos too!

Early 18th century-ish Shoe Alteration

It's rather difficult to find reproduction early 18th century men's shoes as it's not a very popular era, and I haven't got the money for them right now anyways, so I have altered this pair to be a tolerable substitute!

I have some nice late 18th century shoes, but early ones are a totally different shape, and I wanted something closer to that to wear with my 1730's suit. And the 1720's suit I mean to eventually make. (Neal Hurst has an hour long video on 18th century men's footwear if anyone's really interested in learning about all the details of shoes and how they changed over the century.)

My late 18th century shoes have very rounded toes and big buckles, but early ones usually have small buckles, and tend to be chunky looking. Big chunky heels and weird square toes.

Portrait of unknown gentleman (detail). Wikipedia says it's c. 1737,
but his outfit looks earlier than that.

I started with a pair of shabby old leather thrift store shoes with somewhat square toes.

I... actually originally started with a different pair of shoes, but my first attempt failed so badly that it destroyed them. They were an even shabbier pair, with slightly squarer toes, and I made the mistake of taking the sole off. Bad idea! Do not do that if you are attempting to cover a pair of masculine shoes!

The reason I did it was because the only blog posts I could find on altering shoes to look 18th century were about high heeled shoes, and all those ones involve peeling off the sole and then glueing it back on at the end. 

But it turns out that different styles of shoes are constructed differently! Those high heeled shoes have a lot of structure and then a thin sole stuck on the bottom, but separating the top from the sole on my shoes left me with a floppy leather shoe top that it was impossible to stretch material over.
But it was ok, I'd worn them a lot and they were in considerably worse shape than this pair, and when I took them apart I even found that the shanks were rusty and one had broken. 

Fortunately I had two pairs of scruffy old shoes, and I was more careful with the second one. I started by cutting a bit off the end of the toe and glueing a little scrap of davey board (the dense cardboard you use for covers in bookbinding) to the front. I cut it into the rounded shape you see on early 18th century shoe toes. I also cut a bit off the front of the sole, to make it flatter.

For glue I just used a tube of some adhesive called "amazing goop"
but perhaps it would have been better to get Shoe Goo, since that's meant for shoes.
I couldn't make the front bit of the sole any wider, alas, but I built up the toes to be as close to the right shape as I could. I glued on some leather scraps and then some cotton scraps to smooth it out a bit.
Since taking the sole off is a bad idea, I instead made a little channel around the edge using a linoleum cutter.

Shoes almost ready to cover.
I didn't get pictures of this step, but at this point I trimmed down the tongue to be a bit shorter, and the lacing bits to make them a more suitable shape for narrow latchets. I draped a pattern for the front and back portions using a bit of an old cotton sheet, and cut them out from an old leather coat.
(A different one from the bad and weak leather I made my first pair of gloves out of! This leather seems much more sturdy.)
I stuffed the toes with crumpled up paper to help keep their shape, and glued the front pieces on, working in small patches and trying to stretch it smoothly over the shoe. I smeared the adhesive on with a palette knife, and also used the edge of the palette knife to shove the edge of the leather into the groove around the sole as I went.

Once the fronts were all glued I tied some long cotton scraps around them and let them dry overnight.
I sewed the centre back seams by machine and glued the seam allowances down flat to keep them pressed open.

I glued them on the backs just like I did the fronts, working in small patches with a palette knife. I put clothes pins all around the edge to hold the leather in place while the glue dried.
I cut away the top layer of leather on part of the lacing bit before glueing the latchet to it, so it would be a bit less bulky there.
Because the stacked leather soles were worn enough to be more brown than black, and there were some small bits of brown showing where I cut the groove, I gave the edge of the sole a good coating of black leather dye.
Having waited a day to make sure the glue was fully dried, I trimmed off the extra bit of leather that was sticking up over the back of the shoe.
And then I cut little slits in the latchets and added my second pair of breeches buckles to them. (Which, if we're being very picky, are a bit different from shoe buckles in how they attach, but nobody will see that part when it's hidden under the latchet.)
They're not the sturdiest - the adhesive didn't stick things as firmly as I'd expected, and I may go back and add some stitching to reinforce the base of the latchets if they start peeling off, but that's ok. I made these so they'd look decent in photos, and don't expect they'll get a lot of heavy wear, so I'm pleased with how they turned out.


Sunday 17 January 2021

2020 in review (and 8 year blog anniversary)

Well! That was a strange year. I'm just here to talk about what I sewed, but oh my goodness what an odd time. 
I moved out of my parents house last November, so my first full year of Being a Proper Grownup did not go how I expected at all. But I think I am a braver and more capable grownup now.

I hope you're all safe and well! I'm lucky to live in a place with a low population density that nobody wants to travel to, so our numbers are relatively low and I'm doing ok. 

Ok, here's all the stuff I made in 2020.
A pair of green wool 1730's breeches. At last, my 1730's suit is complete! 
I got some photos of it a while ago but haven't posted them here on the blog yet because I also filmed a getting dressed video, which I'm not done editing, and I want to put the photos in the same post as that video.

I think the breeches turned out quite nice, though I really wish I'd been able to find a wool closer in weight to the coat fabric.
A brown & gold brocade waistcoat. I think it turned out very nice, and I love the fabric! Still a bit annoyed by the wrinkled shoulder.

A plain black waistcoat with a patchwork lining. I like it and am glad to have a plain black waistcoat, but am still a bit annoyed by the wrinkling. 
This was the project that finally made me notice that my shoulders aren't quite symmetrical, so on my next collared waistcoat I will pad the smaller shoulder with a bit of batting, which should hopefully even things out and stop the wrinkles.
I did not expect to like these very much, but it turns out I love them! I was just looking to do something that would hold my attention when I was feeling crappy and unmotivated this spring, and a hand sewn pair of breeches in this really nice quality bright orange silk I had seemed interesting enough, which they were. 
I finished them pretty quickly and found that they go very well with my black & white coat. A good October suit.
A navy blue & light grey striped shirt. Awful :( So itchy
Nothing wrong with the cut or construction of this one, but I used the fabric against my better judgement and hoped it would soften up with washing. It did not, and I have stopped wearing it. Not sure what I should do with the shirt, perhaps pick it apart and use the fabric for something else?
It looks very nice, such a shame it's so uncomfortable.
A semi-sheer seaweed printed shirt. Pretty good for hot weather. I do find there to be a bit of a rough sythetic-y feel to the fabric, especially when it gets sweaty, but all in all it's decently comfortable and I'm happy with it.
A black cotton shirt with silver print. Also decently comfortable, and I wear it often, but it's not as nice as my linen ones. I find that the 18th century style of shirt cuff just doesn't work as well with cotton, at least not ones like this that are fairly stiff and have no stretch.

I think the lesson here is that I should stick to linen for shirts, and also that it's ok to make overlapping cuffs that button normally on everyday shirts that aren't trying to be historically accurate.
Black suede gloves, which I had started and then set aside for almost a year. Better than my first pair! A tad stiffer than glove leather ought to be, perhaps, but I think they turned out very nice and I wear them regularly.
Blue & black breeches. Had a bit of trouble with the knees, but they turned out good in the end and I like them.
I haven't blogged these last few things, oops. I'll update this post with links as I do.

I made a blue flannel nightgown from a pattern I drafted based on one of the probably Edwardian ones I examined in my last post. I haven't posted this one yet because I cut out 3 nightgowns from the same fabric, and want to put all 3 in one blog post once they're all sewn up.
Edit: done!
I made a linen toile dressing gown with velvet cuffs & collar, as practice for the patchwork 1830's one I'm working on, and I'm glad I did! I learned some stuff about construction and what to do differently next time, and also need to tweak the pattern a bit.
I've been wearing it fairly often, and it's nice to have it as a less insulating option, because the patchwork one will be very warm.
I also made a matching cap from the linen scraps.
It's not a huge amount of sewing for an entire year, but I'm trying not to feel bad about it. Overall I'm quite pleased with the things I made, with the exception of the itchy shirt.
I've been a bit behind on blogging, but will try and catch up soon. I'm still annoyed at blogger for changing their interface! It's more tedious to do things now.

In July I was invited to a weekly zoom sewing circle and it was definitely the best thing to come out of 2020 for me. It's so nice to sit around working on historical hand sewing with a few friends.

Another big thing for me this year was that I finally started making youtube videos! I am very slow and only have 3 so far, but have a 1730's getting dressed video that I'll post when I'm done editing it, and there are a lot of other projects I'd like to film.

At the end of my year in review posts I write a list of goals for the coming year, and see how I did on the previous list of goals. My list for 2020 was pretty long and ambitious, and I couldn't have predicted how the year would go. I spent a large portion of the spring and summer feeling pretty crappy and unmotivated, and didn't get a huge amount done this year even though I've had a lot of spare time. But I must be kind to myself and try not to feel bad about it.

"Work on a bit of sewing before going on the computer, especially on my days off work." I check my messages in the morning, and like to listen to music or watch videos on the computer while I hand sew, so this one doesn't seem as sensible as it did when I wrote it.

"Try to have a better sleep schedule." I've actually been doing ok on this one for the past month or so! My sleep schedule was very bad for most of the year, but recently I've been mostly getting to bed at a reasonable hour, and haven't been oversleeping.

"Try metal embroidery, even if it's just a small sample." I didn't try metal embroidery, but I did do some metallic 18th century buttonhole samples. So perhaps this goal counts as half done?
I'm excited to do metallic buttonholes on an actual garment!

"Continue to use mostly stash stuff because I still have a lot to sew through. Buying a bit of fabric is ok, but I should do it only if I have plans for it." I did fairly ok. I got a bit of material I needed to finish already started projects (like some lining and collar canvas for my patchwork dressing gown) and a few pieces of fabric I didn't need but do have plans for. And a lot of heavily discounted obi silk, because Ichiroya closed in July and it was a very rare opportunity that would be foolish to pass up.

"Buy a pocket watch, because somehow I still don't have one." I did not buy a pocket watch because money has been tight this year (and still is, I'm getting barely any hours at work) and I decided a pocket watch wasn't a super high priority after all. But then! Ollie (the person who invited me to the aforementioned weekly sewing circle) sent me a pocket watch for Christmas, and made a delightful watch fob to match my monster waistcoat!!
It's beautiful and I love it

"Make a video about death's head buttons! And hopefully other sewing videos." I did make a death's head button video! And have made two other sewing videos so far.

"Do sketches of things before sewing them." I think I did that for a couple of things, but I'm still terribly neglecting my sketchbook. I find I can picture finished projects in my head well enough that I don't need to sketch, but it's still a good habit to have. Ah well.

"On that note, keep better records of projects on paper. I write the time and materials and everything here on my blog, but I should be putting it in a binder too, with swatches." Hm, didn't do that either.

"Keep track of exactly how much fabric I buy and how much it costs - also in a book with swatches." Also did not do that. I did keep all the receipts with the intention of doing it later, but then never did.

"Make an 18th century shirt tutorial." I did! It's not one sewn up in a historically accurate fabric, but it is my best and most thorough shirt construction post ever and people have told me it's helpful!

"Finish and publish those other posts that I have saved in drafts." I did not, alas.

"Do as many of the 2020 Historical Sew Monthly challenges as I can." I did half of them, which I am ok with. 

"Finish the 1830's patchwork dressing gown." I made good progress on that, but have not finished it. I did sew a practice dressing gown in linen though, and decided I need to change the bodice pattern a bit. I also decided I want to make a video on it! I've filmed a lot of patchwork clips and will film the construction too.

"Finish the forest floor embroidered waistcoat." Made some progress on that, but have not finished it either.

"An extravagant 1720's suit, hopefully?" Nope, but I have gotten some more materials for it and solidified my plans. I still need to get metallic threads for the buttons & buttonholes (which will be expensive), and learn how to make metallic thread buttons.

"Maybe if I don't say "more accessories" then I'll actually do them this time?" I did not. One pair of gloves, one shoe alteration, and an indoor cap that doesn't really count as an accessory.

"I think this list is long enough now but one last thing I should mention is make some nightgowns." I made one nightgown (based on one of the extant ones I posted recently) and am part way through sewing two others cut from the same pattern! I'll blog them when all 3 are finished.

I didn't do great, but who did this year?

Alrighty, goals for 2021! I'll keep this list shorter and less ambitious.
  • More wardrobe basics. I am in dire need of more everyday shirts and pants, and also need to finish the aforementioned nightgowns. I've got 2 new shirts cut out and partially sewn up at the moment, and hope to make more. This should be a bit easier to actually get done this year, since I have zoom sewing friends to help keep me accountable.
  • Not resist hand sewing something if I feel like it. I've noticed one of the reasons I don't make as much everyday stuff as I should is because I think to myself "I'll machine sew most of this, it'll be faster" but then it isn't faster because I put it off in favour of hand sewn projects, so this year I want to try to just get things sewn, and not worry about saving it for when I have the machine out.
  • Continue to be restrained about fabric buying, and sew from my stash. And if I do buy fabric, try to focus on wools and linens.
  • Make more youtube videos! Not with any particular schedule, just however many I get done.
  • Do at least half of the Historical Sew Monthly 2021 challenges.
I think that's enough of a list for now! There are lots of other things I want to get done, like finishing the patchwork dressing gown and embroidered waistcoat, and hopefully starting the 1720's suit, but I won't make them specific goals on my list. I have so many projects to finish, so we'll see which ones get done.
This blog turns 8 years old today! How odd it is to think I've been posting my sewing here for that long.

Wednesday 6 January 2021

Some extant men's sleepwear from the King's Landing collection

In the autumn of 2019 I participated in an artist's residency at King's Landing, a historical site here in New Brunswick. During this time I was able to visit the building in which they store their collections, which include a quantity of 19th and early 20th century clothing! 
Not an era I'm usually inclined to sew things from, but it was fascinating to examine things up close, and I took a lot of pictures. (And then forgot about them for a year, even though I meant to blog about them. oops.)
Among the garments I got pictures of are these two nightgowns and one set of pyjamas. I think the nightgowns are either late 19th or early 20th century, and I don't know about the pyjamas but I'm guessing early 20th century?

Photos used with permission of King's Landing Corporation.

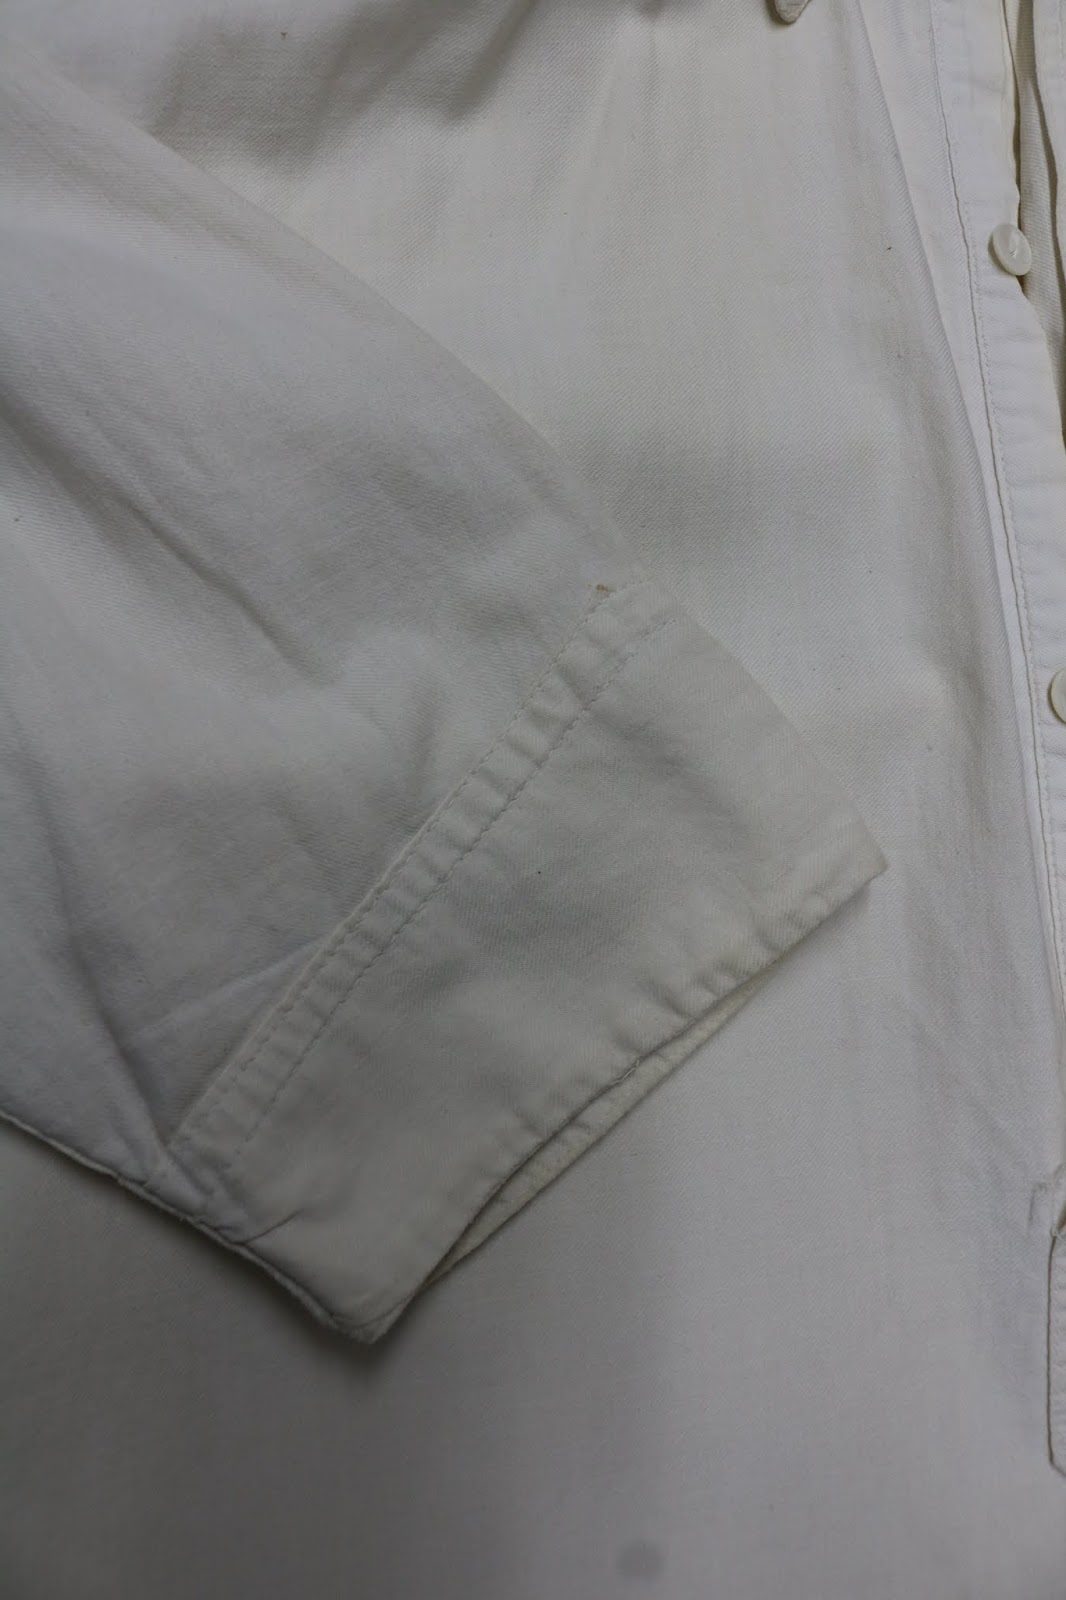
The first nightgown is a nice soft cotton twill, and has an interesting facing/placket thing down the front.
All 3 of these pieces are factory made, and sewn entirely by machine (with the exception of buttons). This one has a tag that says "London Town, Brand Size, Material of English make"
It has tapered sleeves.
With plain little sewn on cuffs on the ends, topstitched to the outside.
They don't have any closures, and were sewn on before the sleeve seam was closed.
The sleeve seam is sewn in one with the side seam, and felled. 
There's a diagonal bit of piecing on the sleeves, the same on both sides, which I'm assuming has to do with the cutting layout they used in the factory. 
(The cutter at my previous workplace had to add a bit of piecing in the crotches of trousers sometimes because it was just more economical that way.)
There's a patch pocket on the left side of the chest.
Here's the inside of the placket thing. 

It has two mother of pearl buttons and two vertical machine sewn buttonholes.
There's a pleat at the bottom of it, and the other nightgown doesn't have it, so I think it might be because of the way this placket/facing thing is sewn. I'm not entirely sure though because I haven't tried to sew this one.
There's a yoke, which was sewn on after the front facings.
It's got a little pointy dip in the back.
The bottom is cut  relatively square, with rounded corners.
It's got a tiny little machine hem.
And gussets at the sides.
They're little diamond shapes folded in half and machine sewn in.
Some of the topstitching and such is done with a lockstitch, but these felled construction seams are chain stitch! (note the thicker line of stitching on the inside and the little tail of chained thread) This is something you still see in factory made garments today! The same is true of the pyjamas. And I think the second nightgown too, though I didn't get as many pictures of the inside of that one.
The bottom of the placket as seen from the inside.


The yoke.
The second nightgown is also made of a nice soft cotton twill, and is extremely similar in construction, with the main difference being that it has a 2 piece collar and a normal placket down the front.
It's nearly identical to the nightgowns in this 1897 Sears Roebuck catalogue.
And this 1901 Eaton's catalogue. (These are re-prints that my uncle gave me, thank you Uncle Sandy!)
One interesting detail is both of these mention them being cut 54 inches long, and this nightgown measured exactly 54 inches long.
This nightgown has a yoke too, but with a box pleat in the back and no pointy dip.
Here's the collar and collar stand.
The hem is the same sort of square shape with rounded corners, but this one's a bit longer in the back while the other one isn't.
It has two vertical machine sewn buttonholes on the placket and one horizontal one on the collar stand, all with mother of pearl buttons.

There are two rows of topstitching on the collar, and the placket. 
And the same on the top edge of the cuffs, which are sewed on and turned to the outside the same way the cuffs on the first nightgown are.

The sleeves on this one are also sewn closed in one with the side seams, and felled.
As you can see here, the cuffs were understitched before 
being sewn down to the outside.

No piecing on the sleeves this time.
It has a breast pocket on the left side, very similar to the first one, but the corners at the top are angled inwards.
The inside of the pocket.

The last of the 3 items is this lovely set of blue and white striped pyjamas, and I haven't done any research to find pictures of similar pyjamas so can't date them with any certainty. I'm just going to make a vague, general guess of "early 20th century". 
Like the other two, they're a nice soft cotton, but this time it's a plain weave with woven stripes in two different shades of blue.
The bottoms are very simple and have a drawstring waistband and a fly overlap without any buttons. 
There's no separate waistband, the top is simply folded and stitched down to form a channel for the drawstring.

As with the nightgowns, it's all machine sewn.
The seams are machine felled and the hems done by machine too. 
There are only inseams and a crotch seam, nothing at the sides. 
Looks like the hems were sewn before the leg seams!

The top has a facing along the front edges, and a triangular facing at the back of the neck, both topstitched down by machine.
The sleeves are the same sort of simple tapered ones, and have cuffs much like the first nightgown, but sewn down to the inside like a facing. I'm guessing this is to avoid the extra trouble of matching up the stripes.
There's an asymmetrical front overlap and it closes with 4 (plastic?) buttons. (The top button is missing but there were 4 originally.)
The front facing has some interesting piecing!

Here we can see that the front facing was topstitched down
and then the top was hemmed.

And here it looks like the shoulder seam was sewn & felled
before the triangular back facing was sewn down.

Same all in one side & sleeve seam construction!

The overlap has 4 horizontal machine sewn buttonholes.


And they have little decorative loops of braid sewn around them, also by machine.

And there's a breast pocket, very similar to the other two.
I wish I'd gotten more photos of a few bits, but I think I've covered the construction well enough to replicate! I hope this is helpful for anyone looking to sew early 20th century men's sleepwear.

I didn't actually take patterns off these garments because I didn't have all the proper supplies with me, but I did take a lot of measurements of the nightgowns, and have drafted a pattern fairly close to the collared one. 
Here are the sketchbook pages where I drew quick messy diagrams and wrote down the measurements:
Of course I wished I'd taken a lot more once I started drafting the pattern, but oh well, good enough.

I've sewn it up up once in blue flannel, and have two more cut out, so I will blog about it once all 3 are sewn up. I'm behind on blogging but I'll try to get caught up and do my year in review post quickly!