
My second-last project of 2019.
____________
I was extra thorough in photographing the construction steps, so hopefully this post will be helpful until I make that big 18th century shirt tutorial I mean to do eventually. I've had a number of people ask me about shirt construction and I'd like to have something to link them to by way of an answer in the meantime, so this will be that. A sort of substitutorial I suppose?
The fabric here isn't remotely accurate to the 18th century, but the cut & construction is, at least to the best of my knowledge. I'll add any extra information I think is relevant.
If you want to see what the shirts look like in the appropriate white linen fabric, here's a link to one with ruffles and another link to one without.
____________
Edit: I have made a new and more thorough tutorial, with a few more improvements to the method! Both video and written versions!
You may now ignore this post!
As I've probably mentioned before, I need more practical shirts without ruffles to wear to work, and I also have a lot of cotton in my stash that needs to be used up.
In May of 2018 I tried making a vaguely modern-ish shirt with the intention of making more like it out of my stash cottons, but it turns out I hate that shirt. It's my least favourite shirt, it doesn't go with any of my waistcoats, and is far less comfortable than my 18th century ones. So if I do make more shirts with stash cotton they'll be cut and sewn just the same as my 18th century linen ones, which is what I did with this shirt.

For most of my shirts I use plain woven white linen, which is much more 18th century appropriate.
I machine sewed some of these seams with cotton thread, and hand sewed some of them with linen thread from Burnley & Trowbridge.
All the pieces are squares and rectangles. The Cut of Men's Clothes (That link is to a free pdf version) has a nice pattern diagram for an 18th century shirt, and Costume Close Up has one too, though the cuffs aren't quite right since it's taken from a shirt that was altered in the 19th century.
The fabric was 113cm wide and I used 1.73m of it, though I regret not cutting it fuller and using up more of it. I used the method of pulling out one thread and following it, so all the pieces are perfectly on grain. The dimensions of my pieces (seam allowance included) were as follows:
Main body - 65 x 180 cm (could easily go a lot wider and longer. 18th century ones were really long - at least mid thigh length.)
Sleeves - 61 x 45.5 cm (I really wish I'd cut them fuller. A 61x61 square would be good.)
Collar - 20 x 41 cm (This was a little bit tight, and next time I'll cut it a smidge bigger.)
Armhole seam binding bit - 42 x 2 cm
Underarm gussets - 12 x 12 cm
Neck gussets - 8 x 8 cm
Hem gussets - 5 x 5 cm
Shoulder strips - 4 x 19 cm
Cuffs - 20 x 6 cm
I'm 5'9", my neck is 38 cm around, and my wrists are about 16.5 cm around, if that helps. The shirts are very loose everywhere except the cuffs and collar, so there's a lot of wiggle room for how big to make the body and sleeve pieces. The cuffs meet edge to edge, so the finished cuff should only be a little bit bigger than the wrist measurement. More on that later in the post.
It might be helpful to pin labels to your pieces if you're worried about not being able to tell which is which.
Having cut out all the pieces, I folded the body piece in half lengthwise and cut a horizontal slit for the neck hole. I left 15.5 cm closed on either side of the slit, for the shoulders. In the middle of that I cut a 27 cm long slit down the front of the shirt, so I had a T shaped opening. I did a tiny hand sewn hem on the edge of the bosom slit.
(For a lot of my previous shirts I didn't realize the body should be cut in one piece, so I did mine in two pieces and sewed the shoulders up the same amount as I left closed here. If you do this be sure to put the seam allowances for the shoulders on the outside of the shirt, as they will be covered by the shoulder strip.)


If you'd rather attach ruffles by machine you'll need to do the front slit ones before attaching the collar, and cut two pieces for each cuff so you can sandwich the ruffles in between. Since I have no better illustration of that method, I'll have to grudgingly link to a shirt post I made waaay back in 2014 in which I photographed all the steps of doing this. I did it by hand on that particular shirt, but since I didn't really know what I was doing I just used the same methods as the previous shirts I'd made by machine. So just do that but with machine sewing instead of backstitching. And here's a link to a quick video on machine gathering.
Oh dear, this post is untidy and not very well organized. But hopefully helpful to people who ask me shirt questions, which is what's important.
Update: Since first writing this post I've realized that sewing on all these little bits and felling all these seams is much easier if you baste them in place first, so I highly recommend basting, wether you're doing the sewing by hand or by machine.
It's especially nice to be able to fell the long sleeve on a seam without all those pins in the way as you carefully bunch up the sleeve around the machine foot.
 |
| Heart shape reinforcement basted in place before sewing. |
 |
| Sewing down sleeve seam bindings that I basted first. |
The neck gussets are two squares, and I pressed the edges in.
 These go on the corners of that horizontal neck hole slit. I topstitched one half of it to the underside of the corner of the slit, then folded the other half over to the outer side of the shirt and topstitched it down as well. This gives you a nice triangular gusset filling in both of those corners, and providing some shaping at the neck.
The shoulder strips then go over the shoulder, and it appears that's the one step I forgot to photograph, so here is what it looks like on the finished shirt. Basically you just fold the long edges in and stitch them down straight across the middle of the triangular gusset and the shoulder. I topstitched it by machine, but if I were doing it by hand I'd use tiny whipstitches.
(All the stitches on 18th century shirts should be small and sturdy, and all the edges finished, so that it can withstand a lot of washing.)
Edit: I took a picture of it on the next shirt I made.

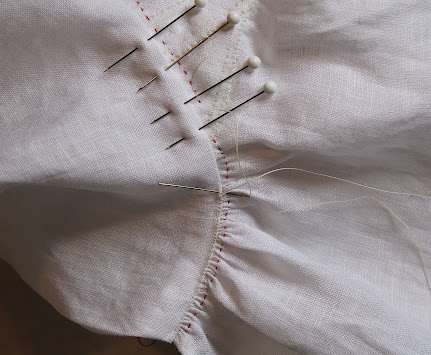
I was going to attach the collar by machine, but I didn't feel like machine sewing so I did it by hand. I gathered the front and back portions of the neck opening to fit, pinned the collar in place, and sewed it on with linen thread using tightly spaced backstitches. Edit: The gathers always looked a bit uneven when I did it this way, instead of the whipstitching technique mentioned above.
 I then pressed the collar up, pressed the remaining 3 edges in, folded it in half and sewed the inside bottom edge down with tiny whipstitches. I sewed up the two front edges with tiny whipstitches too.
You could also easily fold the collar in half with the right sides facing together, and backstitch or machine stitch the sides, then turn it right sides out and finish the inside edge as usual. That would probably be more secure, come to think of it.

 |
| Here you can see the bottom |
(All the stitches on 18th century shirts should be small and sturdy, and all the edges finished, so that it can withstand a lot of washing.)
Edit: I took a picture of it on the next shirt I made.

 |
| Oh dear, that is a bit wobbly. I'm still not used to my new machine. |
 |
| Sewing the collar on. The seam allowance of the collar should of course protrude beyond the neck slit hem. |

 |
| Collar folded and mostly pinned down. |
The front edges of collars on extant 18th century shirts appear to be sewn shut from the outside with whipstitches though.
I gathered the sleeve to a 42 cm portion of the shoulder area (or, 21 cm away on either side from the middle of the shoulder strip) and sewed it on, stopping 1 cm short of the edge so I still had the seam allowance free on the corner. The gathers are concentrated at the top of the shoulder. I added the long strip of binding, also stopping short 1 cm from the edge. The top of the sleeve is sandwiched in between this strip and the shirt body.
I don't know if this particular bit is accurate, because the shirt in Costume Close Up has a large shoulder reinforcement, which is something you see on some extant shirts but not all of them. I've done a few with shoulder reinforcements, but don't really find them useful because it isn't an area that wears out very fast on my shirts.
This is attached in the same way, just much narrower. I also saw a post about a 17th century shirt where someone simply sewed a piece of woven tape over the gathered seam allowances here, so that would work too.
I folded in the seam allowance on all 3 side of this strip and hand stitched it with more tiny whipstitches.

 Next it was time to put in the underarm gussets! These can be sewn in by machine, if you go slowly and carefully, but I did it by hand.
At this point the body and sleeve of the shirt form a right angle in the armpit area. I pinned one side of the gusset into this area and backstitched it on, leaving about 1 cm of seam allowance. The neat little backstitches should be on the square part, not on the sleeve/body side of the seam, so that when you finish this seam later the long messy side of the backstitching will be hidden.
After stitching in the square on the armpit corner on the other side, it's time to sew up the sleeve and side seam. Again, I leave about 1 cm seam allowance, or a little more. I did these by machine, leaving 10 cm open at the ends of both the sleeve and side seam. One is for the cuff opening, and the other is to make the bottom of the shirt easier to tuck in.
Extant 18th century shirts appear to have more of a slit at the bottom than my comparatively small shirt, so if you've cut yours to proper huge 18th century size I'd suggest leaving closer to 15 or 20 cm open at the side seam.
 On the sleeve seam, I clip the seam allowance about 1 cm in from where the cuff opening starts, which I hope is clear enough in the below photo. I trim down one side of the seam allowance on the long seam to about 4mm, and then I fold in the corner nearest the cuff slit like so:
 I press the seam allowance down flat so that the wider one covers the narrower one, I fold the edge of that wider one under, and stitch it down. This is a bit tedious to do by machine because you have to carefully bunch up the sleeve around your sewing machine foot as you go, but it's doable. We'll come back to that cuff bit later.
 I sew up the side seam of the shirt body the same way, with the 10 cm bit left open at the bottom, and finish the seam allowance in the same way. On this one there's no need to fold that little corner in though, because it'll be covered by a hem gusset.
 Now that the side and sleeve seams are all finished, we can finish the edges of those underarm gussets! Press this area nice and flat (preferably over a tailor's ham) and trim the seam allowances of the body and sleeve pieces next to the gusset. I folded the seam allowance of the gusset down and they covered all the end bits of the adjoining seams very nicely.
(For a truly shameful number of shirts I was doing this the other way around, which not only took longer and looked messier, but it made the shirts very weak at the corners of the gussets and nearly all of them ripped and needed to be patched there. Don't do that! Fold those underarm gusset seam allowances outwards!)
 |
| Whipstitching the inside edge down. |
 |
| The sleeve sewn on and the binding strip added after that. I did this by machine. |
This is attached in the same way, just much narrower. I also saw a post about a 17th century shirt where someone simply sewed a piece of woven tape over the gathered seam allowances here, so that would work too.
I folded in the seam allowance on all 3 side of this strip and hand stitched it with more tiny whipstitches.


At this point the body and sleeve of the shirt form a right angle in the armpit area. I pinned one side of the gusset into this area and backstitched it on, leaving about 1 cm of seam allowance. The neat little backstitches should be on the square part, not on the sleeve/body side of the seam, so that when you finish this seam later the long messy side of the backstitching will be hidden.
 |
| Tightly spaced backstitches in linen thread. |
Here I will add a backlit photo of an earlier shirt I made, to better illustrate what's going on here.
 |
| Not a very good photo, but you can see where the gusset goes in. |
After stitching in the square on the armpit corner on the other side, it's time to sew up the sleeve and side seam. Again, I leave about 1 cm seam allowance, or a little more. I did these by machine, leaving 10 cm open at the ends of both the sleeve and side seam. One is for the cuff opening, and the other is to make the bottom of the shirt easier to tuck in.
Extant 18th century shirts appear to have more of a slit at the bottom than my comparatively small shirt, so if you've cut yours to proper huge 18th century size I'd suggest leaving closer to 15 or 20 cm open at the side seam.


(For a truly shameful number of shirts I was doing this the other way around, which not only took longer and looked messier, but it made the shirts very weak at the corners of the gussets and nearly all of them ripped and needed to be patched there. Don't do that! Fold those underarm gusset seam allowances outwards!)

I sewed these edges down with more tiny whipstitches.
 |
| Very neat and tidy and sturdy! |

Much like the neck gussets, the small squares for the hem gussets get their edges folded in and then are folded in half. These I whipstitched onto the split at the bottom of the seam, on the inside.

 |
| Hem gusset from the outside. This looks much nicer when it's white thread on plain white fabric... |
 |
| A better view of the cuff opening. Clipping the seam allowance allows you to fold both to one side on the seam and one in each direction on the opening. Clipping it a bit past the beginning of the seam makes it a bit more sturdy. |


This was supposed to be "just a quick machine sewn project" but it's about 50% hand sewn and it took 19 and a half hours. I just really like hand sewing.


I've been wanting to do tutorials for a while now, but have been feeling rather insecure about it because I'm self taught. Not insecure about my skills, I know I'm good at sewing, but about my knowledge base.
What things do I not know? Are there super obvious important things that I don't know? I have no idea! I've spent a very long time learning what I can from books and the internet, but have never actually met any professionals, and have never even seen a single extant 18th century garment in person.
I tend to worry about being judged by reenactors, which is... weird because I'm not a reenactor. And even more weird because I've never been harshly criticized by one. (I've gotten some unsolicited constructive criticism, which can be annoying, but I usually don't mind it much.) I have no idea why this is a thing I worry about.
And it only goes as early as 1750. I've found next to nothing on making early 18th century menswear, aside from some patterns in The Cut of Men's Clothes which come with no construction information.
I've had multiple people send me messages asking questions about getting started on 18th century sewing, which delights me! I love seeing more people getting involved in my Very Favourite Thing!
But most of the time there just aren't tutorials out there for me to direct them to when they ask, so the best I can do by way of an answer is to post a lot of pictures and type it all out, link to one of my own blog posts, or (for more general questions) recommend a few books.
I've often lamented the fact that so few people sew Fancy 18th century menswear, but perhaps more of them would if the necessary information was more readily available.
My sewing has gotten so much better in the past year, and I finally feel like I have a decent understanding of 18th century tailoring, so I will make some tutorials. With an emphasis on how "This is the way I do it but there are many different ways to do things, so maybe you will want to do it differently, and also I may be getting some things not quite right." And I'm making an effort to be more thorough with the descriptions and photos of my construction process.
I also mean to put together a masterpost of links and whatnot so I can have everything I've ever found useful all in one place. (I've got a rough version of that post up already and I need to organize it better, add more stuff, and post it here.)

Thank you so much for sharing this. As one of the many people asking about 18th C menswear, this is SUPER useful. I continue to be in awe of your beautiful creations and your tiny handsewing. ^_^
ReplyDelete(Also, whilst you may have had some unsolicited advice from reenactors previously, please let it also stand on the record that THIS reenactor thinks what you do is amazing. Y'know. Just so that is clear... Damned internet is very quick to criticise and generally quite slow to praise. But there is definitely a lot of praise out there for you. <3)
You're most welcome! I remember talking to you in some comment thread a while ago about shirt tutorials, and am so glad to finally have posted it.
DeleteThank you! I've definitely gotten a lot more nice comments than critical ones, but I'm still very glad I didn't post anything on social media until just a few years ago.
I really like the calligraphy print for that shirt and the color. You did a great tutorial but I think I would be way too lazy to sew it by hand. So much work. The shirt looks amazing.
ReplyDeleteHugs, Mamoo
Thank you Mamoo!
DeleteFunnily enough, the hand sewing often feels more lazy to me because I can just sit there watching movies or listening to music while stitching, rather than focusing all my attention on the sewing machine.
Your hand sewing is exquisite. I agree with the people who want to see you make more tutorials. It's a lot of work, so only do the ones you want to.
ReplyDeleteIt's really hard to find much of anything on making historical men's wear. Thank you for sharing your knowledge.
The shirt looks great on you, the print is perfect for it too.
Thank you!
DeleteIt is a lot of work, but there are so many things I want to sew and post about in great detail. I really want to try making videos too, which I've never done before and am nervous about, but it's a much better way to show stuff like button wrapping.
I think you need not worry about receiving criticism on line. You are doing really top quality work and you lay it out in your posts in exquisite detail. Even if you didn't get something perfectly accurate, anyone commenting should be discounted if their approach in the comment is nasty. Nasty comments on the internet are kind of a permanent fixture, so they may occasionally show up, but you shouldn't let them get to you.
ReplyDeleteYour work is excellent, and your posts describing the processes are very well done. I made a living for half a dozen years writing procedure documents, and later on taught technical writing for a few years. I know good writing. You are meticulous, as one should be when documenting procedures, and it shows in the quality of your posts. Don't undersell yourself or second guess yourself on your knowledge. Worry is interest paid on problems you haven't borrowed yet. Press on undaunted. Far more people will like your work than will be critical.
Your father
Excellent 👌
DeleteI didn't find the time to read this before now, but here's one more voice of support - especially because historical shirt techniques actually can probably translate even into women's shirts in some parts of the world in some times... :-)
ReplyDeleteThank you! Yes I think there must be shifts with a similar construction, and definitely ones for 18th century riding habits.
DeleteIt's unbelievably hard to find detailed construction information on 18th century menswear on the internet.
ReplyDeleteNot only online, but even in book form! What I wouldn't do for a men's version of Patterns of Fashion. Preferably for 1720, 1810, or 1910.
Therefore: Thank you so much for your information, tutorials, and transparent way of speaking - even if the instructions are still a bit opaque to me. No fault of yours, I assure you. I'm not intimidated by a lot, since in most areas of life I simply research a bit, dive in, and figure it out. But this historical clothing thing has been beating my ego like a rented donkey, as the horrible saying goes. I know I'm terrible at the moment, if slowly getting better with almost no useful information to go on, but you're providing a lot of hope and a lot of (puzzlingly) rare information. Keep it up, sir. I very much appreciate it.