A little over a year ago someone gave me a printed cotton panel of waistcoat fabric (from here) for my birthday, and I started working on it right away, then got distracted and let it sit in The Pile until a few weeks ago.
Here's the original.
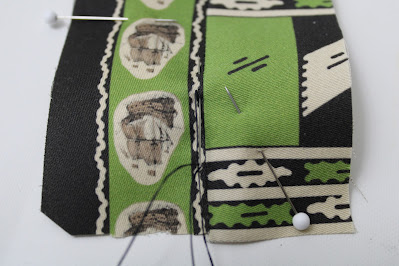
I found the white a bit too bright on the reproduction fabric, so I tea dyed it.I machine sewed the ship print border strips on the front edge.
Oh dear, I see I've taken these photos with my old camera that has dirt stuck in the lens. I think this was shortly before I got my nicer, bigger camera.
I hand stitched some buckram onto the front edge and a slightly thinner piece along the bottom.
I sewed the welt pockets on and I think... I've not been doing them quite right. All this time I've been sewing them just like I do the regular 18th century pocket flaps, cutting the slit and sewing in the pocket bag and whipstiching the flap on top, but after looking more closely at pictures of extant welt pockets they look like they're sewn down and flipped up like a normal pocket flap.
They are whipstitched down on the ends, so perhaps I was just looking at the ends when I started doing pockets like that, or maybe I'd looked at one that was whipstitched all the way around not knowing it was less common, I don't know.
After the pockets were done I lined the fronts in a plain light brown cotton. The facings are hand sewn on first, and I trimmed the extra lining out from under them.
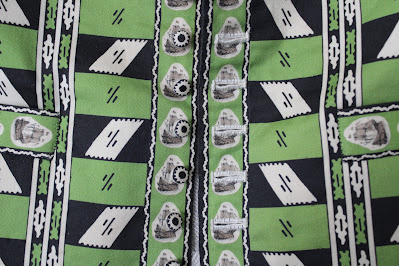
I sewed the 12 buttonholes through all the layers with off white cotton pearl.
The printed panel came with little ship's wheel button covers, but I wanted mine to look like the ones on the original so I painted my own button covers on an un-printed white edge strip.
I used the smallest size of bone mould that Burnley & Trowbridge has - about 9mm.
I covered them the usual way, and sewed them on before the lining. Some footage of me sewing them on is in my 18th century cloth covered button video!
The back is a single layer of heavy linen twill from Pure linen Envy, and the centre back is machine sewn and hand felled. I sewed the side and shoulder seams by machine too, and sewed the front seam allowance down towards the back.
I made my collar a bit higher than the original, and with a strip of the ship border sewn to the main fabric. It's stiffened with 3 scraps of buckram which I overlapped and sewed together.
After the pockets were done I lined the fronts in a plain light brown cotton. The facings are hand sewn on first, and I trimmed the extra lining out from under them.
I sewed the 12 buttonholes through all the layers with off white cotton pearl.
The printed panel came with little ship's wheel button covers, but I wanted mine to look like the ones on the original so I painted my own button covers on an un-printed white edge strip.
 |
| (I used speedball fabric printing ink, as usual, because I still have so much of it.) |
I covered them the usual way, and sewed them on before the lining. Some footage of me sewing them on is in my 18th century cloth covered button video!
 |
| Sewing the lining down to the armholes after finishing with the front edges. |
I made my collar a bit higher than the original, and with a strip of the ship border sewn to the main fabric. It's stiffened with 3 scraps of buckram which I overlapped and sewed together.
 |
| Stitching the collar fabric to the buckram. |
I pressed all the edges in, sewed the collar lining on, then attached it. The front part is hidden under the front waistcoat lining, but since there was none in the back I used a narrow scrap of white shirt linen. The only other thing to do was to hem the bottom, and the backs of the armholes.
Done! After a little over a year in The Pile! I'm mostly pleased with it, aside from the shoulders. I don't think it's particularly "pretty", but I do think it's weird and interesting, and I love weird historical garments. I haven't tried it on with a coat, but it might look nice with my black & white one.
I think it'll look even better with an olive green wool I have in my stash and mean to turn into a 1790's coat someday.
Next time I will do the welt pockets differently, and try even harder to correct the shoulders!
The last time I made a waistcoat with a collar I talked in the blog post about how one side kept being wrinkly no matter what I did, and figured out it was because my shoulders are uneven.
In this waistcoat I added a bit of padding to the right shoulder, and it helped, but there's still a bit of wrinkling. I forgot to baste the shoulder seams to test the fit before sewing them, so maybe it would have been a bit better if I had? Maybe next time I should add some stiffening there too.
I didn't get pictures of it in progress, but it's just a few staggered layers of quilt batting scraps, which I basted in place and covered with a scrap of thin cotton. The fit on the shoulders isn't awful, but it's still wrinkly enough to annoy me. |
| On this bit the seam allowance was too narrow, so I had to add a scrap to finish the edge. |
I think it'll look even better with an olive green wool I have in my stash and mean to turn into a 1790's coat someday.
 |
| The collar is seamed in the centre back, so both lines of ships point forwards. |
Next time I will do the welt pockets differently, and try even harder to correct the shoulders!


It's amazing the amount of work that is involved in making this waistcoat. The fabric looks interesting and the finished garment looks great.
ReplyDeleteHugs, Mamoo
What a fantastic and wonderful project. I love all the little details you've included. The final product looks utterly fantastic. Bravo!
ReplyDelete