18th century shirts are my favourite kind of shirt!
They're nice and big and comfortable, and the fact that every piece is a rectangle makes them very economical in terms of fabric usage. There's no paper pattern needed, only a set of dimensions for each piece.
All my everyday shirts are 18th century in cut, though most of them are in not very historical colours.
Way back in early 2020 I wrote a post about how I do machine sewn 18th century shirts, but it was never intended to be a proper tutorial, and my technique has improved since then. (And it was already much better than it had been for my first shirt, made an entire decade ago!)
I've been meaning to do a video tutorial and a better, more thorough written tutorial for ages, so here it finally is. Owing to the differences between videos and blog posts, this is slightly less thorough than the video version.
Intro, Video, & Hand Sewing Links
Tutorial part 1 - Pattern & Cutting - You are here!
Tutorial part 2 - Construction
Tutorial part 3 - Ruffles
Since it's mainly machine sewn this tutorial is obviously not intended to be super historically accurate, but I've done my best to make it look as close to 18th century construction as a machine sewn shirt can. I hope it will be helpful for both historical costuming and historical fantasy/everyday wear purposes.
(I'll make a hand sewn shirt tutorial at some point in the future, but not anytime soon. For now, see the links to hand sewing resources in the intro/video post.)
This is a different shirt from the one I sewed in the video because I simply cannot remember to photograph and film every step of a thing at the same time. (Some of the measurements are also slightly different from the shirt I made in the video.)
Link to my shirts pinterest board.
Fabric
Your shirt fabric ought to be fairly light and drapey, since these have a lot of gathers that get very bulky with thicker fabrics.
The historical ones were usually white linen, but not always, there were also some striped or plaid or unbleached linen working class shirts.
I'll be making this one in sage green linen, because I love the sage green shirt I made a few years ago and it's getting worn out. My favourite linen to use for shirts is the Summer Breeze weight stuff from Pure Linen Envy, which is fortunately right here in Canada, so the shipping is not too horrible.
The Featherlight works too, though it's a bit see-through, and the everyday linen is too thick for this kind of shirt.
(If you're in the U.S., Burnley & Trowbridge and Renaissance Fabrics both have some nice linen.)
However, if this is your first shirt I'd suggest something less expensive.
A thrifted bedsheet is a good choice if you're on a tight budget, and should be a bit easier to work with than linen. The fine 100% cotton sateen ones are a great way to get a large piece of nice cotton for very cheap, and I like to use them for nightgowns, which have almost the same construction as shirts. (The top sheet is best, because the fitted ones are missing their corners and tend to be more pilled and worn out.)
I've also made shirts out of cotton voile, and soft drapey rayons work too, though both of those options will need more basting and careful handling.
With modern fabric widths I can usually fit my body and sleeve pieces side by side, so I find 2 metres to be sufficient. I'm average height for a man (5'9") and the amount of fabric you need may differ depending on how big you are relative to the width of your fabric, and how long you want your shirt to be.
Cutting
I don't have any fancy mathematical formulas for shirt patterns, but I can go over my own measurements vs. the size of all my shirt pieces. There's some wiggle room for most of them, aside from the collar and wristbands nothing is tightly fitted.
(A plain list of measurements can be found at the bottom of this post, but I need to explain them all first.)
Your fabric should be washed & ironed before beginning, and you'll probably need to even up the ends of the yardage. This, just like all the cutting, is done by pulling threads.
You start by putting a little snip in the edge of the fabric, then grab one thread and carefully pull on it. The purpose of this is to make a little line to cut along, which will be perfectly on grain.
The thread will probably break before you've pulled the whole thing out, but you can either pull it out again with a pin, or cut along the line as far as you can see it and then keep pulling the thread from there.
This doesn't work very well with tightly woven cottons, but it can still usually be done. If your fabric has a woven plaid or stripe, you can cut along that instead, and it will save some time.
Do NOT tear the fabric if you're using linen, it'll ruin the edges. You can get away with it on a tightly woven cotton for the big pieces, but you'll have to make them a few cm too big and then go back and trim all the frayed edges off.
 |
| Here I'm also cutting the selvedge off. |
When you make a shirt, or any rectangular cut thing, it's very important that you write everything down. Write down the dimensions of the pieces you cut out, and things like how much you leave closed at the shoulder and how long the side and sleeve vents are, and then you will be able to reference them the next time you want to make one.
If you think you might have trouble telling the pieces apart you can pin notes to them saying which is which, but if you don't then you can just measure them and figure it out based on what you wrote down. I write down the measurements of every shirt and nightgown I make.
 |
| All the measurements for my last 3 shirts. |
I cut my pieces in decreasing order of size, so the body and sleeves are always first, and the width I cut them depends on the width of my fabric.
The linen I'm using for this shirt is 130 cm wide. I prefer to cut my sleeves square, if possible, and for me a good size is 59 or 60 cm. That leaves 70 cm for the body width.
The body should be cut all in one piece, and the historical ones should be almost knee length, but I have some everyday ones that only go to about the mid thigh. As long as it's long enough to tuck into your pants, it should be ok.
 |
I would write the measurements for this, but
I don't remember which of my plain white shirts this is. |
You can measure down from your shoulder to decide where you want the hem to be, then add hem allowance and double that number. If your fabric is a weird shape and you have to cut it in 2 pieces, that's fine too, just make them each half as long as the full body would be. (Plus about 5 mm of seam allowance for the shoulders.)
Since my cut of linen was 2 m and I lost a bit to shrinkage in the wash, and evening up the ends, the body piece I cut for this shirt was 1.96 m long.
I have cut sleeves and bodies at various different sizes, depending on the kind of fabric I'm using and how much of it there is, so here are some more for comparison.
First, the sage linen one I made for this written tutorial, which is more or less the size I make most of my everyday linen shirts:
Body - 1.96 m x 70 cm
Sleeves- 60 cm x 60 cm
The teal one I made for the video is much the same:
Body - 1.9 m x 74 cm
Sleeves - 59 cm x 59 cm
(Yes, it's the same fabric from the same store, but there is some variation in size after all the stretching & shrinking that comes of being washed and ironed.)
They can go much bigger though! This red cotton voile was only 1 metre wide, so I cut both the body and sleeves to the full width. This only worked because it was so lightweight. A heavier fabric would not be suitable for such large sleeves, as the wrist gathers would be far too bulky:
Body - 1.9 m x 1m
Sleeves - 59 cm x 1m
At the other end of the spectrum, here are a couple I made with very little fabric. This brown cotton print:
Body - 1.8 m x 64 cm
Sleeves - 60 cm x 44 cm
I would not want to do sleeves any narrower than that.
And this cotton & gold lurex blend:
Body - 1.6 m x 61.5 cm
Sleeves - 62 cm x 48 cm
I would not want to cut the body piece any narrower than that. My hips are 109 cm around at the widest part, and the circumference of the finished gold shirt is only 116 cm.
You will need to cut a T shaped opening in the body for the neck hole and front slit.
The neck will be gathered down, so the width of the neck opening (the top part of the T) doesn't matter, the important measurement is the amount you leave closed for the shoulders. This will depend on your shoulder measurement, where you want the top of the sleeve to sit, and how big your neck gussets are.
I will talk about it more when I get to the neck gusset, but I'm leaving 16 cm closed here. (My shoulders are about 15 cm, but they're also very sloped and one's smaller than the other, so it's not the most helpful measurement.)
Fold the long edges in half to find the shoulder point, then measure in from the sides and mark the ends of the slit. To pull a thread for this one you can stick a pair of snips into the fabric and carefully make a little cut, then pull the thread until the wrinkling reaches the mark on the other side.
Fold that top edge in half again to find the middle of the neck opening, and cut the front slit (the bottom part of the T) the same way. I do anywhere from 25 to 32 cm. You can measure down from your neck to decide how much you want.
In the case of boobage you may wish to make it shorter, but it's up to you, and it shouldn't gape too much when the collar is buttoned and you're wearing a waistcoat or jacket over it.
Just make sure the slit length plus the collar length minus all 4 seam allowances is long enough to fit easily over your head. I did 28 cm for this one.
If you're trying to copy a specific historical style, see if you can find any portraits where the whole slit is visible. If there's a ruffle on it the exact length should be easier to see.
As mentioned, I like to cut my sleeves 59 or 60 cm square. The exact length will depend on how long your arm is, as well as how low you want the shoulder to sit.
The tip of my shoulder to my wrist measures 57 cm, which is about the same length as the finished sleeve. But you also need a bit more length in order to move your arm - enough so that the end of the sleeve poofs out nicely, but not enough to sag and cover the wristbands. And my shoulder seam is usually slightly dropped about 3 cm below the point of my actual shoulder.
So arm length plus seam allowance should be a good start if your shoulder seam is a few cm lower than your shoulder, and a bit longer if you want it on your shoulder, or shorter if you want a very dropped shoulder. (For my gold shirt I put the shoulder higher, since the body was so narrow, which is why that sleeve is 2 cm longer than usual.)
Next you need 2 long rectangles of fabric to finish off the inside of the sleeve/shoulder seams, since there will be gathering there, meaning it can't be neatly felled.
 |
| Inside view on the finished shirt. |
These should be 2 cm longer than the area you sew your sleeve down to. I sew my sleeves onto the body with a 42 cm long seam, so I cut the armhole bindings 44 cm long.
I make them 3.5 cm wide, but if you want to you can make them
a little wider, or
a lot wider. Often times they're
so wide they reinforce most of the shoulder area, but I find that part is never the first to wear out on my shirts, so I keep mine small. I can see it possibly being useful if you wear things slung over your shoulders a lot though.
I cut them on the straight of grain, because they behave better while being sewn on if they have as little stretch as possible.
For the length of the collar, take your lower neck measurement with the tape at a tightness that feels comfortable, and add seam allowance and overlap for each end. I like a 1 cm overlap, and I use a 1 cm seam allowance, so combined with my 40 cm neck measurement that gives me a 43 cm long collar piece.
For the collar width, take whatever height you want it to be, double it, and add 2 cm for seam allowance (I'm using a 1 cm seam allowance for a lot of things, but you can use a different amount if you prefer). I wanted mine to be 6.5 cm high, so I cut it 15 cm wide.
These tended to be quite short in the early 18th century, and stayed fairly short for most of the rest of the century before getting very tall in the 1780's and 90's, but there are some exceptions.
I cut it on the straight grain.
The top of the shoulder will be reinforced with a strip of fabric, and the length will depend on how much you left closed when cutting the neck opening, and how big your neck gusset is. (More on that in the neck gusset part of this post!) It's best to overestimate the length, just in case.
 |
| Here's what they'll look like on the finished shirt. |
I cut mine 22 cm x 3.5 cm, which is slightly longer than I needed, but you can trim the excess off after sewing them.
You can make them a bit wider if you want. I cut them on the cross grain because they're a flat piece that will have to go over an angled surface, so I like a little stretch, but straight grain works just fine too.
The wristbands (
Not cuffs! Wristbands!) are typically very narrow. Wide shirt cuffs come into fashion around the veeery end of the 18th - beginning of the 19th century, but for almost the entire century the wristbands stayed very small. Barely wider than the sleeve buttons they're fastened with.
It took me an embarrassingly long time to notice this, and did wide cuffs on far too many shirts for far too many years. It seems to be a pretty common beginner mistake though, we look at the reference pictures but don't note the wristbands and our brains just fill in the space with modern shirt cuffs.
I make my wristbands to have a finished width of 1.5 cm.
If you aren't going for historical accuracy you can give your wristband an overlap and sew a button onto it, but the 18th century ones ought to close with sleeve links. I have
a video on making sleeve links/sleeve buttons, they're really easy!
I have done some wristbands with an overlap and a sewn on button, but I always regret it, it just doesn't sit as nicely on my wrist as the sleeve links do.
Because the fabric is so thin (18th century shirts have no interfacing) and there are bulky gathers on the sleeve side of it, you often end up with a distinct little ridge of fabric along the edge, and that side of the buttonhole gets a bit stretched out. In order to bulk up that edge a bit I like to cut my wristbands to have seam allowance as wide as the finished wristband, so it goes all the way to the fold on the inside.
Since my wristbands are 1.5 cm wide, that makes a 6 cm wide wristband piece.
For the length, I add 1.5 cm of ease to my wrist measurement, plus a cm of seam allowance at each end. (This makes a fairly tight fitting wristband, so you may wish to add a bit more ease, especially if your fabric is a stiff cotton.)
My wrist measures 16.5 cm, so with the 1.5 cm of ease and the 2 cm of seam allowance, my wristbands are cut 20 cm long. Like the collar, I cut them on the straight grain so they won't stretch out as much.
The underarm gussets are squares that give you more room under the sleeves. Very important when you have rectangular sleeve and body pieces meeting at right angles!
I cut mine 14 cm square. You could go a bit bigger or smaller and it would still be fine.
The neck gussets are smaller squares, and they get folded in half to create a triangular insert for the area where the neck meets the shoulder. This helps give it some shape, to better fit the slope of a shoulder and lower neck.
 |
| Outside view on the finished shirt. |
 |
| Inside view on the finished shirt. |
I used to cut mine 8 or 8.5, but then decided that seemed too small, so I tried a few at 12 cm, but those were too big and didn't give me enough room in the collar to gather the shirt body into. Now I cut them 10 cm square.
If you fold the neck gussets in half diagonally, line up the tip with the very edge of the shoulder (not overlapping it, just touching), and subtract 4 cm for the 4 combined seam allowances, you should have a decent estimate for how long the finished shoulder will be.
Mine measured 23 cm all together when folded like so.
And the finished shoulder is 19.
Then we need one more pair of gussets, to reinforce the vents at the bottom of the side seams.
Like the neck gussets, these are also squares that get folded to make a little triangle. I cut mine 5 cm square, but you could go just a bit bigger, and that would make them easier to sew on.
And then one more little piece for the
heart patch, which reinforces the bottom of the front slit.
I don't know when these started showing up on shirts, since it's basically impossible to see them in portraits, and extant shirts are rarer the further back in time you go, but I think it's always a good idea to add them. It strengthens that area a lot and prevents the shirt from tearing.
The few shirts I've made without them always get little holes worn in the front, right where the patch would have been, and I end up having to patch it anyways.
I cut mine without measuring, but it's about 4.5 cm square. I fold it in half diagonally and trim three of the corners like so, to get the heart shape.
But you can also
leave them square! And those ones are even better suited to machine sewing.
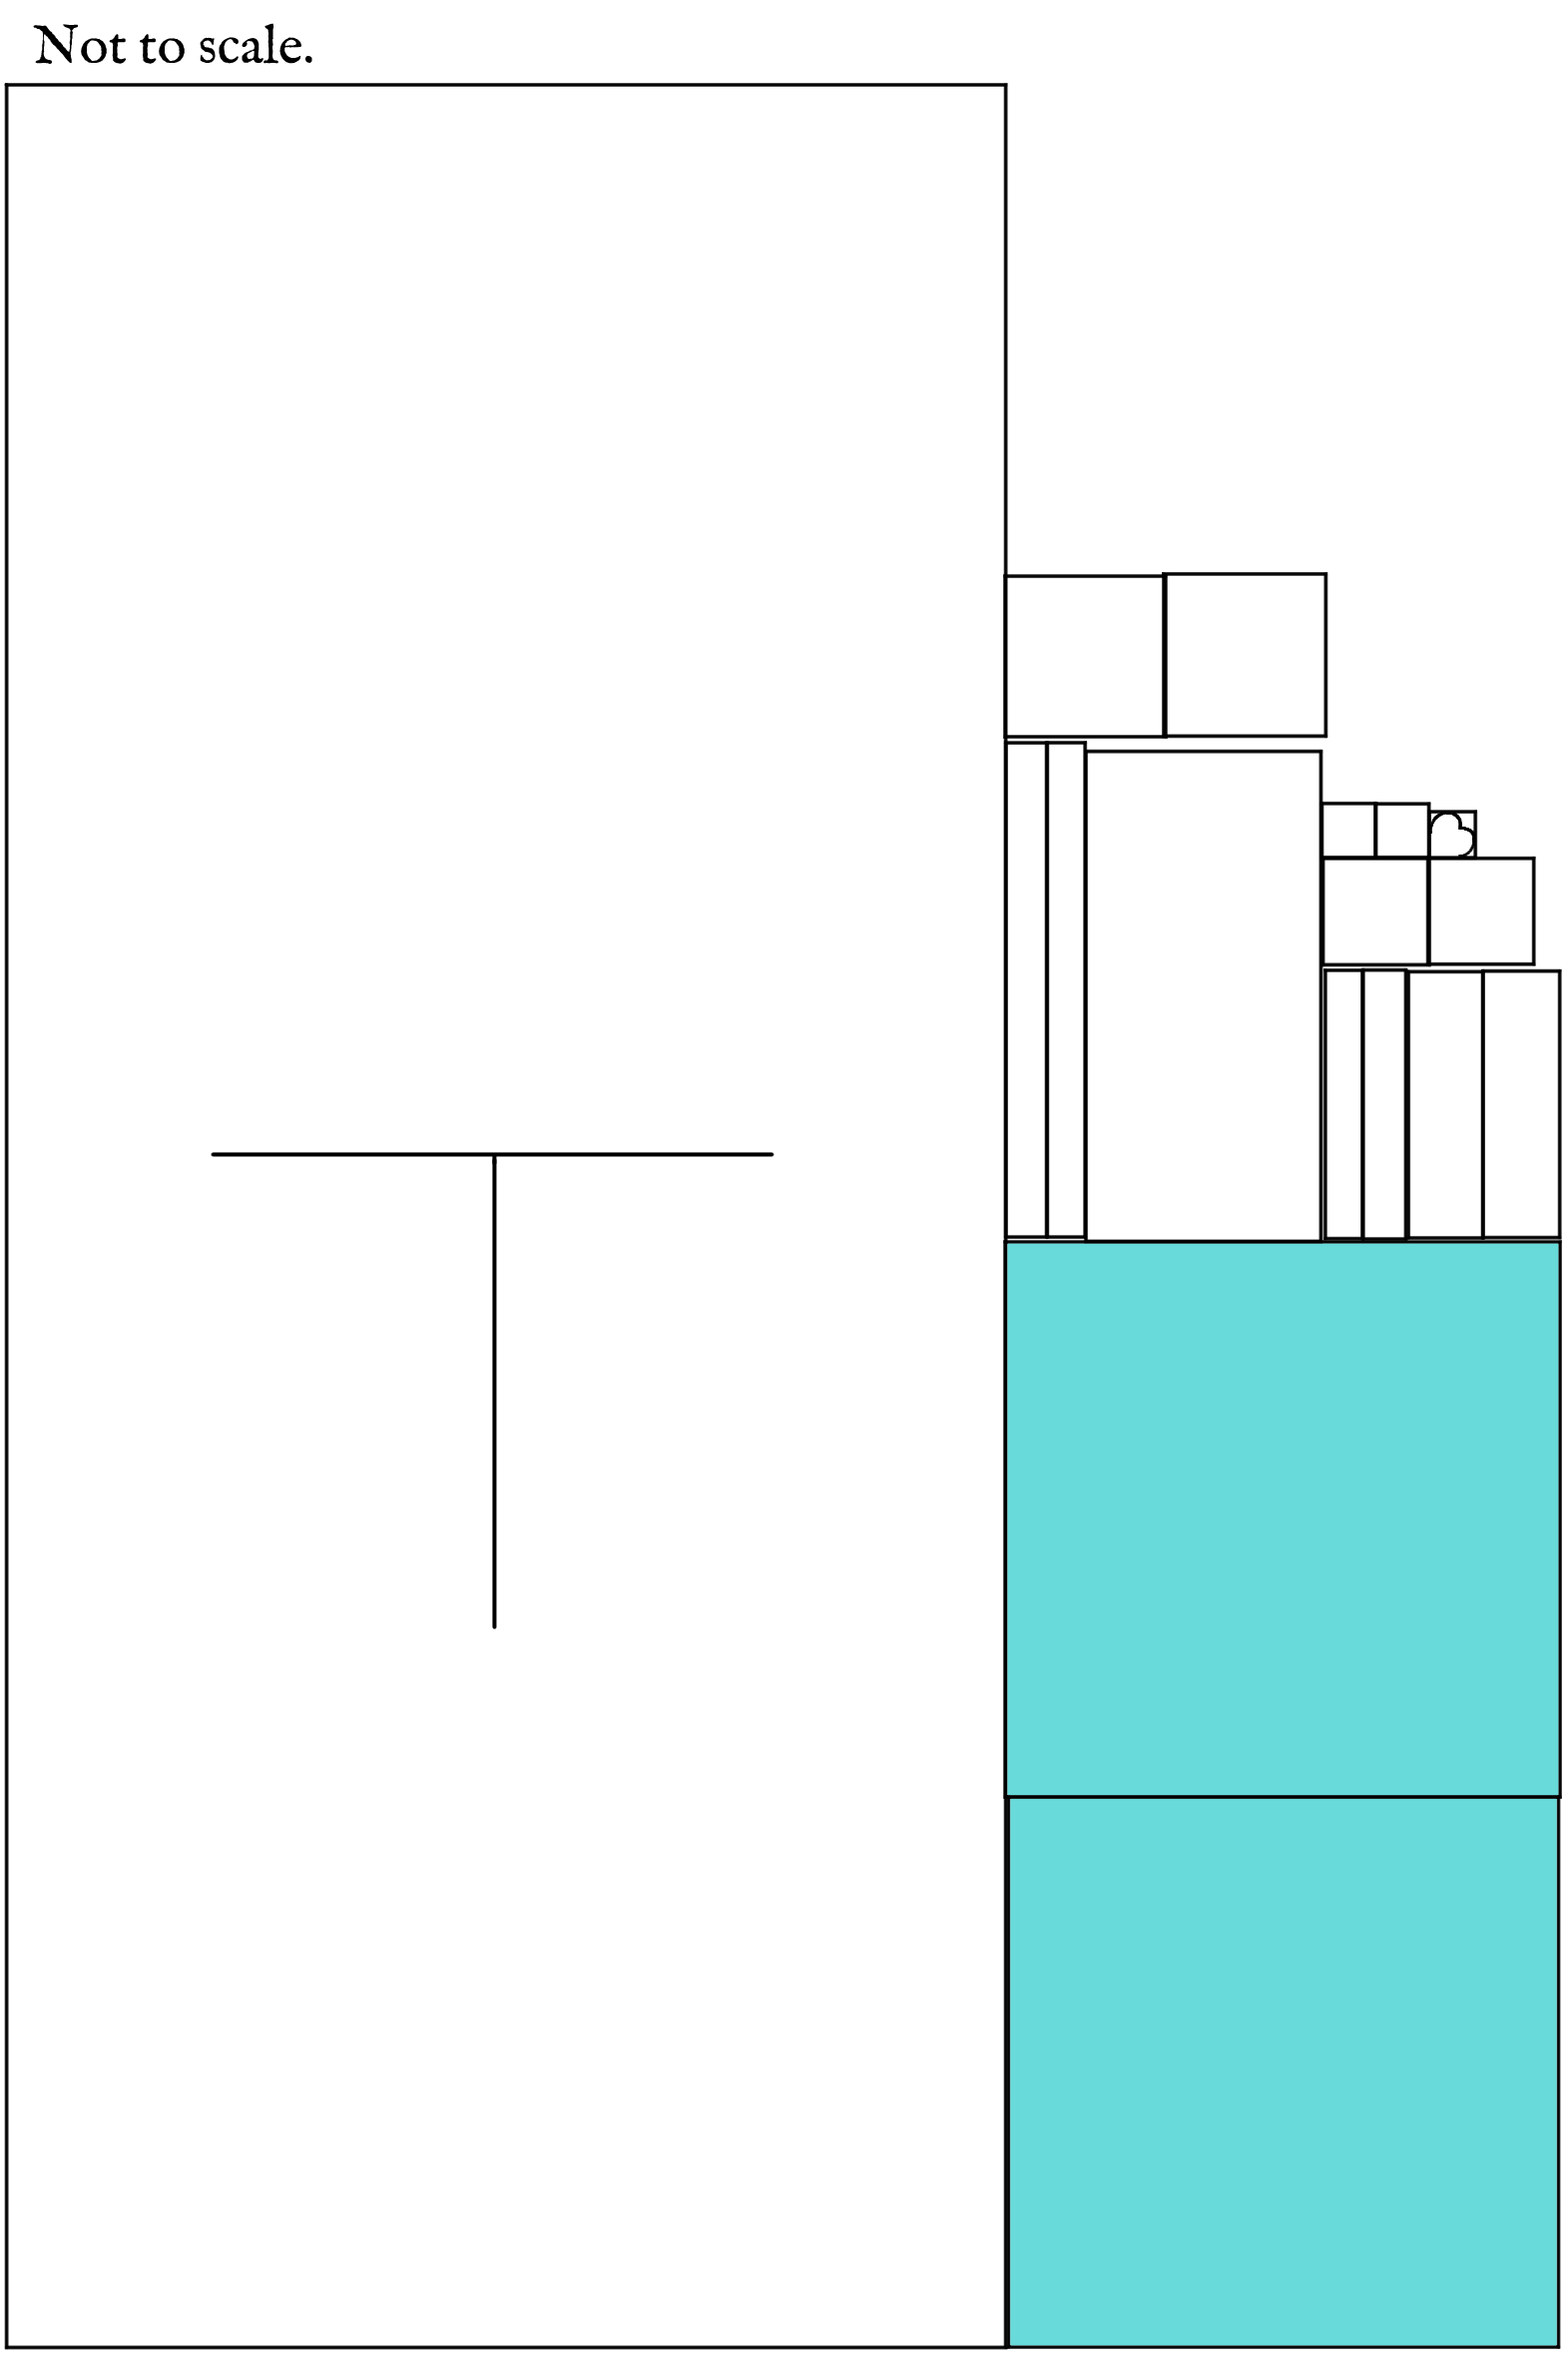
And that's all the pieces you'll need!
Just to put everything in one convenient place, my relevant body measurements are:
Side neck to knees - 109 cm
Widest part of hips - 109 cm
Arm from shoulder tip to wrist - 57 cm
Lower neck - 40 cm
Shoulder (approximately, they're quite slopey and also asymmetrical) - 15 cm
Wrist - 16.5 cm
And the pieces of this this sage green shirt measure:
Body - 1.96 m x 70 cm with 16 cm closed at the shoulders, and a 28 cm slit at the front.
Sleeves - 60 cm x 60 cm
Armhole bindings - 44 cm x 3.5 cm
Collar - 43 cm x 15 cm
Shoulder strips - 22 cm x 3.5 cm
Wristbands - 20 cm x 6 cm
Underarm gussets - 14 cm x 14 cm
Neck gussets - 10 cm x 10 cm
Side seam vent/hem gussets - 5 cm x 5 cm
Heart patch - 4.5 cm x 4.5 cm, trimmed on 3 corners.
(As mentioned, this is slightly different from the teal one I made in the video. The body and sleeves are not quite the same size, and the collar is a bit shorter, but there's a fair amount of wiggle room in this kind of pattern.)
Ruffle measuring & cutting will be covered in the ruffles portion of the tutorial.


I've returned to this tutorial several times and I just need to say how incredible it is! Thank you so much for making this so comprehensive and informational - my sewing and history nerd brain loves it. You're an absolute gem.
ReplyDeleteIncredible work! Thank you for sharing your wisdom and helping out your fellow man! 18th century shirts for all!
ReplyDelete